Thursday, June 4, 2015

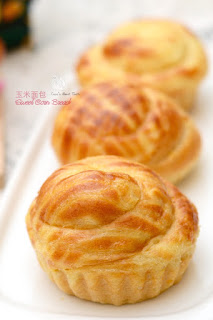
Sweet Corn Bread 玉米面包

Another lovely bread recipe using 'starter dough / sponge dough'  method. 

Having this prepared in advance and added into the final dough ingredients provides better baked volume and structure to the bread. This method had been widely adopted by bread maker prior to the availability of bread improvers, which, I resisted using until today.  Usually I will prepare several 'sets' of the required sponge dough and store in the fridge for several days, but not any longer than that.

As for the extra buns, I would normally store them in the freezer immediately once it cooled, to retain the freshness and reduce aging of the dough.  Thaw the buns several hours before reheating , I prefer to thaw the frozen bread at room temperature overnight (kept inside the microwave oven or anywhere safe from pets / pest.  You may heat the bread under the steamer (which my hubby likes) or leave for 5-10 mins in a heated oven (preheat at 140C degrees for 10 mins then turn off the heat).  

玉米面包
Sweet Corn Bread
(Recipe credit to Alex Goh's Magic Bread)

Ingredients 
(A)
80g Bread Flour
55g Boiling Water

(B)
350g Bread Flour
50g Chicken Floss
50g Castor Sugar
4g Salt
10g Milk Powder 
6g Instant Yeast

(C) 
150g Cold UHT Milk
2 Egg Yolks

(D)
60g Unsalted Butter

(E)
150g Creamy Corn (canned type)

(F) Optional
Chicken Floss
Mayonnaise


Preparation


Sponge Dough Method.  Mix boiling water and flour from (A) until well blended to form a dough.  Cover and set aside to cool or store in the fridge overnight before using.

Combine all the ingredients(A), (B), (C) and (E)  into the bowl of a stand mixer with dough hook and mix with lower speed until all ingredients are well combined. 

Add (D) butter and continue using the mixer to knead with medium speed for another 20-25 mins to form an elastic dough.  Once you are able to stretch the dough to a thin membrane before breaking, the dough is ready for proofing.


Transfer the dough to a slightly greased bowl, cover bowl with either cling wrap or cloth. Allow the covered dough to proof in a warm place (under 28 celsius degrees)  for 1-2 hours or until doubled in size. 

Test the readiness of the dough with a finger lightly dusted with low gluten or cake flour. The dough is ready when the dough remain indented after the finger pokes into it.
Punch down the dough. Divide each dough into 10 equal portions and mould it round. Let it rest for another 10-15 mins.

Round out each portions into any preferred shapes on baking mats or by placing the shaped dough into greased baking mould.   Tuck the ends down. Lightly cover the dough with cling wrap and prepare the dough for the second proofing for 1 hr or until double in size.

Preheat the oven to 185C degrees 20 minutes before baking.

Apply egg wash over the dough. Decorate the buns with mayonnaise toppings, chicken floss
or canned corn and bake in the middle rack at 185C degrees for 15-23 mins or more (depending on the size of dough / mould used).

Enjoy.


Wednesday, June 3, 2015

Chocolate Strawberry Bread ......sinfully rich and decadent


Made these along with the batch of Mexican breads for my other half's sales team last week since they would normally stay back to work overtime during the closing week of each month. Making almost 40 buns and a batch of 20 light cheese cupcakes for the team as overtime snacks.

Indonesians love cheesey or chocolate flavored in their desserts. This could be easily observed from  the pastries and cakes sold all over the country. I am more of a fan towards coffee or mocha flavored desserts than chocolate or cheese flavored ones.  Last year when I randomly went around the neighborhood bakeries looking for coffee cake but only managed to get something close ie. Vanilla sponge cake with coffee buttercream. This is after going through several bakeries.

I still have leftover chocolate ganache from the recent strawberry chocolate chiffon cake hence I decided to use it on coating the bread as well. As expected, the bread were all taken up within minutes.

Recipe as follows......

Chocolate Strawberry Bread


Ingredients

(A)
200g Milk Water
50g Strawberry Puree 
330g Bread Flour
70g Cake Flour
70g Castor Sugar
4g Salt
1 Grade A Egg

(B)
40g Unsalted Butter

(C) Glazing / Ganache
100g Dark Chocolate (chopped)
100g Milk Chocolate (chopped)
100g Whipping Cream

(D)
Chocolate Rice


Method

Combine all the ingredients (A) into the bowl of a stand mixer with dough hook and mix with lower speed until all ingredients are well combined.

Add (B) butter and continue using the mixer to knead with medium speed for another 15-20 mins. Once you are able to stretch the dough to a thin membrane before breaking, it is considered ready for proofing. 


Transfer the dough to a slightly greased bowl, cover bowl with either cling wrap or cloth. Allow the covered dough to proof in a warm place (under 28 celsius degrees)  for 1-2 hours or until doubled in size. 

Test the readiness of the dough with a finger lightly dusted with low gluten or cake flour. The dough is ready when the dough remain indented after the finger pokes into it.

Punch down the dough. Divide dough into 10-12 equal portions and mould it round. Let it rest for another 10 mins.

Round out each portions into round balls and tuck the ends down. Arrange each dough on baking mats / muffin cups with liners accordingly. Lightly cover the dough with cling wrap and prepare the dough for the second proofing for 1 to 1-1/2 hrs or until double in size.

Preheat the oven to 185C degrees 20 minutes before baking. 


Bake in the middle rack at 185C degrees for 14-15mins.


(Chocolate Glaze / Ganache)

Place a heatproof saucepan over medium low heat for a few minutes. Remove saucepan from heat when the cream is about to simmer.  Add the chopped chocolate into the cream
mixture and gently stir a spatula or wooden spoon to distribute the chocolate through the cream until the mixture melted and turn creamy.

Allow the chocolate ganache to cool and thicken to spreadable consistency before using. 

Make sure the bread has completely cooled down before applying chocolate glazing and  topping. 

Friday, May 29, 2015

椰林风光 Coconut Flavor Kuih


This morning as I was leafing through some cookbooks, I came across a page which was bookmarked as 'tried and tested' recipe in December 2013 which immediately sprang me into digging the computer hard disk for any saved photos (if any) of this chinese dessert I attempted making 2 years ago.

To my disappointment, only one photo came into view. From the photo I couldn't quite remember how the kuih tasted but from the photo I reckoned it somehow appeared less  of those 'melt in the mouth' effect I wanted, therefore, I rolled up my sleeves and set about revisiting the recipe and adapt to whatever deemed necessary.


This time round I actually got down to using fresh coconut milk instead of the instant packet ones I used a lot whenever I make asian desserts that called for coconut milk. I am very happy with the outcome as compared with the one I did 2 years ago, which was slightly harder, like chewing hardened rubber, this one is actually smoother and silkily chewy that almost instantly glides and melts away.

Now, I finally understood why certain recipes taste best with original unprocessed ingredients. Lesson learn from this experience, always and always use fresh coconut milk for better result. For your info, I bought the grated fresh coconut 3 weeks ago and not knowing when I will actually use it, I stored it in the freezer. 

Thaw the frozen grated coconut several hours before using.  Even after thawing I find the coconut rather dry and difficult too squeeze out the milk. So I blended the grated coconut with water and sieved out the milk for use. Try it. It will be much easier than trying to do manually by hand.


椰林风光 

Coconut Flavor Kuih

Ingredients 材料 (A)
40g Rice Flour 沾米粉
40g Tapioca Flour 木薯粉
13g Potato Flour 马铃薯粉
50g Sugar 糖
100g Coconut Milk 椰浆
130ml Water 水
25ml Evaporated Milk 淡奶
1/8 Tsp Salt 盐
1 Tbsp Panda Juice 班兰叶汁 
1 Drop Green Colouring (optional) 青色素

Ingredients 材料 (B)
40g Rice Flour 沾米粉
40g Tapioca Flour 木薯粉
13g Potato Flour 马铃薯粉
50g Coconut Milk 椰浆
1/8 Tsp Salt 盐

Ingredients 材料 C
(Dissolved and Set to Cool 煮溶后待冷)

70g Palm Sugar (chopped)
200ml Water


Method

Combine ingredients (A) thoroughly and mix until sugar dissolved. Filter and set aside.
材料(A)搅拌至糖溶. 过滤待用. 

In another bowl, combine ingredients (B) and (C) evenly. Filter.
在另一个搅拌碗里,加入材料(B和C)搅拌均匀后过滤。

Apply a layer of oil onto individual muffin cups or any preferred mould and steam the empty mould for several minutes before using. 
先将个别松饼杯或任选模具的表层 抹上油, 使用前蒸空模几分钟。

Pour 1-1.5 Tbsp of the (A) mixture into the mould and steam under medium high for 4 minutes.
倒入2大汤匙青色粉浆, 蒸4分钟.

Pour 1-1.5 Tbsp of the palm mixture (B&C) onto the steam green mixture (A) layer and steam  under medium high heat for 4 minutes.
之后在蒸熟青色粉浆层上倒入2大汤匙椰糖粉浆, 蒸4分钟.


Repeat the steps till mixtures are used up. Steam the last layer for 10 minutes.
重复以上步骤直到所有粉浆蒸完为止. 最后一层蒸10分钟.


This was the only photo taken from the first attempt 2 years ago.


Strawberry Chocolate Chiffon Cake


Bought several baking books during my recent trip back to Malaysia, and this recipe is derived and adapted from the book name 微笑的戚风齿蛋糕 published by韩版国麒麟出版社. According to the book (written in Chinese language), this publisher is one of the recipients of the 世界美食图书大奖 The Gourmand World Cookbook Award for publishing many quality recipe books.

This book features beautiful looking chiffon related cakes with detailed pictorial step by step illustrations which I find extremely helpful and encouraging, particularly for me who ALWAYS have phobia doing egg whites separation and beating of meringue.

For this recipe, I only adapted 60% from what is taught technically and methodically from the book. The ingredients and glazing part I just did on impromptu based on what ingredients I have or wanted to get rid of.


As you may have noticed from my recent posting, there are quite a handful of strawberry related postings. This is due to my impulse purchases of strawberries from a street peddler who went around under the hot blazing sun selling pre-packed organic strawberries. I turned soft whenever seeing the  under privileged working hard selling merchandise. 


Strawberry Chocolate Chiffon Cake
(Recipe adapted to fit my 22cm Chiffon Pan)

5 Egg Yolks (Grade A Eggs)

65g Castor Sugar
75g Corn Oil
60g Strawberry Puree
25g Water
1 Tsp Vanilla Extract
Pinch of Salt
130g Cake Flour (Sifted)

6 Egg Whites (Grade A Eggs)
65g Castor Sugar


Chocolate Glaze
150g Cooking Chocolate (chopped)
300g Whip Cream / Cooking Cream
Fresh Strawberries


Method


Preheat oven to 160C degrees. 

In a large mixing bowl, whisk the egg yolks and sugar until the mixture turns light and creamy. 

Add oil and gently stir to combine. Add strawberry puree and stir to combine. Follow by water, vanilla extract and salt. Stir to combine.

Sift the flour over the batter and use a hand whisk to combine gradually until fully incorporated. Do not over mix. Set aside.

In a clean, dry and spotless mixing bowl, whisk the egg whites with an electrical mixer at medium low speed for 1 minute, or until frothy. Gradually add in sugar and continue whisking at medium high speed until the egg whites reaches soft peak stage. The soft peak stage is reached when the peaks curl over with slightly drooped hook. The egg whites should appear smooth and glossy at this stage.

Using a spatula, gently fold the beaten egg whites into the egg yolk batter in 3 separate additions, until just blended.

Pour batter into the chiffon or any baking pan. Tap the pan lightly on a table top to get rid of any trapped air bubbles. Or you may also run a wooden chopstick by swirling 1-2 rounds over the top batter.

Bake in middle lower level of a preheated oven at 160C degrees for 45-50 mins.

Remove and invert the cake upside down to cool before unmoulding.


(Chocolate Ganache)

Place a heatproof saucepan over medium low heat for a few minutes. Remove saucepan from heat when the cream is about to simmer.  Add the chopped chocolate into the cream
mixture and gently stir a spatula or wooden spoon to distribute the chocolate through the cream until the mixture melted and turn creamy.

Allow the chocolate ganache to cool and thicken to pourable consistency before using. 

Make sure the cake has completely cooled down before applying chocolate ganache over it.

Decorate with strawberries before the chocolate sets.


Tuesday, May 26, 2015

Snow Cheesecake


This is another 'preloved' dessert which I have long forgotten about until I started blogging for recipes for my next photography subjects / project. My first experience of this savory sweet cake during one of my ex company's potluck occasion when my ex colleague ordered this cake from her friend. The cake tasted so smooth and savory sweet that I whiffed down several slices at one go, secretly hoping for leftovers to bring back home. Even then I never knew this cake by name.

So when I saw pictures of this cake recently, I started recall how much I miss eating this cake, which, I just got to know it is actually a sponge cake with cream cheese frosting. Anyway, since I have yet to find any non dairy, egg and milk substitute ingredients for making this awesome cake, I shall just enjoy the baking process and derived satisfaction from the photography and baking accomplishments.

Based on feedback from my guinea pigs food tasters, they loved it! So here I am putting  extra effort (writing in chinese and english) into sharing this recipe with you and hope you enjoy the process and every bite of it.

Happy baking and feeding.....


Snow Cheesecake
(Recipe adapted from Amir's Kitchen and Vivian Pang)

Ingredients 材料

(A)
5 Egg Yolks 蛋黄
20g Castor Sugar 细砂糖
60g Corn Oil 粟米油
100g Cake Flour 底筋面粉 (sifted过筛)
65g Milk 牛奶


(B)

5 Egg Whites 蛋白
1/4 Tsp Cream of Tartar塔塔粉
60g Castor Sugar 细砂糖
(C)
250g Cream Cheese 奶油乳酪(softened to room temp 室内暖化)
50g Sweetened Condensed Milk 练奶
120g Whipping Cream 动物性奶油

(D) Decoration 装饰外面
Cheddar Cheese 切達乾酪 (shredded 刨丝)


Method 做法

Line and grease the base of a 21cm square cake pan with parchment paper.
在22cm方形烤盘铺上烤焙纸 (烤盘喷一些水或抹少许牛油固定烤盘纸).

Preheat the oven to 180C degrees.
烤箱打开䂋预热至180C.

In a mixing bowl, combine egg yolks and sugar from ingredients (A) with hand whisk till combine.
将材料(A)里的蛋黄加入细砂糖先用打蛋器搅拌均匀.

Add in corn oil until well combined. 
将粟米油加入搅拌均匀.

With a spatula, gently fold in the sifted cake flour and milk respectively. Set aside.
再将过筛好的粉类, 牛奶分次交错混入, 搅拌成无粉粒的面糊. 放冰箱冷藏族备用.


(For The Cake)

In a separate bowl, whisk the egg whites from ingredients (B) until foamy. Add cream of tartar and castor sugar in 3 additions and beat until stiff peaks forms. 

材料(B), 蛋白先用打蛋器打出一些泡沫, 然后加入塔塔粉,糖分三次加入, 打至尾端稍微弯曲的蛋白霜。

Using a spatula, gently fold in the egg whites to the egg yolks batter (A) in three additions until just blended (Being careful not to deflate the batter).
将1/3的蛋白霜 混入蛋黄糊中,用橡皮刮刀搅拌拌均,然后将拌匀的面糊倒入剩下的2/3的蛋白霜中混合均匀。

Pour bater into the prepared cake pan. Tap the cake pan on the counter top several times to knock the air bubbles and bake in the middle tack of a preheated oven for 25 - 30 mins or until evenly cooked.
将面糊倒入铺上烤纸的烤盘, 进炉前在家桌上轻敲几下, 敲出较的汽泡. 放入已经预热的烤箱中焙烤 25 - 30 mins. 

Unmould cake onto cooling rack. When cool, slice the cake vertically into 3 equal parts. Set aside.
脱模,蛋糕冷却后,将蛋糕以长的一面分切为三等份.

(For the Frosting)

For ingredient (C), cream the cream cheese with condensed milk until light and fluffy. Add in whipping cream and continue beating till well combined.  
将材料(C) 里的奶油乳酪和练奶打至松发成奶白色,后加入动物性奶油拌均.

Apply one layer of cream cheese frosting evenly on top of each layer and sandwich with the 2nd layer. Repeat the process until the 3rd layer has been placed and the entire cake evenly frosted.
每一层蛋糕都铺上一些动物性奶油抹平, 盖上另一片蛋糕. 使用同样方式做完3个夹层. 用抹刀将鲜奶油抹上蛋糕, 表面及周围利用刮板及抹刀尽量整平.

Gently coat the whole cake with shredded cheddar cheese. Chill for 2 hours before serving
最后把刨丝切達乾酪装饰在整个蛋糕表层上. 放置到冰箱冷藏 2 ~ 3小时定形再取出.


Saturday, May 23, 2015

Magic Custard Cake


After my 2nd attempt at making Pandan Layer Kaya Cake through Kitchen Tigress recipes lately I planned to lay low for a while to recuperate from the lengthy ordeal, I got caught in another of her recipes. 


Yes, I did it again! Another multi layer cake but with lesser prep work. During the time of preparing, the part I dreaded most was the lining of the cake pan as well as my careless blunder of not realizing the unavailability of the full fat milk supply when the recipe stated the importance of using milk with higher fat content to allow the different layers to set by naturally.  Under the circumstances, I had no choice but resorted to substituting the required full fat milk with the boiling of full cream milk powder, low fat UHT milk and water.  Given the adhoc change, I prepared for the worse outcome.

Luckily the cake turned out alright with visible custard layers, if only my cake layer could be thicker as shown in kitchen tigress posting. I shall revisit this recipe and try again....with some adjustment in sugar usage. Even though I have reduced the icing and castor sugar in proportion to the ingredients increase against the cake pan size, I still find the cake slightly 'overly' sweet. In fact, I have already increased the saltiness by using salted butter and not the unsalted ones as indicated in the original recipe. Still, I would like to cut the sugar further in my next attempt. 

Magic Custard Cake
(Recipe Adapted from Kitchen Tigress)


Ingredients
(22x22x6cm Square Cake Pan)

130g Icing Sugar
90g Egg Yolks
170g Salted Butter (melted and cooled)
24g Water
1-1/2 Tsp Vanilla Extract
170g Plain Flour
720g UHT Full Fat Milk (slightly warm)

210g Egg Whites 
30g Castor Sugar

Snow Sugar / Icing Sugar for dusting (optional)

Method
  • Prepare a folded and uncut piece of 36 x 36cm parchment paper to fully line the bottom and sides of a 22 x 22 x 6cm square cake pan. 
  • Preheat oven at 160C degrees. 
  • In a mixing bowl, combine sifted icing sugar with egg yolks and whisk until mixture becomes light and fluffy.
  • Add melted butter, water and vanilla extract into the egg yolk batter and whisk to evenly combined. Sift and fold in the flour to combine. 
  • Add in the slightly warm full fat milk. (Note : Should you ran out of full fat milk, you may try combining 420g Warm Water with 4-5 Tbsp full cream milk  powder and 300g Low Fat UHT Milk and boil under medium heat for until the milk dissolves. Remove from heat and set aside to cool. Add to the egg yolk mixture when the milk has slightly cooled after 10mins. Keep whisking the egg yolk batter while adding the warm milk to ensure the egg yolk mixture doesn't get cooked).  
  • In another separate clean bowl, whisk the egg whites until frothy, add in sugar in 2 batches. Continue whisking at high speed until it reaches stiff peak stage. The mixture should appear thick, heavy and slightly grainy.  When the whisk is turned upside down, the peak formed on the end of the beater points straight up without collapsing. 
  • Using a hand whisk, swift but gently mix the beaten egg whites to the egg yolks batter, until combined. Scrap the sides of the bowl with a spatula to fully incorporate the mixture. 
  • Transfer the batter into the prepared 22x22x6cm square baking pan. Jiggle the pan slightly to level the batter. 

  • Bake the cake in a preheated oven at the 2nd lowest tray (to accommodate my oven which tend to be warmer) at 160C degrees for 55-60mins.
  • Remove cake from oven. Unmould the cake by lifting the entire parchment paper out of the pan.
  • Chill the cake before serving.

Once again, I want to thank Kitchen Tigress for this wonderful recipe. 


Printfriendly

Related Posts Plugin for WordPress, Blogger...