Tuesday, February 23, 2016

健康八宝营养粥 Heathy 8 Treasures Porridge


I love eating congee ever since childhood days. It gives me co much comfort to gulp down a huge bowl of any type of warm congee and feeling the warm congee gliding its way into tummy. 
我自小就爱吃米粥。尤其是当那热腾腾的粥吃进嘴里后一股温暖的热粥滑入肚子里的感觉极之享受。

Today I am sharing this recipe to the porridge fans who also share the same food interest as me. In this recipe, I used lotus nuts instead of gingko nuts as I happened to run out of it. Either way, both of them have their nourishing and health properties which are commonly used in chinese cooking. The only set back to me is bitter after taste of the lotus nuts as compared to that of gingko nuts. All in all the porridge turned out as yummy as I hoped.
这道米粥食谱是分享给热爱吃粥的粉丝们。在这道食谱中我因家里缺货没采用白果而采用了莲子。莲子及白果都是各有自己的独特营养功效,也是时常用于中菜和甜品里边。唯一要注意的是莲子味带苦,你若介意的话还是用回白果较好。最后煮出来的成品一点都没有任何苦味而且还很好吃呢!


健康八宝营养粥
Heathy 8 Treasure Porridge


Ingredients 材料(A)
1 Cup White Rice 白米
1 Cup Brown Rice 糙米
8 pcs Chinese Mushrooms 花菇 (diced 切丁)
20g Lily Bulbs 百合
20g Gingko Nuts 白果/ Lotus Nuts 莲子
30g Peanuts 花生米
1 Medium Potato 马铃薯 (diced 切丁)
1 Medium Sweet Potato 地瓜 (diced 切丁)
100g Carrot 红萝卜 (grated 磨碎)
10g fresh ginger 生姜 (chopped coarsely 切碎)
2Lit Water 清水


(B) Seasoning 调味酱料
2 Tsp Mushroom Powder 香菇粉
1 Tbsp Sesame Oil 麻油
2 Tsp Salt 盐
1 Tbsp Light Soy Sauce 酱清
Pepper to taste 胡椒粉


Method 做法
Combine white and brown rice together and soak overnight in the freezer. Defrost and drain.
白米和糙米洗净泡浸雪藏隔夜。除雪沥干。

Soak lily bulbs, peanuts and gingko nuts overnight in freezer. Drefrost and drain.
百合,花生米及白果也一样泡浸水里雪藏隔夜。除雪沥干。

Soak chinese mushroom for an hour to soften. Drain and dice.
花菇泡浸一小时至软后沥干,切丁。

Transfer 1.7 Liter water and the ingredients (A) into a pot and cook with medium heat until it starts to boil. Lower the heat and allow the porridge to simmer until cook and soften to your preferred consistency. Add sesame oil and stir to incorporate.
把1.7公升清水和一切材料A一起倒入汤锅以中火煮滚。把火调低再继续焖煮至米粥软化熟透及您喜欢的浓稠度。混入麻油,拌匀。


Continue to stir the porridge frequently to loosen it to prevent it from getting burnt. Stir in more water whenever necessary.
简中须不断匀松锅里的粥以免樵底。必要时就加多点清水。

Add seasonings till incorporated. Allow the porridge to simmer another 15 mins before serving.
搅入调味料再继续焖煮15分钟才熄火。

Notes :

The process of soaking the ingredients like rice, lily bulbs, gingko nuts and peanuts and freeze it overnight helps to soften the them thus utilize shorter cooking time. I personally like this method very much especially when its used in porridge cooking.
我采用这种泡浸水雪藏米,百合,白果及花生米隔夜的作用是协助食物快速软化而能数短烹饪时间。这是我时常取用来煮粥的方法。


Do link back to Coco Sweet Tooth if you have used any information as published in this blog. 


Monday, February 22, 2016

咖啡兰姆千层蛋糕 Coffee Rum Lapis Legit

Another yummy cake recipe adapted from Patricia Lee's 'Delicious Nyonya Kueh and Desserts' .


又再次与你分享一道美味的千层蛋糕食谱取自Patricia Lee 的娘惹风味糕点。

咖啡兰姆千层蛋糕
Coffee Rum Lapis Legit


Ingredients 材料

(A)
220g Unsalted Butter 无盐牛油
220g Salted Butter 咸牛油
200g Condensed milk 炼奶
130g Cake Flour 蛋糕粉
1 Tsp Mixed Spice 混合香料
2 Tsp Rum 兰姆精 or Vanilla Extract 香草精

(B)
21 egg yolks 蛋黄, room temperature 温室回温
100g Castor sugar 幼糖

(C)
8 Egg whites 蛋白, room temperature 温室回温
50g Castor sugar 幼糖
1 Tsp. Cream of tartar 塔塔粉

(D)
2 Tbsp Instant Coffee Granules 即溶咖啡精
1-2 Tbsp Hot Water 滚水


Method 做法
Pre-heat the oven to 200° C.
烤箱预热至200C度。

Combine and sift together floor with mixed spice. Set aside.
蛋糕粉及混合香料一起混匀,过沥搁置待用。

Cut butter into small cubes and allow to soften to room temperature in a mixing bowl.
牛油切丁放入搅拌盆待回温。

Combine (D) until dissolved. Set aside.
材料D混匀至融化。搁置待用。

Grease the bottom and sides of an 20cm square cake pan. Line the bottom with parchment paper.
准备一个20方寸的四方蛋糕模具,模具底及边缘涂抹油。模底铺上烘培纸。

Cream the butter until light and fluffy. Gradually add in condensed milk to incorporate. Add rum or vanilla till evenly combined.
将牛油打至松发,再慢慢的加入炼奶混匀。之后再倒入兰姆精或香草精混合。

Sift the sifted flour and spice mixture over the creamed butter mixture and switch the mixer to low speed to incorporate. Set aside.
把过沥的粉料沥入打发的牛油糊,以慢速混匀。搁置待用。

In another mixing bowl, whisk the egg yolks until frothy. Add in sugar and continue to beat the eggs till thick and doubled in volume.
把材料B的蛋黄倒入另一个搅拌盆,搅打至起泡。加入糖再继续搅拌至浓稠及松发两倍大。

Transfer the beaten egg yolks mixture into the butter and condensed milk mixture and mix until well combined.
把打发的蛋黄糊倒入牛油糊,混匀。

In a dry and grease free mixing bowl, whisk the egg whites until frothy. Add sugar and continue whisking till thick. Add in cream of tartar and continue whisking at high speed till stiff peaks.
将蛋白倒入个干净无油脂的搅拌盆,以中速打至起泡后加入幼糖继续打至浓稠。再加入塔塔粉继续以高速打至硬性发泡即可。

Transfer 1/3 of the beaten egg whites to the cake batter and fold to incorporate. Fold in the balance beaten egg whites in another 2 additions.
把蛋白霜分三次拌入蛋糕糊。

Equally divide the cake batter into 2 portions. One portion to remain original while the other portion to mix with the coffee mixture (D).
完成的蛋糕糊平均分成两份。一份保持原味而另一份加入咖啡液D。

Place the prepared cake pan into the preheated oven and heat for 2 minutes.
蛋糕模送入烤箱烧热2分钟。

Remove cake pan from oven and add in 4 Tbsp of the original flavored cake batter. Level the top with spatula before transferring it back into the oven. Bake in the middle rack for 5-7 minutes until the top is nicely browned.
蛋糕模取出烤箱,马上勺入4大汤匙的原味面糊,表面用橡皮刮刀铺平。送入烤箱的中层烘烤5至7分钟至表面微黄色。

After the first layer is baked, switch the oven to top grill mode.
当第一层的蛋糕烤熟后, 将烤箱转移去烧烤模式。


Add the same amount of coffee batter for the second cake layer. Spread the top evenly and grill for 8-10 mins until the layer is fully cooked before adding on the subsequent layer.
勺入同样分量的咖啡面糊于第二层。表面用橡皮刮刀铺平后送入烤箱烧烤8-10分钟至熟透才可加入下一层的面糊。

After grilling, firmly press each layer with a lapis press or with the back of a spoon to evenly flatten the cake.
当烧烤出来的蛋糕出炉后,马上用汤匙的背面在蛋糕表层上轻轻的压平以免产生气泡。

Alternate between the 2 cake batter and repeat the process (pour batter, grill, press) until all batter has been used up.
重复以上的步骤(勺入面糊,烧烤,压面)至到蛋糕糊用完为止。 As you build up the layers, you might need to decrease the temperature of the grill or lower the oven shelf so that the cake doesn't cook too fast.
随着越多的蛋糕层的完成,建议您可减低烧烤的温度以免蛋糕过熟及脱水。

When done, invert the tin onto a cooling rack. Let the cake cool in the tin before slicing.
完成后,把蛋糕模倒扣在铁架上待凉。待凉后才脱模切块享用。 


Do link back to Coco Sweet Tooth if you have used any information as published in this blog. 


Sunday, February 21, 2016

素糯米鸡 Steamed Vegetarian Glutinous Rice


Amongst the several attempts, this is the best steamed glutinous rice recipe perfected to everyone's palate. We all love it and I think you might agree to that too!
经过多次的尝试,终于给我找到这道即满意同时又能配合到很多人的口味的糯米鸡食谱。我们都喜欢,相信您或许也会赞成哦!

素糯米鸡 
Vegetarian Steamed Glutinous Rice

Ingredients 材料
(A)
500g Glutinous Rice 糯米
10 pcs Chinese Mushrooms 花菇
65g Vegetarian BBQ Pork 素叉烧 (diced 切丁)
65g Vegetarian Mutton Meat 素羊肉
290g Water 清水

(B)
100ml Cooking Oil 食油
2 Tbsp Sesame Oil 麻油
1-1/2 Tbsp Vegetarian Oyster Sauce 素蚝油
1-1/2 Tbsp Light Soy Sauce 生抽
3-4 Tbsp Dark Soy Sauce 黑酱油
2-3 Tbsp Ginger Juice 姜汁
2 Tsp Five Spice Powder 五香粉
9g Salt 盐
45g Sugar 糖
10g Mushroom Powder 香菇粉
Some Pepper 胡椒粉少许
100g Water 清水

Method 做法

Soak glutinous rice in adequate water overnight. Drain。
糯米浸水隔夜。沥干。

Soak chinese mushrooms for an hour to softened. Drain. Remove the stalk.
香菇泡浸1小时至软化。冬菇角部份去掉。

Place glutinous rice on a steaming tray. Add 290g water to cover the rice.
把糯米放入蒸盤上,倒入290克清水遮盖糯米。

Steam the rice under high heat for 25 mins until the rice softened and water absorbed.
以大火蒸25分钟至倒糯米熟透及水份吸收。


Prepare the seasonings by combining all ingredients (B) into a bowl. Stir to combine. 
将调味料B一起混入碗,搅匀搁置。

Pour and mix the seasoning evenly over the steamed rice. 
把拌匀的调味料B倒入已蒸熟的糯米上,拌匀。

Place vegetarian big pork, mutton and chinese mushroom into 10 small bowls respectively. Place the rice evenly over the ingredients and firmly press to even the top.
把素叉烧,羊肉和香菇平均的摆入10小碗的底部。然后在平均的把糯米饭舀入小碗内压平。


Transfer bowls into the steamer again and steam under medium high heat for 25 mins.
把小碗送入蒸锅以中火蒸25分钟即可。


Do link back to Coco Sweet Tooth if you have used any information as published in this blog.


Saturday, February 20, 2016

鸡丝马芬杯子蛋糕 Chicken Floss Muffins


This is an extremely easy and fuss free muffin recipe with minimal use of baking tools. Just right for me to kickstart my baking mood after a long break from celebrating lunar chinese new year. 
这是一道即简单又省工的马芬杯子蛋糕。此外制做的过程不须采用太多的烘焙工具,正好可以推动一下我自从庆祝新年已久没烘焙而变懒散的心情。

Besides, meat floss is easily available during this period and this recipe shall serve to use up the batch of chicken floss given by relatives for the festive celebration.
特别是在庆祝新年期间,家里随时都会存有肉丝之类的食品。就用这道马芬杯子蛋糕食谱来清理那批亲友品送的鸡肉丝吧。


鸡丝马芬杯子蛋糕

Chicken Floss Muffins

Ingredients 材料

(A)
280g Cake Flour 蛋糕粉
15g Baking Powder 发粉
150g Castor Sugar 幼糖

(B)
80g Chicken Floss 鸡丝
80g Mayonnaise 美奶滋

(C)

3 Grade A Eggs A级鸡蛋
130ml Fresh Milk 鲜奶
160g Melted Butter 溶化牛油
1 Tsp Vanilla Extract 香草精

(D)

Sesame Seeds 芝麻

Method 做法


Preheat oven to 175C degrees. 

烤箱预热至175C度。

Melt butter and set aside to cool.

牛油烧热融化,搁置待凉备用。

Combine (B) into a bowl until mixed. Set aside.

将材料B一起混合加入碗中,搁置待用。

Sieve together flour and baking powder into a mixing bowl. Stir in castor sugar. Make a well in the center of the bowl. Set aside.

把蛋糕粉及发粉沥入一个搅拌盆,再加入幼糖拌匀。将混料推向盆边,开窝于中间后搁置待用。


In another bowl, combine and stir in eggs, fresh milk, melted butter, vanilla extract and chicken floss mixture (B). Stir to combine.

在另一个搅拌盆里倒入鸡蛋,鲜奶,溶化牛油,香草精及混合的鸡丝美奶滋,拌匀。


Transfer mixture into the flour mixture (A). Mix gently and fold to combine.

再把混合的湿料倒入之前拌匀的粉料(A)中,轻轻的翻拌均匀。

Spoon batter into prepared muffin cups till 3/4 full. Sprinkle some sesame seeds over the top.

将面糊舀入马芬纸杯7分满即可。然后在马芬面糊表面撒上少许芝麻。


Bake in a preheated oven at 175C degrees for 20-25 mins until cooked.

烤盘送入已预热的烤箱以175C度烘烤20-25分钟至熟透即可。


Do link back to Coco Sweet Tooth if you have used any information as published in this blog.

Friday, February 19, 2016

香辣素炒米粉 Vegetarian Spicy Fried Bee Hoon


Here is one easy and quick vegetarian one dish meal recipe I truly enjoyed.
这是一道我很喜欢即简易及快速制做的素炒米粉食谱。


香辣素炒米粉 
Vegetarian Spicy Fried Bee Hoon


Ingredients 材料


(A)
350g Rice Vermicelli / Bee Hoon 米粉
100g Dried Straw Mushrooms 干草菇
150g Bean Sprouts 碗豆芽
1 Medium Carrot 红萝卜(cut into strips 切丝)
1 Tube Silken Tofu 一条嫩滑豆腐
8-9 Tofu Puffs 豆腐卜

(B)

1/4 Cup water 清水
2 Tbsp Tauco Sauce 豆酱
2 Tbsp Tomato Ketchup 番茄酱

2 Tbsp Chilli Sauce 辣椒酱
1 Tbsp Vegetarian Mushroom Sauce 素香菇酱
1 Tbsp Ketchup Manis / Sweet Soy Sauce 甜酱
1 Tbsp Light Soy Sauce 酱清
1 Tbsp Chinese Black Vinegar  渐醏
1/2 Tbsp Sesame Oil 麻油


(C)

2 Tbsp Sesame Oil 麻油
3 Tbsp Cooking Oil 食油
1 Tbsp Ginger 姜 (finely chopped 切碎)
1 Tbsp Vegetarian Sambal Chilli 素叁峇酱 
1 Tsp Vegetarian Mushroom Powder 素香菇粉
Salt and Pepper to Taste 盐,胡椒调味


Directions 做法


Soak rice vermicelli and straw mushrooms for 30 mins till softened. Drain.
米粉及草菇泡浸半个小时至软化。沥干。


Cut the straw mushrooms and carrot into strips. Set aside.
草菇及红萝卜切丝,搁置待用。

Boil the tofu puffs for 5 minutes to remove excess oil. Drain. Slice into think strips.
豆腐卜放入锅里加入水一起煮滚5分钟去除油迹后沥干。将豆腐卜切成幼条。


Mash the soften tofu and set aside.
嫩软豆腐按碎成泥后搁置待用。


Combine and mix all the sauce ingredients (B) into a bowl until incorporated. Set aside.
把材料B的酱料倒入小碗,混匀搁置。


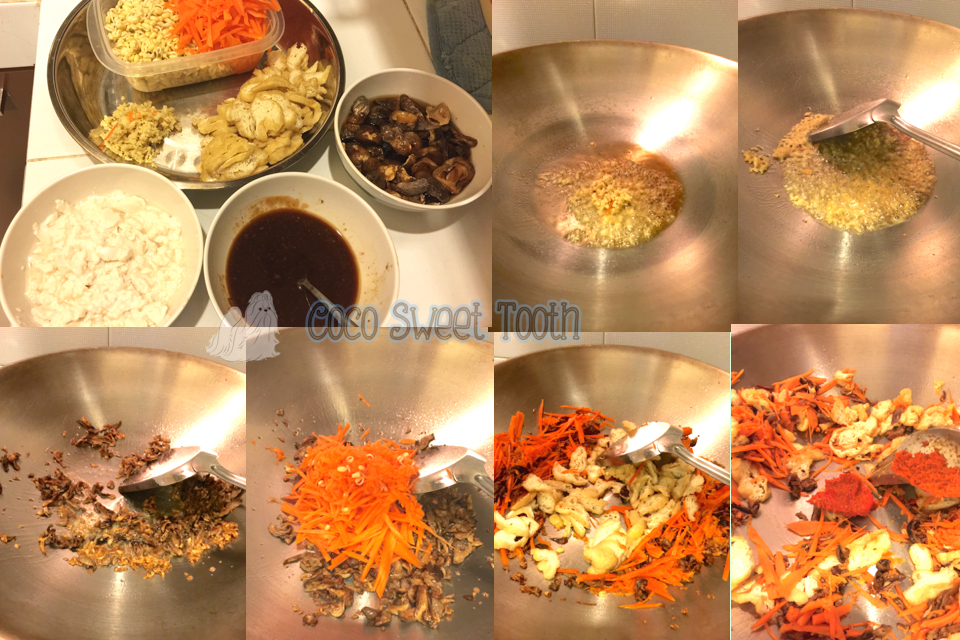
Heat up sesame oil and cooking oil (C) into a deep frying pan. Stir in the chopped ginger and saute until fragrant and lightly brown.
开始将材料C里的麻油及食油倒入炒锅烧热。再加切碎姜蓉爆香。


Add in straw mushrooms and stir fry for 1 minute before adding in carrot. Continue to stir fry the ingredients to incorporate. Stir in tofu puffs and continue stir frying.
再加入草菇翻炒1分钟便放入红萝卜丝继续翻炒均匀。


Add vegetarian sambal chilli and bean sprouts. Stir to combine.
继续加入素叁峇酱和碗豆芽一起翻炒匀即可。


Transfer in the softened rice vermicelli , the pre mix seasoning (B) and mushroom powder (C). Stir fry the mee soon under medium heat until the all the seasonings has been absorbed and the mee soon thoroughly cooked. Add salt and pepper to taste.
最后将泡浸软的米粉倒入锅,淋上预拌酱料B和素香菇粉一起以中火翻炒至酱料吸收及米粉熟透即可。熄火前可以加入少许盐及胡椒粉调味。


Do link back to Coco Sweet Tooth if you have used any information as published in this blog.

Monday, February 15, 2016

兰姆巧克力豆饼干 Chocolate Rum Cookies

This recipe is taken from Carol Hu's 'First Book of Baking for Beginners' which had helped a lot when I first picked up baking through self learning 3 years ago. During that time, I was lucky to come across 2 of her baking books which are still the most comprehensive baking recipe book I have seen from all recipe books so far.
这道饼干食谱取自于湖涓涓的‘烘焙新手必備的第一本書’,也是这三年以来给予我许多烘焙制做方面心得的食谱书籍。早前当我开始自己自修烘培食品时,非常幸运的找上了该作者出版的前两本烘焙书籍。一直到今日,我还是认为湖涓涓的书籍是我所收集的食谱书籍最详细完整值得收藏的烘培全书。

Unfortunately, her books is only published in Chinese language until now.  I hope her books would be printed in English language to benefit more people one day. If you do not have her book, you may also get check for this recipe from her site.
很可惜的是,目前她的书籍只限于中文版。希望她的书籍可以早日附上英文版好让跟多的人受益。您若没购买道她的书籍,可以在此参考到这道饼干食谱。


兰姆巧克力豆饼干
Rum Chocolate Cookies
Recipe from Carol Hu


Ingredients 材料

255g Cake Flour 蛋糕粉
120g Unsalted Butter 无盐奶油
45g Castor Sugar 细砂糖
45g Brown Sugar 黑糖
2 Eggs (Grade B) 鸡蛋(中号)
1 Tbsp Rum 兰姆精 
1/2 Tsp Salt 盐
100g Milk Chocolate Buttons 耐烤巧克力豆


Directions 做法

Prepare and measure all ingredients accordingly. Allow the unsalted butter to soften at room temperature until it leaves an imprint when lightly pressed with finger.
所有材料秤量好, 无盐奶油放置温室回软至手指可以压出印子的程度即可。

Preheat oven to 160C degrees.
烤箱预热至160度。


Transfer the softened butter into a mixing bowl and use a hand whisk to beat until light and creamy.
把奶油装入搅拌碗,用打蛋器搅打成乳霜狀。

Combine castor sugar, salt and brown sugar till even. Transfer to the butter mixture and continue beating the mixture until pale and fluffy.
糖料一起混匀,与盐一起加入奶油霜内搅打至泛白,拿起来打蛋器尾端呈现角狀。

Add in eggs and rum in few additions. Whisk to combine.
再把鸡蛋及兰姆酒分数次加入,用打蛋器搅拌均匀。

Sift in the sifted cake flour in 3-4 additions while using a rubber spatula to press and fold into the mixture.
将过沥的蛋糕粉分3-4次沥入后使用橡皮刮刀以磨擦按压方式将粉料混入。


Lastly, stir in the chocolate buttons to combine.
最后才把巧克力豆加入,混合均匀的面团即可。

Pinch a small bit of the cooker batter and roll into 30-35g round balls. Flatten the cookie dough with fingers into 0.5cm thick and arrange onto baking tray.
用手捏出一小块的面团搓揉约成30-35克的圆球狀,再用手指轻轻的把面团压扁约0.5cm厚度,间隔的排入烤盘上。

Bake the cookies in a preheated oven at 160C degrees for 15-18 mins until cooked.
放入已预热的烤箱以160度烘烤15至18分钟即可。

Place the baked cookies onto the cooling rack to cool completely before storing in air tight container.
烤好的饼干须放在铁网架上待凉即可。


Do link back to Coco Sweet Tooth if you have used any information as published in this blog.


Sunday, February 14, 2016

香草印度酥饼 Ghee Cookies


The week before Chinese New Year was the busiest time for me, having to experiment while rushing to make as many types of new year cookies within a short time before flying back to Malaysia for the new year festive holidays.
在农历新年到临的前一个礼拜前,也就是我最繁忙的时候。那时候我不止一边练习及研究制做饼干而且还得在那短短的时间里完成许多种类的饼干带回马来西亚。

This is one of the most satisfied cookie recipe among the several I attempted, the cookies are crunchy and yet melts in the mouth without much opportunity to chew them.
在我所尝试制做的饼干食谱中,这道是我最满意的饼干。这饼干即松脆而带有浓香的酥油味,一旦吃进口中即刻融化。

香草印度酥饼
Ghee Cookies
Recipe credit Nasi Lemak Lover


Ingredients 材料
(A)
200g Ghee 酥油
90g Icing Sugar 糖粉
1/2 Tsp Salt 盐

(B)
2 Egg Yolks 蛋黄
1 Tsp Vanilla Extract 香草精

(C)
220g Cake Flour 蛋糕粉
3/4 Tsp Baking Powder 发酵粉
100g Almond Flour 杏仁粉


Directions 做法

Preheat the oven to 170C Degrees.
烤箱预热至170C度。


Combine ingredients (A) into a mixing bowl and whisk with handmixer until pale.
将材料A混入搅拌盆再以打蛋器打发至膨胀发白即可。

Add in egg yolks and vanilla extract (B) and mix evenly.
倒入鸡蛋黄和香草精,混匀。


Sift ingredients (C) together into a bowl and then sift the flour mixture into the beaten ghee mixture in 3 batches. Fold the mixture with rubber spatula as swift as possible to form a dough.
把所有材料C一起例如另一个碗中混匀,再把混匀及过沥好的材料C分三次沥入之前打发的酥油糊里。用橡皮刮刀快速的把粉料翻拌入形成软面团。

Shape each portion into 1 teaspoon size ball and arrange on a lined baking tray. Press the dough with finger to flatten. Emboss the top of the cookie dough with any cookie cutter if applicable.
把面团搓成一小茶勺的小圆粒,排入已铺上烤纸的烤盘上。用手指轻轻的在面团表面上按一按。这时可以采用饼干浮雕具往饼干表层上按出花纹。


Bake the cookies in a preheated oven at 170C degrees for 15-20 mins or till golden brown.
把饼干送入已预热烤箱以170C度烘烤15至20分钟直到饼干变金黄色即可。

Allow the cookies to cool on a cooling rack completely before storing them in an airtight containers.
烤出来的饼干放在铁架上待凉后才可以收藏入密封的盒子。


Do link back to Coco Sweet Tooth if you have used any information as published in this blog.


Printfriendly

Related Posts Plugin for WordPress, Blogger...