Thursday, August 11, 2016

我至爱的巧克力煎饼 My Favorite Chocolate Pancake


Breakfast is one the crucial meal in our household. With several people's palette to cater for, breakfast planning has been a part of my daily routine to start the day. This is more evident with the 3 new live in housekeepers and gardener whom are bread eating fans like my husband. The food they usually have for breakfast are rice or instant noodles. When choices are available they would add on fried eggs with other grease laden dishes.

在家中,早餐是一项非常重要的一餐。特别是现在家里多出三位留舍的女庸及园丁,我每天都得提早计划好准备不同的早餐来配合他们的食物取向。我丈夫在吃方面并不挑剔,就算每天把面包当早餐都没问题。但是对于家中的三位印尼员工来说,每早吃面包倒是痛苦之事。一般上他们的早餐都是以炒饭或即时面为主,若经济应许的话他们还会添加炒蛋及其他油炸类的肉菜来配合。


Instead of forcing them to adopt our daily bread eating habits, I learnt to find different ways to adopt flour based staples to encourage them to healthier eating habits. This is one of the many breakfast which caught their interest. Gauging from their response, I assume the pancake is yummy enough for them to temporary forego the greasy food yearning.

以其强逼他们学习每天吃面包,我选择采用不同方式制做出面粉制的早餐慢慢地把他们带入较健康的饮食习惯。这是其中一道激起他们吃劲的早餐食谱,从他们给予的反应来看,我猜想这道煎饼因该是很美味,足以让他们暂忘于那些油腻腻的食品。


至爱的巧克力煎饼
My Favorite Chocolate Pancake


Ingredients 材料

85g Salted Butter 咸牛油, melted 融化
210g Plain Flour 面粉
2 Tsp Baking Powder 发酵粉
1 Tsp Baking Soda 小苏打粉
2 Tbsp Cocoa Powder 可可粉
2 Egg Yolks 蛋黄
2 Egg Whites 蛋清
5 Tbsp Sugar 糖
1 Cup Plain Yoghurt 原味酸奶
1 Cup Milk 鲜奶


Directions 做法

Heat butter in a saucepan until melted. Allow to cool.
牛油烧热至融化。搁置待凉。

Combine and sift together flour, baking powder, baking soda and cocoa powder into a mixing bowl. Set aside.
把面粉,发酵粉,小苏打粉和可可粉一起混合入碗,混匀。搁置待用。

In another dry and grease free mixing bowl, beat egg whites until soft peaks. Set aside.
蛋清加入在另一个无油脂及干净的碗里,打发至湿性发泡即可。搁置待用。

In a separate mixing bowl, beat egg yolks with sugar until incorporated. Stir in yoghurt to combine.
Add milk until mixed.
将蛋黄及糖一起放入另一个搅拌碗,搅匀。再加原味酸奶混匀。接着又加鲜奶,搅匀即可。


Transfer egg mixture into flour mixture. Whisk to combine. Add melted butter to incorporate.
再把蛋黄糊送入粉料内,捣匀。又加入融化牛油,混匀。

Fold in beaten egg whites till evenly mix.
最后把打发的蛋清拌入煎饼糊内,拌匀。

If the batter is too thin, add an extra tablespoon of flour. Add an additional tablespoon of milk if the batter is too thick. Adjust the batter until it reaches the consistency of heavy cream.
若是煎饼糊因水份过多而太稀,可以多加一汤匙面粉。相反地,若煎饼糊过浓稠的话可以多混入一汤匙的鲜奶混合。把煎饼糊调至鲜奶油般的浓度即可。

Heat a non-stick frying pan over medium heat greased with some cooking oil / butter.
把平底锅以中火加热,锅上擦上一层食油或牛油。


Pour 1/4 cup of batter onto the heated pan. Spread the batter with spoon.
倒入1/4杯的面糊入已预热的锅上。用勺底面将面糊扩散。

When the top of the pancake starts to bubble, flip it over and cook the other side until the pancake has risen in thickness.
当煎饼的表层开始出泡泡时,把煎饼翻转继续煎热至膨胀及厚度增加而熟透为止。


Repeat the process until all batter is used up.
以同样的做法将其余的面糊用完即可。

Serve with maple syrup and extra butter if preferred.
煎熟的煎饼可以配上枫糖浆及另加牛油品尝。


Do link back to Coco Sweet Tooth if you have used any information as published in this blog.   


Wednesday, August 10, 2016

简易酸奶巧克力松饼 Easy Yoghurt Chocolate Cupcakes


I love this straight forward and easy cake recipe. 
我超爱这道直接即简易的蛋糕食谱。 


简易酸奶巧克力松饼
Easy Yoghurt Chocolate Cupcakes


Ingredients 材料

200g Salted Butter 咸牛油 (soften at room temp 温室回温)
80g Castor Sugar 细砂糖
1 Tbsp Dark Muscovado Sugar 有机红糖
4 Large Eggs 鸡蛋 (大)
250g Self Raising Flour 自发面粉
2 Tbsp Cocoa Powder 可可粉
50g Chocolate Buttons 巧克力豆
110g Plain or Greek Yoghurt 原味酸奶
1 Tsp Pure Vanilla Extract 香草精


Directions 做法


Preheat oven to 170C degrees.
烤箱预热至170C度。

Combine and sift raising flour with cocoa powder into a bowl till evenly mixed. Set aside.
发粉和可可粉一起沥入碗中,混匀后搁置。

Combine butter, castor sugar and muscovado sugar into a mixing bowl and beat till pale and fluffy.
把咸牛油,细砂糖和有机红糖加入搅拌盆,以中速打至松发色淡。

Add yoghurt till incorporated.
再加酸奶混匀。

Add eggs, one at a time and beat to combine.
分次把鸡蛋一个一个混入,捣匀。

Add vanilla extract.
把香草精放入,混匀。

Whisk in 1/3 of the flour mixture and gently fold to combine. Repeat the same process for balance flour mixture in 2 additions until combined.
沥入1/3的粉料以翻拌方法拌匀,继续分两次把剩余的粉料拌入至均匀即可。

Fold in 1/2 of the chocolate buttons.
拌入1/2的巧克力豆,拌匀。

Spoon cake batter into individual cupcake liners until 80% full.
勺入蛋糕糊入杯子蛋糕模至八分满。

Decorate the top with the leftover chocolate buttons.
把剩余的巧克力蛋装饰在蛋糕表层上即可。


Bake in the middle rack of the preheated oven at 170C degrees for 15-18mins until the skewer comes out clean.
将蛋糕模送入已预热至170C度烤箱的中架烘烤15-18分钟至熟透为止。

Allow the cupcakes to cool on top of cooling rack.
烤熟的蛋糕放在铁架待凉。


Do link back to Coco Sweet Tooth if you have used any information as published in this blog.   


无麸质地瓜红萝卜蛋糕 Gluten Free Sweet Potato Carrot Cake.........Happy Birthday Jolly Cookie


Time flies without realizing and now my youngest fur baby Cookie is already 4 years old. They are all my daily bundle of joys who brightens my life with their love and loyalty. My three canine fur babies certainly befits the title being 'Men's Best Friend'.
时间流逝,转眼间我的老幼(宠物宝宝)已经四岁了。家里的三只可爱即忠心的宠物爱犬们一直都是我们的精神资助给予我们许多的欢笑和温馨,简直就是‘人类的好朋友’。


Made this healthy gluten free birthday cake so that the oldest one can also get to eat it. She is highly allergic to gluten, yeast, rice, wheat and red meat hence this cake is custom bake to cater for all. Actually, it is so yummy that I plan to make a sweeter version for our own consumption later. With this current amount of sweetness in this cake, all my fur babies seem to love it so much.
为了配合老大对麸质, 酵类, 米和红肉类的过敏,我特别制做了这道无麸质版的地瓜红萝卜健康蛋糕让它们三个都有得享用。看着它们吃得津津有味的样子,我想下次也来制做同一道‘加糖’的版本自己享用。 


无麸质地瓜红萝卜蛋糕
Gluten Free Sweet Potato Carrot Cake

Ingredients 材料

70g Mashed Sweet Potato 地瓜泥
60g Grated Carrot 红萝卜丝
60g Tapioca Flour 木薯粉
15g Potato Flour 马铃薯粉
10g Corn Flour 玉米粉
1 Grade A Egg 鸡蛋(大)
1 Egg Yolk 蛋黄
60ml Olive Oil 橄榄有
1 Egg White 蛋清
10g Castor Sugar 幼糖
1/2 Fresh Apple 新鲜苹果


Method 做法


Preheat oven to 175C degrees.
烤箱预热至175C度。

Line and grease a 5" round cake mould.
在5寸圆形蛋糕模底铺上烘焙纸后涂抹油脂。

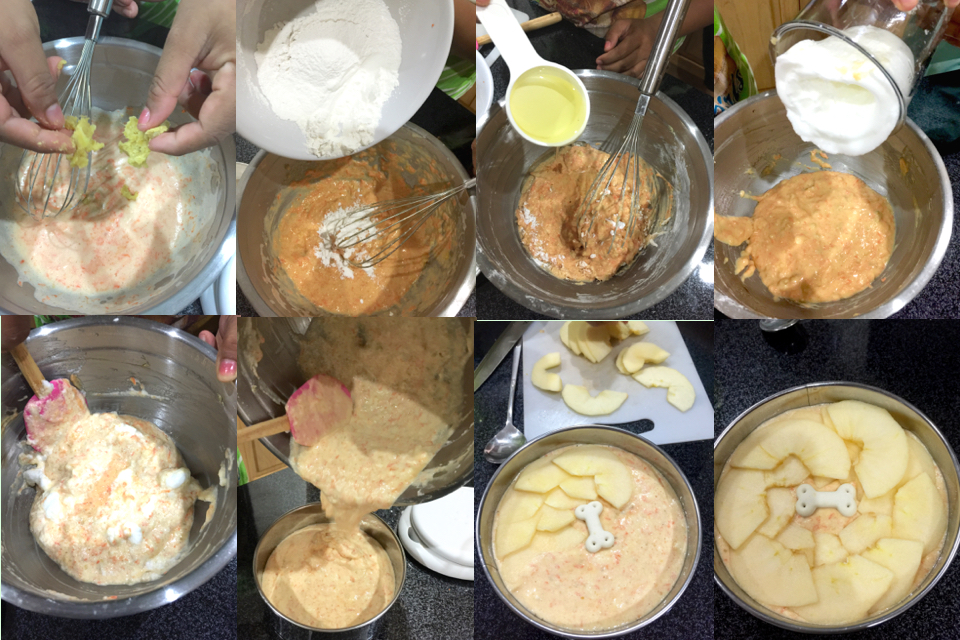
Peel and wash yellow sweet potato. Cut into cubes and steam for 20 min until softened. Mashed and set aside.
地瓜去皮,洗净后切丁。大火蒸20分钟至软化。搅成泥状后搁置待凉。

In a clean and grease free bowl, beat egg white until stiff peaks. Set aside.
把蛋清放入个干净无幼脂的碗,将蛋清打至硬性发泡。搁置待用。

In another mixing bowl, combine egg yolk, egg and sugar. Whisk until light and fluffy.
在另一个搅拌盆里,加入蛋黄,全蛋和糖一起打至松发。

Add grated carrot and mix well.
继续加红罗卜丝混匀。


Loosen the mashed sweet potatoes into the egg carrot mixture and stir to combine.
把冷却的地瓜泥弄松,加入鸡蛋红萝卜液内,搅匀。

Add flour ingredients and mix well.
再放粉料,混匀。

Stir in oil and mix till incorporated.
接着加橄榄油,搅匀。

Gently fold in the beaten egg whites till mixed.
轻轻的把打发的蛋清拌入蛋糕糊,快速以翻拌的方法拌匀。


Transfer cake batter into cake pan and decorate the top with apple slices and doggy treats.
将蛋糕糊倒入模具,在表层上铺上苹果片及狗狗零食装饰即可。

Bake in the center rack of the preheated oven at 175C degrees for 35-40 mins until cooked.
送入已预热的烤箱的中层以175C度烘烤35-40分钟至熟透为止。


Do link back to Coco Sweet Tooth if you have used any information as published in this blog.   


Monday, August 8, 2016

班兰椰浆菜燕 Pandan Coconut Agar Agar


This is actually a simple recipe which can be made with ease by using store bought packet coconut milk and pandan extract. Today I decided to be a little bit adventurous by making this yummy dessert by preparing the main ingredient from scratch while also giving me the opportunity to compare the taste difference.
班兰椰浆菜燕其实是非常容易做的,只要采用市面贩卖现成的包装椰汁及班兰精华然后配上食谱里基本的材料就可以制做了。这次忽然心血来潮想把主要的材料从零做起,比较看看会不会更好吃。

Based on the satisfactory outcome, I concluded that this method using fresh coconut milk taste better  as the agar agar reminded me of the ones i had during my childhood days.
我从这项满意的成果所得到的结论就是,菜燕糕还是采用新鲜椰汁制做出来的能香浓美味,令我回想童年时所吃的一样。


班兰椰浆菜燕
Pandan Coconut Agar Agar

Ingredients 材料

(A) Coconut Milk 椰浆

1 Fresh Coconut 鲜椰子一粒 (dice 切块 / grated 搅丝)
3-4 Cups Water 清水


Blend coconut with 3 cups water in blender on high speed to fully grind the coconut until the water turns milky in color.
椰子与3杯清水混入食物搅拌机以高速打碎直到水变牛奶色即可。

Strain the mixture in a fine sieve to collect the first extract of the coconut milk. Refrigerate until ready to use.
过滤取出第一轮的浓椰浆, 冷藏待用。

Transfer the coconut residue into the blender again and blend with another cup of water to get the 2nd  extract of coconut. This will not be used in this recipe but for other cooking purpose later.
再把椰渣送入食物搅拌机,加一杯清水继续以高速混匀取出第二轮的淡椰汁。这批淡椰汁并不会用于此而将会冷藏收藏予烹饪用途。


(B) Pandan Juice 班兰汁
9 Fresh Pandan Leaves 班兰叶
125ml Water 清水


Wash pandan leaves to remove dirt.
班兰叶洗净。

Cut pandan leaves into 1cm strips and transfer into a blender. Add 125ml of water and process until the leaves are pulverized.
把班兰叶剪成1cm条后放入食物搅拌机。加入125ml清水和班兰叶一起搅拌至粉碎。

Strain and squeeze the pandan extract over a strainer. Refrigerate until ready to use.
过滤取出班兰汁, 冷藏待用。


(C)
40g Agar Agar Powder 菜燕粉
100ml Water 清水
900ml Water 清水
4 pcs Pandan Leaves 班兰叶 (knotted 打结)
180g Sugar 糖
500ml Coconut Milk 浓椰 (A)
1 Tsp Salt 盐
90ml Pandan Juice 班兰汁 (B)


Instructions 做法

In pot filled with 900ml Water and pandan leaves, bring water to boil. Add sugar and stir until dissolved.
把900ml清水和班兰叶一起放入煮锅烧热后加入糖,捣匀。

Dissolve agar agar powder into 100ml water. Transfer it into the boiling water and simmer under medium heat for 15 mins to combine.
在另一个小碗里,把菜燕粉与100ml 清水一起混合后转送入已烧滚水的锅内,焖煮15分钟直到菜燕完全融化为止。

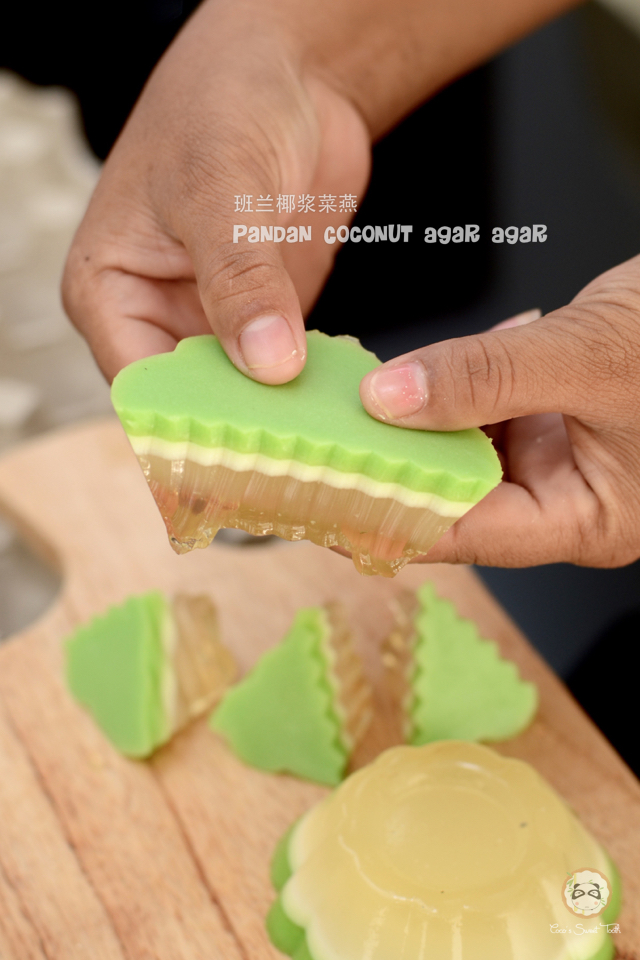
Scoop 1/2 of the agar agar mixture from the pot and pour it into any prepared mould.
从锅里取出一半的菜燕汁倒入任何模具, 待凉。


Add coconut milk into the balance agar agar in the pot and continue to boil for 5 minutes. Add salt to combine. Remove from heat.
将浓椰浆倒入剩余的半锅菜燕汁里继续煮5分钟微滚,加盐捣匀即可离火。

When the 1st agar agar layer has set, transfer 1/2 of the coconut agar agar mixture over the agar agar layer and allow to set.
当手指抹而不粘第一层的透明菜燕时便可将锅里的一半分量的椰浆菜燕倒入模具,待凉。


Add 90ml pandan juice into the remaining coconut agar agar in the pot and stir to combine. Reheat the pandan coconut mixture and bring to a gentle boil. Remove from heat.
最后把90ml的班兰汁倒入锅里与剩余的椰浆菜燕汁一起混合。再把锅子加热煮至微滚即可。

Once the 2nd layer of the coconut agar agar has set, gently pour the pandan coconut mixture over.
等第二层的椰浆菜燕开始要定型时,轻轻的把班兰菜燕汁倒入模具里。

Chilled to set.
完成后,放入冰箱冷却后享用。


Do link back to Coco Sweet Tooth if you have used any information as published in this blog.   


Saturday, August 6, 2016

紫薯椰丝糯米球 Purple Sweet Potato Onde Onde


After the successful attempt on making pulut udang rempah, we went on to make the sweet potato version of onde-onde to further the mood of making traditional kuehs. This is one great recipe bookmarked from Mimi Bakery House which I been wanted to try out. Am glad to have finally done it as the texture of the glutinous rice ball is so tender and combine with the popping of sugar syrup is simply wonderful!
自从昨天顺利的制做干虾糯米卷后,我们又连续制做另一份传通糕粿来满足那忽然激起的糕粿热潮,而做了一道紫薯本版的糯米球糕。其实,我老早前在Mimi Bakery House 博客里看到她分享的这道食谱后,心里早已打算尝试,就是一直没机会。很开心终于有机会做上了这份好好吃的糯米球糕点,制做出来的糕点Q软即香甜,尤其是那糖浆爆发在嘴里的感觉真棒!

Will certainly make this again soon. Thank you Mimi Baker House.
我一定会再次尝试制做这道糕点。谢谢您 Mimi Bakery House


紫薯椰丝糯米球
Purple Sweet Potato Onde Onde

Ingredients 材料
(A)
225g Purple Sweet Potato 紫薯 
225g Glutinous Rice Flour 糯米粉
15g Castor Sugar 细糖
110-125g Cold Water 冷水

(B)
120g Gula Aren / Palm Sugar 椰糖 (chopped切碎)

(C)
200g Fresh Grated Coconut 鲜嫩椰丝
1 Tsp Salt 盐
3 Pandan Leaves 香兰叶


Method 做法


Combine grated coconut and salt (C) into a steaming tray place with cut pandan leaves. Steam over low heat for 10 mins. Set aside.
椰丝加盐(C)一起混合后放入已铺上香兰叶的蒸盘上蒸10分钟。搁置待用。

Cut sweet potato into chunks and steam it under high heat for 25-30 mins until softened. Remove from heat and mashed.
紫薯切块送入蒸锅以大火蒸25-30分钟至熟为止。趁热马上把紫薯搅碎成泥状。


Transfer mashed sweet potato into a mixing bowl and add glutinous rice flour and sugar to mix. Gradually add in water while kneading the mixture into a soft dough. Cover the bowl with cling wrap.
把紫薯泥放入搅拌盆,再加糯米粉及椰糖一起用手混匀,慢慢加冷水继续把粉搓成团。用保鲜纸盖在盆上以免面团转干后难处理。

Scoop a teaspoon of dough and roll into small ball. Use the thumb and lightly press into the center of the ball to make a pouch. Place 1/2 tsp of gula aren in the center. Seal and gently roll it back into a ball.
取一小茶匙的面团,把面团搓成小球接着用大拇指在面团中间按个沟型。将1/2茶匙椰糖放入中间的凹部份,收口捏精后搓回圆球型。


Repeat the same process until all the dough has been used up.
从复同样的做法把全部的面团用完为止。


Bring a medium sized pot of water to boil.
准备一个装满水的烫锅把水煮至沸滚。

Cook the onde onde in the boiling water in batches.  When the onde-onde floats to the surface, continue cooking for another minute.
把糯米球分次的送入烧滚水的锅里煮熟。煮至糯米球浮上来后再多煮一分钟后即可。

Use a slotted spoon to remove the cooked onde-onde from the pot and immediately coat it with the steamed grated coconut.
用漏勺取出煮熟的糯米球便马上趁热时滚上椰丝。


Do link back to Coco Sweet Tooth if you have used any information as published in this blog.  


Friday, August 5, 2016

干虾糯米卷 Rempah Udang


Today our ex maid came over to impart some cooking recipes which will come in handy whenever I am not around to cook for my husband.
今天我家的旧女佣过来叙叙旧,也顺便来与我家新聘请的两位女佣分享我家人爱吃的日常菜肴食谱,以备他俩能在我出外时可以顺利的准备我先生食物。

With her help, we set out to try out another popular recipe well love by many of them.  While preparing for this non vegetarian kueh for the staff, I also prepare a small portion of vegetarian grated coconut with gula melaka to wrap with the pulut rice.
有了她的帮助,我们一群女性即开开心心的尝试做起各自喜爱的菜肴。除了制做了这道非素食版的糯米卷,我私底下也弄了一小部份的素版椰丝椰糖内陷来用弄数卷自己吃的素椰丝糯米卷。

In this recipe, I am only listing the regular dried shrimp version but excluding out the vegetarian part. If you are keen, you may check out this post for the grated coconut fillings recipe to make the fillings for your preferred vegetarian version of Rempah Pulut.
在今天这项帖里我只贴上干虾米版本而将不会列出素版椰丝椰糖内陷的食谱。您若是有兴趣的话可以从我旧的帖上找到素版椰丝椰糖内陷的食谱来配合您的食物取向。


干虾糯米卷
Rempah Udang


Ingredients 材料

(A)
200g White Grated Coconut 白椰茸
80g Dried Prawns, pounded finely 虾干,舂碎
Pinch of Tumeric Powder 少许黄姜粉

(B)
50g Shallots 干葱
4 pcs Candlenuts 石栗
1 stalk Lemongrass 香茅
6 Tbsp Cooking Oil 食油
4 Tbsp Sugar 糖
1 Tbsp Ground Coriander 芫茜碎
2 Tsp Pepper 胡椒粉
1 Tsp Red Chilli Powder 辣椒粉

(C)
600g Glutinous Rice 糯米
250ml Coconut Milk 椰浆
100ml Water 清水
3 Pandan Leaves 班兰叶
Few Drops of Blue Food Coloring 蓝色食用色素少许
20 pcs Banana Leaves 香蕉叶
Pinch of Salt 少许盐


Directions 做法


Fillings 馅料


Heat up wok until hot. Turn to low heat and stir in grated coconut, dried prawns and turmeric powder. Stir fry until golden brown and crispy. Dish up and set aside.
烧热鑊后转小火,下椰茸,虾米干及黄姜粉,翻炒至金黄香脆,取出搁置待用。

Combine shallots, candlenuts and lemongrass (B) into a stone pestle and grind until evenly mix.
舂碎馅料B内的干葱,石栗和香茅。

Heat up oil in frying pan and fry the pounded shallots, candlenuts and lemongrass until fragrant and golden brown. Add sugar, ground coriander, pepper and chill powder. Fry for 5 mins further. Stir in the grated coconut and dried prawns to combine. Dish up and set aside to cool.
把平底鑊烧热,倒入油将舂碎的馅料爆香至微黄。再倒入糖,芫茜碎及胡椒粉,继续翻炒5分钟, 再放入已炒香的椰茸,炒匀。捞起搁置待凉备用。


Pulut 糯米料


Soak glutinous rice with sufficient water overnight. Drain.
糯米用水泡浸隔夜, 沥干。

Scald banana leaves in boiling water for 2 mins. Wipe dry.
蕉叶放入滚水烫2分钟, 抹干。

Combine coconut milk with 100ml water until evenly mix. Set aside.
把椰浆及100ml清水一起混入碗,混匀后搁置待用。

Add a pinch of salt into the glutinous rice and stir to combine. Transfer steamed rice together with pandan leaves onto a steamer tray and steam for 25 mins.
把少许盐混入糯米,搅匀。就把糯米和班兰叶一起放入蒸盤,蒸25分钟。

Remove from heat and discard pandan leaves. Add in coconut milk mixture. Mix well. Sprinkle a few drops of edible blue food coloring over the steamed rice.
离火取出班兰叶后便倒入椰浆,拌匀后便可撒上少许蓝色使用色素, 拌匀。

Transfer the rice back into the steamer and steam for a further 10-15 mins until thoroughly cooked. Set aside to cool.
再送入蒸锅续蒸10-15分钟至熟透即可,待凉。


To Wrap 糯米卷


Apply a think coat of cooking over over the banana leaves. Place 2 Tbsp of the cooked rice onto a piece of banana leaves and 1 Tsp of fillings in the center of the rice. Roll the banana leaf into cylindrical shape. Seal and secure both ends with tooth picks.
在蕉叶上涂抹薄薄的一层食油,糯米2汤匙内包入1茶匙馅料,放置蕉叶上,卷成长筒形,两边即用竹籤固定即成。


Repeat the same process until all ingredients are used up.
照着同样的做法继续完成剩余的材料。


    Do link back to Coco Sweet Tooth if you have used any information as published in this blog.  

    Printfriendly

    Related Posts Plugin for WordPress, Blogger...