Tuesday, June 9, 2015

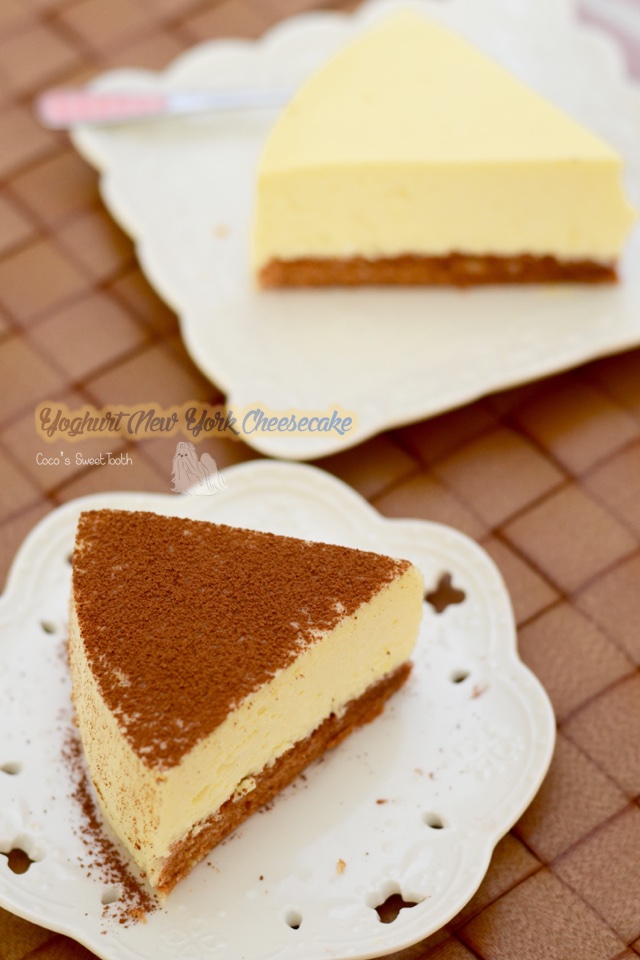
Yoghurt New York Cheesecake

Ever time I come across a rich creamy and dense looking New York Cheesecake or related recipes, I promised myself that I 'would' get to start try making one soon. That promise took me almost 3 years to make good, even despite being a frequent baker who had whipped / used up dozens of blocks of cream cheese.  

Yes, I have made numerous cheesecake over the past three years but mostly were either souffle cheesecake or the lighter version with minimal cheese content.  This time I decided to go full fledge.....almost, but with the addition of yogurt which I wanted to dispose.

For this cake, I used sponge cake as the base instead of the crushed biscuits which this recipe normally prescribed. First, I am too lazy to crush the biscuits and the pressing of the crumbs into the cake pan. Somehow I don't fancy such task. Secondly, I dislike handling and the slicing of the cake with the biscuit layer. From past experience, the biscuit layer disintegrates or did not remain intact with the cheese cake layer when I sliced the cake.  


Thirdly, I get to select the flavor and color for the cake base when its made from a sponge cake made from scratch.

I am extremely happy with the outcome this time. By baking this cake over another layer of a larger fixed based cake pan, I do not risk having the cake getting moist at the base while also saving money on the usage of aluminum paper.


Yoghurt New York Cheesecake

Recipe adapted from Vivian Pang

Sponge Cake For The Base (A)
20g Corn Flour
20g Plain Flour
20g Self Raising Flour
2 Grade B Eggs
Salt
20g Corn Oil
80g Sugar
Few Drops of Chocolate Coloring

1 Tbsp Instant Coffee Powder
1 Tbsp Hot Water

Method
  1. Preheat oven to 180C degrees. Line and grease the bottom of a 8-1/2 or 9inch cake pan.
  2. In a mixing bowl, Sift and combine in all the various flours (A) together and set aside.
  3. Prepare coffee mixture by mixing instant coffee powder with hot water and stir until well blended. Set aside.
  4. In another mixing bowl, beat eggs and sugar till light and fluffy. Add in salt and continue beating for a minute before adding in corn oil and coffee mixture.
  5. Fold in flour swiftly and gently until thoroughly combined. 
  6. Transfer the batter into the prepared cake pan and tap the pan lightly on a table top to get rid of nay trapped air bubbles in the batter. 
  7. Bake at 180C degrees for 10-12 minutes or until the toothpick inserted comes out clean.
  8. Unmould the cake and allow to cool on a wire rack.


For The Cheese Cake (B)
565g Cream Cheese (softened to room temp)
160g Castor Sugar
2 Lemon Zest
2 Tsp Vanilla Extract

3 Tbsp Plain Flour
3 Grade A Eggs
225g Plain Yoghurt

Topping (Optional)
Cocoa Powder
Whipped Cream and shredded cheddar cheese


Method

Place the sponge cake layer into an 8 inch lined removable bottom pan or springform pan. 

Preheat the oven to 125C degrees.

Using an electric mixer, cream the cream cheese with the sugar together on medium speed for about 3 minutes, until the mixture turn light and fluffy. Reduce the speed to low, beat in  3Tbsp of flour and mix till combined.

Add the eggs one at a time, beating well between each addition. Stir in the yogurt until just combined.
Pour batter into the prepared baking pan. Tap the pan lightly on a table top to get rid of any trapped air bubbles in the batter. 

Place the 8 inch baking pan into another 9 inch or larger fixed based baking pan which could sufficiently accommodate the original baking pan. I prefer to use this method rather than to secure the cake pan with aluminum foil as usually (for me) the moisture / water managed to seep through the many layers of aluminum paper I wrapped the pan with. Thus, I choose to use this method and it also saves on buying the aluminum paper.  

Bake in water bath at 120-125C degrees for 70-75 mins or till set. 

Allow the cake to cool completely at room temperature before refrigerating for at least 2 hours before serving.


Top with whipped cream or dust with cocoa powder.


  • Tip

    Mixing the ingredients

    The way you blend the ingredients is crucial: under-beating can lead to a lumpy mixture, over-beating can whip in too much air. This can result in uneven cooking, bubbles, and cracking.
  • Tip

    Keep everything at room temperature

    Keep everything at room temperature. To avoid lumps and ensure even mixing without over-beating, it is essential to have the soft cheese at room temperature before starting. Ideally, let it come to room temperature in its pack for 2 hours. If you're short of time, cut the soft cheese into chunks and leave to soften for 1 hour. It also helps to have a tabletop mixer with a powerful motor. But if you don't have one, a hand-held mixer works fine.

Sunday, June 7, 2015

夏威夷豆杂果面包 Macadamia Fruity Bread

Another great bread recipe from Alex Goh's 'Magic Bread'. This bread book had been once my daily bread bible when I started baking two years ago. As I progressed in my bread baking experience, this book has been sitting idly among the array of cook books waiting for their turn to be discovered. 

Two years later, I woke this book from its deep slumber and began leafing through it for something to bake as my forthcoming photography subject. This is how this bread recipe got selected and featured in this blog, mainly due to me wanting to use up the Grand  Manier orange alcohol and macadamia nuts previously bought for baking purposes but still left untouched in their respective storage place.

This is my second attempt at making this bread since year 2013, and during then I chose to use orange juice to soak the dried fruits instead. As for whether are there any difference between using orange juice and orange alcohol to infuse the dried fruits, I suppose there are. Since I stopped consuming alcohol after becoming a vegetarian, I usually rely on my sense of smell to gauge the taste of any non vegetarian food I prepare. This batch of macadamia fruit bread not only have stronger aromas than the orange juice infused ones, it also camouflage away the yeasty scent of the bread.

Yes yes I know, another bread making through sponge dough method. Requires slightly more steps and time to follow for every process right up until baking time. I can assure you it is an effort worth making to create this 'commercial' looking bread. A crowd pleaser.


夏威夷豆杂果面包 
Macadamia Fruity Bread

Ingredients

(A)
120g Bread Flour 高筋面粉
85g Boiling Water 滚水

(B)

280g Bread Flour 高筋面粉
60g Sugar 糖
1 Tsp Salt 盐
20g Milk Powder 奶粉
6g Instant Yeast 即用酵母粉
1 Nos. Orange Zest 柳橙皮屑

(C)

100g Cold Water 冷水
3 Egg Yolks 蛋黄

(D)

80g Butter 牛油

(E)

30g Sultanas 葡萄干
40g Golden Raisins 金黄葡萄干
40g Dried Cranberries 蔓越莓干
1-1/2 Tbsp Grand Manier / Orange Juice 柳橙酒 

(F)

20g Chopped Macadamia Nuts 切碎夏威夷豆
(Bake the nuts in the oven at 150C degrees for 10-13 mins.Chopped into fine bits and set side to cool for later use)


(G) Mexico Topping

60g Butter 牛油 (softened to room temp 四室内回温)
45g Sugar 糖
1 Egg 鸡蛋
65g Plain Flour 面粉
1/4 Tsp Baking Powder 发粉
  • Cream butter and sugar until light and fluffy. Add in egg and continue creaming until smooth. Add in flour and baking powder until evenly combined. Transfer the mixture into piping bag and set aside for later use. Any leftover toppings can be refrigerated for another 1-2 weeks for future use.

Method


Sponge Dough Method. Combine ingredients (A) and mix evenly to form a dough. Cover and set aside to cool. Refrigerate for at least 12 hours before using.

Premix E and set aside for at least an hour before using.

In the mixing bowl of a stand mixer fitted with dough hook, combine ingredients (B) and (C) together with lower speed to form a rough dough. Add in the overnight sponge dough (A) and continue kneading until all ingredients are well combined. 

Add (D) butter and continue kneading with medium speed to form an elastic dough. Once the dough can be stretched to a thin membrane without breaking, it is ready for proofing.

Transfer the dough to a slightly greased bowl and cover with cling wrap. Allow the dough to proof in a warm place for an hour or until doubled in size. I kept mine inside the idle and unheated oven for proofing.

Test the readiness of the dough with a finger lightly dusted with cake flour. The dough is ready when the dough remain indented after the finger poked into it.


Punch down the dough and divide the dough into 90g each and mould it round. Let it rest for another 10-15 mins.

Place the rounded dough onto baking mat / tray. I placed mine into  individual 5.5" muffin paper liners. Apply egg wash onto the surface and sprinkle chopped macadamia nuts. Allow the dough to proof for another 50 minutes.


Pipe the mexico topping over the dough and bake in a preheated oven at 180C degrees for 15 mins.


Do link back to Coco Sweet Tooth if you have used any information as published in this blog.


This post is linked to Cook Your Books Event #24hosted by Joyce of Kitchen Flavours


Thursday, June 4, 2015

Sweet Corn Bread 玉米面包

Another lovely bread recipe using 'starter dough / sponge dough'  method. 

Having this prepared in advance and added into the final dough ingredients provides better baked volume and structure to the bread. This method had been widely adopted by bread maker prior to the availability of bread improvers, which, I resisted using until today.  Usually I will prepare several 'sets' of the required sponge dough and store in the fridge for several days, but not any longer than that.

As for the extra buns, I would normally store them in the freezer immediately once it cooled, to retain the freshness and reduce aging of the dough.  Thaw the buns several hours before reheating , I prefer to thaw the frozen bread at room temperature overnight (kept inside the microwave oven or anywhere safe from pets / pest.  You may heat the bread under the steamer (which my hubby likes) or leave for 5-10 mins in a heated oven (preheat at 140C degrees for 10 mins then turn off the heat).  

玉米面包
Sweet Corn Bread
(Recipe credit to Alex Goh's Magic Bread)

Ingredients 
(A)
80g Bread Flour
55g Boiling Water

(B)
350g Bread Flour
50g Chicken Floss
50g Castor Sugar
4g Salt
10g Milk Powder 
6g Instant Yeast

(C) 
150g Cold UHT Milk
2 Egg Yolks

(D)
60g Unsalted Butter

(E)
150g Creamy Corn (canned type)

(F) Optional
Chicken Floss
Mayonnaise


Preparation


Sponge Dough Method.  Mix boiling water and flour from (A) until well blended to form a dough.  Cover and set aside to cool or store in the fridge overnight before using.

Combine all the ingredients(A), (B), (C) and (E)  into the bowl of a stand mixer with dough hook and mix with lower speed until all ingredients are well combined. 

Add (D) butter and continue using the mixer to knead with medium speed for another 20-25 mins to form an elastic dough.  Once you are able to stretch the dough to a thin membrane before breaking, the dough is ready for proofing.


Transfer the dough to a slightly greased bowl, cover bowl with either cling wrap or cloth. Allow the covered dough to proof in a warm place (under 28 celsius degrees)  for 1-2 hours or until doubled in size. 

Test the readiness of the dough with a finger lightly dusted with low gluten or cake flour. The dough is ready when the dough remain indented after the finger pokes into it.
Punch down the dough. Divide each dough into 10 equal portions and mould it round. Let it rest for another 10-15 mins.

Round out each portions into any preferred shapes on baking mats or by placing the shaped dough into greased baking mould.   Tuck the ends down. Lightly cover the dough with cling wrap and prepare the dough for the second proofing for 1 hr or until double in size.

Preheat the oven to 185C degrees 20 minutes before baking.

Apply egg wash over the dough. Decorate the buns with mayonnaise toppings, chicken floss
or canned corn and bake in the middle rack at 185C degrees for 15-23 mins or more (depending on the size of dough / mould used).

Enjoy.


Wednesday, June 3, 2015

Chocolate Strawberry Bread ......sinfully rich and decadent


Made these along with the batch of Mexican breads for my other half's sales team last week since they would normally stay back to work overtime during the closing week of each month. Making almost 40 buns and a batch of 20 light cheese cupcakes for the team as overtime snacks.

Indonesians love cheesey or chocolate flavored in their desserts. This could be easily observed from  the pastries and cakes sold all over the country. I am more of a fan towards coffee or mocha flavored desserts than chocolate or cheese flavored ones.  Last year when I randomly went around the neighborhood bakeries looking for coffee cake but only managed to get something close ie. Vanilla sponge cake with coffee buttercream. This is after going through several bakeries.

I still have leftover chocolate ganache from the recent strawberry chocolate chiffon cake hence I decided to use it on coating the bread as well. As expected, the bread were all taken up within minutes.

Recipe as follows......

Chocolate Strawberry Bread


Ingredients

(A)
200g Milk Water
50g Strawberry Puree 
330g Bread Flour
70g Cake Flour
70g Castor Sugar
4g Salt
1 Grade A Egg

(B)
40g Unsalted Butter

(C) Glazing / Ganache
100g Dark Chocolate (chopped)
100g Milk Chocolate (chopped)
100g Whipping Cream

(D)
Chocolate Rice


Method

Combine all the ingredients (A) into the bowl of a stand mixer with dough hook and mix with lower speed until all ingredients are well combined.

Add (B) butter and continue using the mixer to knead with medium speed for another 15-20 mins. Once you are able to stretch the dough to a thin membrane before breaking, it is considered ready for proofing. 


Transfer the dough to a slightly greased bowl, cover bowl with either cling wrap or cloth. Allow the covered dough to proof in a warm place (under 28 celsius degrees)  for 1-2 hours or until doubled in size. 

Test the readiness of the dough with a finger lightly dusted with low gluten or cake flour. The dough is ready when the dough remain indented after the finger pokes into it.

Punch down the dough. Divide dough into 10-12 equal portions and mould it round. Let it rest for another 10 mins.

Round out each portions into round balls and tuck the ends down. Arrange each dough on baking mats / muffin cups with liners accordingly. Lightly cover the dough with cling wrap and prepare the dough for the second proofing for 1 to 1-1/2 hrs or until double in size.

Preheat the oven to 185C degrees 20 minutes before baking. 


Bake in the middle rack at 185C degrees for 14-15mins.


(Chocolate Glaze / Ganache)

Place a heatproof saucepan over medium low heat for a few minutes. Remove saucepan from heat when the cream is about to simmer.  Add the chopped chocolate into the cream
mixture and gently stir a spatula or wooden spoon to distribute the chocolate through the cream until the mixture melted and turn creamy.

Allow the chocolate ganache to cool and thicken to spreadable consistency before using. 

Make sure the bread has completely cooled down before applying chocolate glazing and  topping. 

Friday, May 29, 2015

椰林风光 Coconut Flavor Kuih


This morning as I was leafing through some cookbooks, I came across a page which was bookmarked as 'tried and tested' recipe in December 2013 which immediately sprang me into digging the computer hard disk for any saved photos (if any) of this chinese dessert I attempted making 2 years ago.

To my disappointment, only one photo came into view. From the photo I couldn't quite remember how the kuih tasted but from the photo I reckoned it somehow appeared less  of those 'melt in the mouth' effect I wanted, therefore, I rolled up my sleeves and set about revisiting the recipe and adapt to whatever deemed necessary.


This time round I actually got down to using fresh coconut milk instead of the instant packet ones I used a lot whenever I make asian desserts that called for coconut milk. I am very happy with the outcome as compared with the one I did 2 years ago, which was slightly harder, like chewing hardened rubber, this one is actually smoother and silkily chewy that almost instantly glides and melts away.

Now, I finally understood why certain recipes taste best with original unprocessed ingredients. Lesson learn from this experience, always and always use fresh coconut milk for better result. For your info, I bought the grated fresh coconut 3 weeks ago and not knowing when I will actually use it, I stored it in the freezer. 

Thaw the frozen grated coconut several hours before using.  Even after thawing I find the coconut rather dry and difficult too squeeze out the milk. So I blended the grated coconut with water and sieved out the milk for use. Try it. It will be much easier than trying to do manually by hand.


椰林风光 

Coconut Flavor Kuih

Ingredients 材料 (A)
40g Rice Flour 沾米粉
40g Tapioca Flour 木薯粉
13g Potato Flour 马铃薯粉
50g Sugar 糖
100g Coconut Milk 椰浆
130ml Water 水
25ml Evaporated Milk 淡奶
1/8 Tsp Salt 盐
1 Tbsp Panda Juice 班兰叶汁 
1 Drop Green Colouring (optional) 青色素

Ingredients 材料 (B)
40g Rice Flour 沾米粉
40g Tapioca Flour 木薯粉
13g Potato Flour 马铃薯粉
50g Coconut Milk 椰浆
1/8 Tsp Salt 盐

Ingredients 材料 C
(Dissolved and Set to Cool 煮溶后待冷)

70g Palm Sugar (chopped)
200ml Water


Method

Combine ingredients (A) thoroughly and mix until sugar dissolved. Filter and set aside.
材料(A)搅拌至糖溶. 过滤待用. 

In another bowl, combine ingredients (B) and (C) evenly. Filter.
在另一个搅拌碗里,加入材料(B和C)搅拌均匀后过滤。

Apply a layer of oil onto individual muffin cups or any preferred mould and steam the empty mould for several minutes before using. 
先将个别松饼杯或任选模具的表层 抹上油, 使用前蒸空模几分钟。

Pour 1-1.5 Tbsp of the (A) mixture into the mould and steam under medium high for 4 minutes.
倒入2大汤匙青色粉浆, 蒸4分钟.

Pour 1-1.5 Tbsp of the palm mixture (B&C) onto the steam green mixture (A) layer and steam  under medium high heat for 4 minutes.
之后在蒸熟青色粉浆层上倒入2大汤匙椰糖粉浆, 蒸4分钟.


Repeat the steps till mixtures are used up. Steam the last layer for 10 minutes.
重复以上步骤直到所有粉浆蒸完为止. 最后一层蒸10分钟.


This was the only photo taken from the first attempt 2 years ago.


Strawberry Chocolate Chiffon Cake


Bought several baking books during my recent trip back to Malaysia, and this recipe is derived and adapted from the book name 微笑的戚风齿蛋糕 published by韩版国麒麟出版社. According to the book (written in Chinese language), this publisher is one of the recipients of the 世界美食图书大奖 The Gourmand World Cookbook Award for publishing many quality recipe books.

This book features beautiful looking chiffon related cakes with detailed pictorial step by step illustrations which I find extremely helpful and encouraging, particularly for me who ALWAYS have phobia doing egg whites separation and beating of meringue.

For this recipe, I only adapted 60% from what is taught technically and methodically from the book. The ingredients and glazing part I just did on impromptu based on what ingredients I have or wanted to get rid of.


As you may have noticed from my recent posting, there are quite a handful of strawberry related postings. This is due to my impulse purchases of strawberries from a street peddler who went around under the hot blazing sun selling pre-packed organic strawberries. I turned soft whenever seeing the  under privileged working hard selling merchandise. 


Strawberry Chocolate Chiffon Cake
(Recipe adapted to fit my 22cm Chiffon Pan)

5 Egg Yolks (Grade A Eggs)

65g Castor Sugar
75g Corn Oil
60g Strawberry Puree
25g Water
1 Tsp Vanilla Extract
Pinch of Salt
130g Cake Flour (Sifted)

6 Egg Whites (Grade A Eggs)
65g Castor Sugar


Chocolate Glaze
150g Cooking Chocolate (chopped)
300g Whip Cream / Cooking Cream
Fresh Strawberries


Method


Preheat oven to 160C degrees. 

In a large mixing bowl, whisk the egg yolks and sugar until the mixture turns light and creamy. 

Add oil and gently stir to combine. Add strawberry puree and stir to combine. Follow by water, vanilla extract and salt. Stir to combine.

Sift the flour over the batter and use a hand whisk to combine gradually until fully incorporated. Do not over mix. Set aside.

In a clean, dry and spotless mixing bowl, whisk the egg whites with an electrical mixer at medium low speed for 1 minute, or until frothy. Gradually add in sugar and continue whisking at medium high speed until the egg whites reaches soft peak stage. The soft peak stage is reached when the peaks curl over with slightly drooped hook. The egg whites should appear smooth and glossy at this stage.

Using a spatula, gently fold the beaten egg whites into the egg yolk batter in 3 separate additions, until just blended.

Pour batter into the chiffon or any baking pan. Tap the pan lightly on a table top to get rid of any trapped air bubbles. Or you may also run a wooden chopstick by swirling 1-2 rounds over the top batter.

Bake in middle lower level of a preheated oven at 160C degrees for 45-50 mins.

Remove and invert the cake upside down to cool before unmoulding.


(Chocolate Ganache)

Place a heatproof saucepan over medium low heat for a few minutes. Remove saucepan from heat when the cream is about to simmer.  Add the chopped chocolate into the cream
mixture and gently stir a spatula or wooden spoon to distribute the chocolate through the cream until the mixture melted and turn creamy.

Allow the chocolate ganache to cool and thicken to pourable consistency before using. 

Make sure the cake has completely cooled down before applying chocolate ganache over it.

Decorate with strawberries before the chocolate sets.


Printfriendly

Related Posts Plugin for WordPress, Blogger...