Wednesday, May 6, 2015

Brioche Loaf 布里欧土司


Brioche bread is an highly enriched bread with a high proportion of eggs and butter. This bread has the richer aspect of a pastry, somewhat similar to french croissant despite it being made in the same way as any ordinary bread. 

Unlike french pastry whereby the butter is added and rolled onto the pastry dough, butter can be added almost immediately along with the other ingredients during the early process of making Brioche bread. It high content of eggs and yolks actually helps to emulsify and bind the fat into the dough.  

Since I have my bread loving buddy over in Jakarta last week, I couldn't be more please to tune to bread making mode.  

Brioche Loaf 布里欧土司
Recipe Adapted from 周老师的美食教室

Ingredients
(A) 
136g Milk
5g Instant Yeast
440g Bread Flour
136g Whipped Cream
2   Grade A Eggs
48g Castor Sugar
6g Salt
     
(B)     
48g Unsalted Butter

(C)
30g Golden Raisins

Method

Combine all ingredients from (A) & (C) into the bowl of a stand mixer with dough hook and mix with lower speed until all ingredients are well combined. 

Add (B) butter and slowly increase the speed to medium for approx.  15-18 mins, until a smooth window pane effect is formed. 

Transfer the dough to a slightly greased bowl, cover bowl with either cling wrap or cloth. Allow the dough to proof for an hour or until the dough doubled in size. 

Test the readiness of the dough with a finger lightly dusted with low gluten or cake flour. The dough is ready when the dough remain indented after the finger pokes into it.

Punch down the dough. Divide dough into 2 equal portions and mould it round. Let it rest for another 15 mins.

Lightly dust the work top with low protein flour, using a rolling pin, roll out each dough into a 12x36cm rectangle. Roll up the the rectangular dough like a roulade and place in a well greased 13x22cm bread loaf pan. Tuck the ends down.

Repeat the same process for the balance dough.

Spray some water over the dough with a fine mist nozzle. Proof the final bread dough in the bread loaf pan for 1-2 hours or until it reaches the brim of the bread pan. 

Lightly sprinkle the dough surface with water and bake the bread at the lowest rack of a preheated oven at 175C degrees for 38 mins. The bread top will start to brown after 25 mins of baking.

Remove bread mould from heat and transfer the bread onto a wire rack for cooling.


Tuesday, May 5, 2015

Pandan Kaya Rolled Cake


Made this roll of Pandan Kaya from the extra layer of leftover cake slice from the Pandan Kaya Layer Cake yesterday. The original recipe of the said cake was so soft and cottony that it would be a waste to throw the leftovers away.

Given that this mini roulade cake only took place 1 day after the baking and being exposed wouldn't be in the ideal shape for rolling. To make it worse, the leftover layer was really thin to begin with. Nevertheless, I am posting this as a record and reminder for me to apply this recipe as the cake base for my next rolled cake project. 

The outcome was too soft and cottony to be missed. I have adjusted the cake recipe to suit the cake pan size of 30x30x2cm as my future rolled cake base.


Pandan Kaya Rolled Cake
(Recipe for a 13" Rolled Cake)


60g Castor Sugar
60g Egg Yolks
60g Corn Oil
1-2 Tsp Pandan Paste
40g Cake Flour
1/8 Tsp Salt

140g Egg Whites
60g Castor Sugar

Butter (for greasing pan)

Filling
80g Home Made Kaya 


Directions


  • Grease and line pan with 30x30cm parchment paper. 
  • Preheat oven to 200C degrees.
  • Whisk egg whites on medium slow speed till thick foam forms. Gradually add castor sugar whilst still whisking and continue whisking the eggs are at soft peak stage. Reduce speed to low and continue to whisk till firm peak stage.
  • Add yolks to white in 4 batches. Whisk on slow speed until evenly mixed after each addition. Sift 1/2 of cake flour into mixture. Add salt. Sift remaining cake flour into mixture. Mix with whisk till just evenly combined.
  • Add pandan paste and corn oil. Fold with spatula till just evenly mixed, while occasionally banging  against worktop 2-3 times. 
  • Slowly pour batter into cake pan. Spread with spatula as evenly as possible, pushing batters into corners of the pan.
  • Jiggle till batter is level. Tap pan against worktop twice. Bake on middle shelf for 10-11 mins or when middle of cake is springy when lightly pressed. 
  • Remove pan from oven. Drop pan from 30cm high onto the table top, 2-3 times.
  • Unmould cake onto wire rack. Peel parchment from sides of the cake. Leave till cool. 
  • Place cake on new sheet of parchment paper, face down. Remove parchment paper from bottom cake. Spread evenly with kaya spread or any preferred cream.


Strawberry Cranberry Pull Apart Bread


Found an interesting bread recipe from Minty's blog's so here I am trying out with major adaptations according to whatever ingredients I have at hand. Her recipe calls for blueberries which I am short, after this attempt I have made a mental note to make a second go on the same recipe with fresh blueberries soon.


Despite receiving many compliments for the bread, I personally find my version of this recipe a wee bit sweet. Please adjust the sugar usage according to your preference.

This bread is best eaten straight out of the oven, and, a perfect accompaniment to a cup of hot tea. Enjoy!

Strawberry Cranberry 
Pull Apart Bread

Ingredients
(A) 
60g Bread Flour
2 Tsp Instant Dry Yeast
130g Lukewarm Water

(B)
450g bread flour
1/2 Tsp Salt
150ml Strawberry Puree
50ml Sour Cream
1 Tbsp Milk or more
50g Olive Oil

(C)
40g Dried cranberry
60g Almond Flour
90g Raw Sugar
1 Tsp Cinnamon Powder (Optional)

(D)
40g Salted Butter, melted

(E)
Chocolate Buttons


Directions


  • In a small bowl, combine ingredients (A) bread flour with yeast and lukewarm water into a thick paste.  Cover and leave at room temperature until the mixture becomes foamy.
  • In a mixer fitted with dough hook, combine all ingredients (B) together until evenly mixed. Add in the paste from (A) and continue kneading until the dough becomes smooth and elastic. Once the dough is able to stretch to form a window like thin membrane without breaking (window pane test), transfer the dough into a lightly greased bowl and cover with cling wrap.
  • Place the bowl in a warm place to allow the dough to proof and rise until doubled in volume. To ascertain readiness, poke a floured finger into the dough. When the dough springs back immediately, it is under proved and needs more time to proof further.
  • In a food processor, combine ingredients from (C) until well combined. Set aside for later use.
  • Once the dough has doubled in size, gently deflate the dough with your hand. Roll the dough into a rectangle and using a pizza cutter, cut the dough into 5 equal strips.
  • Brush melted butter (D) liberally on the first strip of dough and sprinkle evenly with (C) the cranberry almond flour mixture.
  • Stack a second strip of dough over the first one, brush with melted butter and sprinkle evenly with cranberry almond mixture (C). Repeat the steps with the rest of the dough strips until you get a stack of 5 strips, all buttered and topped with cranberry almond  flour mixture.
  • Then slice the stack crosswise through all the five layers, into 6 equal rectangles. Transfer these square stacks of dough into the two prepared loaf pans, with cut edges facing up, side by side. Gently insert chocolate buttons (E) evenly in between each layer of the dough. Cover with cling wrap and leave it to proof until almost doubled.
  • Bake in a preheated oven (175 deg C) for about 40 minutes or until brown.
  • Remove the bread from the pan immediately and brush the top with melted butter (D), optional.


page3image30272


Wednesday, April 29, 2015

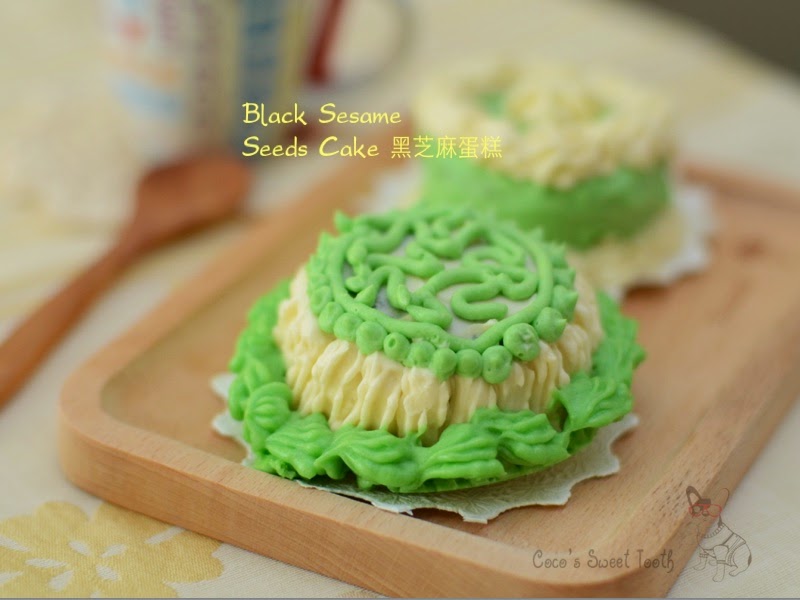
Black Sesame Seed Cake 黑芝麻蛋糕


Last weekend I decided to try out this recipe which I have bookmarked among my baking books collection. It is a relatively easy to make cake with minimum fuss with the usual preparation procedures as many other cake. 

The reason why I chose this recipe  was more towards the sesame part as I am a fan of sesame products and have used lots of sesames in cooking, particularly the oil. A good friend of mine gave me a kg pack of black sesame seeds some time ago and no matter how hard I tried I just could finish consuming it. Through this recipe, I was hoping to clear up the supply and also to find out for myself how it actually taste in baking. 

For the icing cream, you may use any frosting recipe of your preference.  This is the original version of icing proposed by the author of this recipe. Cake frosting is the part I am still shunning away from.  Instead of baking and icing the entire cake as per what the recipe called for, I baked mine in muffin cups and decorate the top with the proposed icing.


Black Sesame Seed Cake

Ingredients (A)
5 Grade A Eggs
140g Castor Sugar
160g Cake Flour
80g Black Sesame Seed Powder
40ml Fresh Milk
1 Tsp Ovalette (Optional)

(B)
200g Butter

Icing Cream (C)
100g Shortening
120g Butter
150g Golden Syrup
1/2 Tsp Vanilla Essence

Pandan Coloring

Method

Preheat oven to 170C degrees. Line bottom of a 13" x 13" x 1" baking pan, Set Aside.

Blend A with blender at high speed for 5 minutes till light and fluffy. Set Aside

Blend B till thick and creamy, gradually fold in batter. Pour batter evenly into prepared  baking pan and bake for 20-25 minutes. If using muffin cups 15-18 mins baking time.

Icing Cream
Blend butter until soften. Fold in shortening and whip till fluffy. Add in vanilla essence and golden syrup and mix till well incorporated. Scoop out a small portion and add pandan coloring. Stir well and set aside.

Cut the cake horizontally into 3 layers. Spread icing cream over the first layer of cake, place second layer onto it, then spread another layer of icing cream over and place the 3rd layer of cake on top (not applicable for cake baked in muffin cups).

Cover the cake with icing cream.

Pipe some green icing onto the cake and decorate as desired.


Monday, April 27, 2015

Vegetarian Yam Puffs 素芋头角........Simply Yummy

I have been itching to eat yam puff for a while but have not been successful in finding vegan versions in any of the eateries I visited in Jakarta. Even if its available as meat free, there would still be onion or garlic to consider. 

Under my desperate circumstances, I ended up adapting from a regular yam puff recipe into a vegetarian version.

The outlook may not seems as appetizing as the restaurant made ones...but the taste do taste like one. Worth the effort making it. Handling and wrapping the dough might be a 'wee bit' messy and challenging.

素芋头角
Vegetarian Yam Puffs

For The Dough
600g Yam

100g Wheat Flour
100g Shortening

Seasoning For Dough
1/4 Tsp Five Spice Powder
3/4 Tsp Salt
1/2 Sugar

Method 
Peel Yam and diced into cubes. Steam until softened. Add wheat flour and shortening to the cooked  yam and mix well. Transfer the mixture onto a slightly floured work top, mash the mixture with the face of the knife. Add in Seasoning and knead until well combined. Set Aside.


For The Fillings
20g ginger (finely cut)
30g Diced Vegetarian Meat ( I substitute with Radish)
30g Diced Carrot
50g Diced Vegetarian BBQ Pork 
50g Diced Chinese Mushrooms
30g Green Peas
100g Mangkuang, shredded
300ml water

Seasoning for Fillings 
2 tbsp vegetarian oyster / mushroom sauce
1 Tbsp Light soy sauce
1 Tbsp Dark soy sauce
1/2 Tsp Salt
1 Tbsp Sugar
3-4 Tbsp Sesame Oil
Oil For Frying
1 Tbsp each (Tapioca Flour, Plain Flour mix with Water)

Method

Soak diced vegetarian meat in water for 1/2 hour, squeeze out excess water.

Heat up sesame oil in a pot, saute ginger until fragrant. Stir fry all the diced ingredients till fragrant.   Add water and the balance of the ingredients and continue stir frying for another 5-10 minutes or until cooked. Add seasoning and cook till it boils. Lastly add in flour and tapioca flour solution. Remove and set aside for later use.

Divide the yam dough into 35g each. Flatten and place a spoonful of filling in the center. Wrap the fillings and seal the edges tightly. 

Heat up a pot of oil. Deep fry the yam balls till golden brown. Serve.


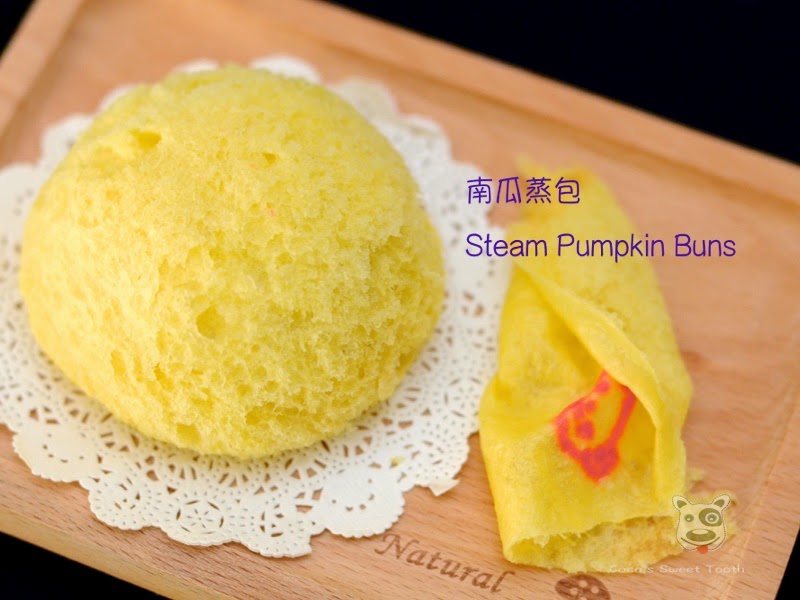
Pumpkin Pau 南瓜蒸包


Following my recent posting on pumpkin bread, I decided to adopt this ingredient into steam buns for its rich golden color and also the nutritional value it carry. Try choosing pumpkins with brighter orange color, the stronger color tends to be riper and sweeter in taste. And also, the concentration level of the pumpkin puree may differ, so do pay extra attention to the amount of water added to the dough. You may need to adjust the amount of water to be added to the dough accordingly.  For pau making, it is not required to knead the dough until it passes the membrane test. Once the kneaded dough becomes manageably soft and shiny, it's ready for proofing. 

I have studied many recipes on Pumpkin steam pau and not all of them propose the same cooking / steaming time. To be on the safe side, I opt to apply the steaming time based on previous pau recipes I had successfully experimented. 

Pumpkin Pau 南瓜蒸包

To Make Pau Skin (A)
1 Tsp Instant Yeast
160ml Water

120g Pumpkin Puree 

330g Pau Flour (sieved)
50g Caster Sugar
1 Tsp / 5g Double Action Baking Powder
25g Rice Bran Oil / Salad Oil

For Fillings (B)
Any store bought lotus fillings

(if you make your own) (C)
150g Fresh Grated Coconut
35ml Water
40g Caster Sugar


Method

To make pumpkin puree, remove skin and cut into small cubes. Steam till softened. Discard water and mash it immediately while it is hot. Leave to cool.

Place enough water in a steamer pot and bring water to boil. Place a steaming rack which has cloth laid on it.

To prepare the fillings, cook ingredients (C) while stirring till it turns to pale yellow color.  Dish up and cool. I use store bought fillings. 

To prepare pau skin, mix yeast with 1/2 portion of the water well and set aside. In another big mixing bowl, combine all ingredients from (A) as well as the yeast water mixture. Add the remaining water to the dough and adjust based on the concentration of the pumpkin puree. You may stop adding water once a rough dough is formed. Transfer the dough to a slightly floured work table and knead for approx 20 mins or more till the dough becomes shiny and soft. I did mine in a stand mixer for the first 15 minutes before kneading by hand.

Place dough in a slightly oiled bowl and wrap with clingfilm and proof for 30 mins.

Lightly dust the work table with flour. Gently punch down the dough to deflate the air and knead for 1-2 minutes.

Divide dough into 16 portions. Roll each portion into a ball and then flatten. Place a spoonful of filling into the centre. gather the edges, seal the opening and lay each dough ball downwards on a parchment paper or muffin liners.

Repeat the process for remaining 15 portions.

Cover the pau with clingfilm and proof for 30 mins until double in size.

Arrange the pau on the steamer rack and steam over medium high heat for aproximately 15-20 mins (depending on size of the pau) or till cooked.  Turn of the heat.

Open the steamer lid slightly to release the heat and let it stand for another 3-5 minutes before removing the lid. This is to prevent the pau from shrinking after cooling.


Thursday, April 23, 2015

Mocha Layer Cake

Mocha Layer Cake


It's been almost a year since I last played with cake frosting, the part which I just couldn't do well. I have tested many types of frosting but the outcome was not pretty. 

Seeing that there is leftover whip cream lying around in the fridge, I decided to give it a go without much expectations. Leafing through the neglected baking books in the study I found this relatively easy and less time consuming recipe to try out. The original recipe calls for the using of 3 separate 7 inch shallow cake pans but I only have 1 hence I just bake the entire recipe on a standard 7" round cake pan and worry about the layering the cake later.

True enough the layering is tough for novice baker like me as the cake was rather crumbly and instead of making 3 layers, I settled for 2 layer...phew! Cold sweat ! My advice would be to follow the recipe and bake with at least 2 separate cake pans if you don't have many spare baking pan of the same size. 

While layering the cake, lots of crumbs came loos. So, I kept it for use in decorating the sides of the cake while only opting chocolate shaving on the top surface of the cake. The feedback from my maid was the chocolate being too sweet. Luckily I cut down on the castor sugar from 120g to 90g and in the end, the using of the cake crumbs for the side also helps to even out the sweetness. 

Recipe adapted from the book "Simple & Delicious Desserts" published by Love Food.


Mocha Layer Cake
(Servings - 8 pax)

Cake

Butter (for greasing)
250g Self Raising Flour
1/4 Tsp Baking Powder
4 Tbsp Cocoa Powder
95g Castor Sugar
3 Grade A Eggs
2 Tbsp Golden Syrup
150ml Corn Oil
150ml UHT Milk

Filling / Topping

1 Tsp Coffee Powder
1 Tbsp Boiling Water
300ml Double Cream
2 Tbsp Icing Sugar

Decoration

50g Chocolate Shavings
Loose Cake Crumbs (optional)
Icing Sugar (for dusting)


Method

Lightly grease 3 shallow 7" cake pans. I bake mine using one standard 7" cake pan (bottom and side line with parchment paper) instead of what the recipe calls for.

Sift the flour, baking powder and cocoa powder together into a large bowl. Stir in the castor sugar. Then make a well in the center. Add eggs, syrup, oil and milk to the well and gradually beat in with a wooden spoon to form a smooth texture. Divide the batter between the prepared cake pans (if any).

Bake in a preheated oven at 180C degrees for 35-40 mins, or until springy to the touch. Leave to cool slightly in the cake pan before transferring to a wire rack to cool completely.


To make filling, dissolve the coffee in the boiling water. Add coffee mixture into a mixing bowl containing the double cream and icing sugar. Whip at high speed until the cream starts to hold its shape. Apply the cream to sandwich the 3 layers of cake together. I only layered mine  to 2 layers. Spread the remaining cream over the top and side of the cake.

To decorate, lightly press the chocolate shavings into the cream on the top as well as the side of the cake. I did mine with the cake crumbs (for the sides) and chocolate shavings (for the top).

To serve, lightly dust with icing sugar.


Printfriendly

Related Posts Plugin for WordPress, Blogger...