Showing posts with label Liquor Cakes. Show all posts

Friday, August 4, 2017

南瓜戚风蛋糕 Sweet Pumpkin Chiffon Cake


Hello everyone, I guess you must be wondering why I haven't been posting any recipes for the past one month.  I even received a message from an avid blog supporter showing her concern over my missing in action.
大家好,我整整一个月没在博客里出现而相信您可能也会注意到。近期我还收到一个热心网友的留言关注着我的状况。

Truth is, I have been extremely occupied traveling to and fro between Malaysia and Indonesia the past few months due to family matters. From the look and progress of the issue, I will be tied up with and left with little time to indulge in my recipes ventures.
我这几个月里因为忙于家里的事务而得每个月分部飞往马来西亚及印尼之间,非常忙碌。看来接下里的月份我还是会继续繁忙着,因该不会有以往般的时间享受烹饪乐。


Meanwhile, thank you for staying with my blog. I will try to share as much recipes whenever my schedule permits.
同时,我很感谢您一直以来的支持,以后只要我的行程充许的话,一定会继续尝试不同美味的食谱与你分享。
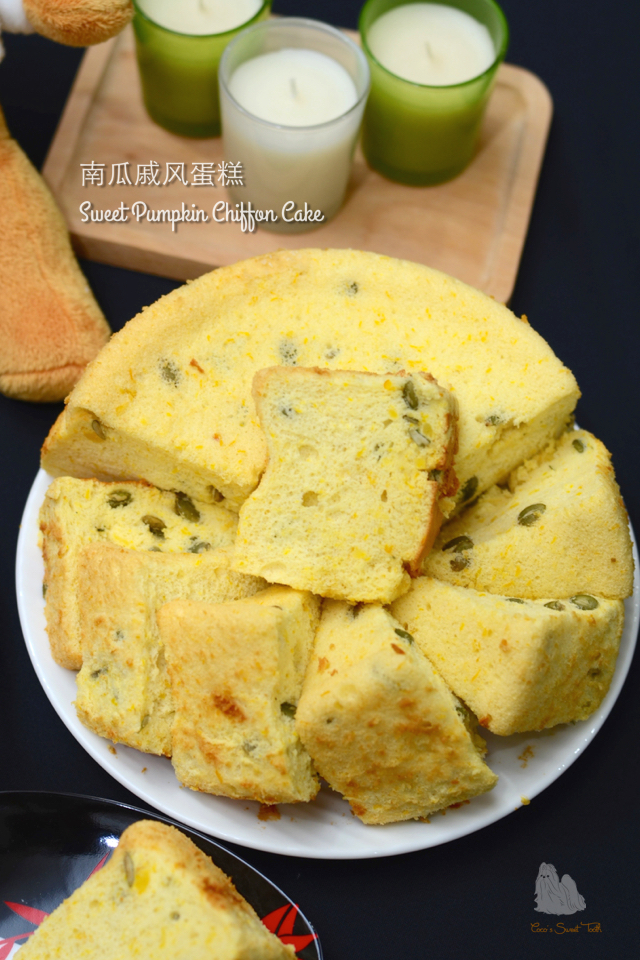


南瓜戚风蛋糕
Sweet Pumpkin Chiffon Cake

Ingredients 材料

(A)

105g Pumpkin 南瓜 (steamed and mashed 蒸熟搅成泥)
35g Milk 牛奶
35g Olive Oil 橄榄油
8g Grand Marnier 柑曼怡酒
105g Cake Flour 蛋糕粉
6 Egg Yolks 蛋黄
1/4 Tsp Salt 盐

(B)
6 Egg Whites 蛋清
105g Golden Castor Sugar 金砂糖

(C)
50g Sunflower Seeds 葵花籽


Directions 做法


Preheat oven to 180C degrees.
烤箱预热至180C度。

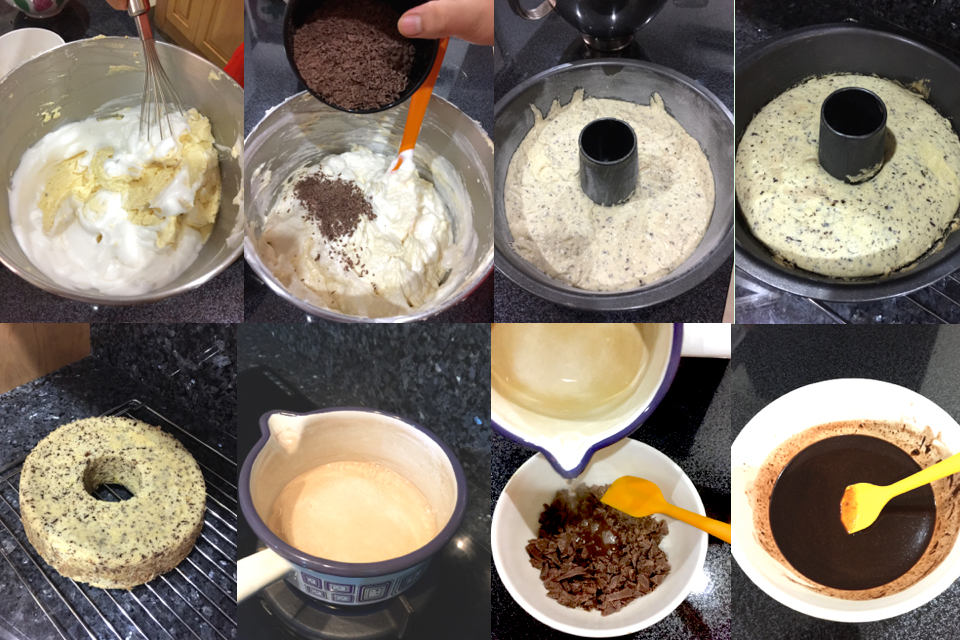
Combine mashed pumpkin, salt, milk, grand marnier and olive oil (A) into a mixing bowl and whisk until combined.
将南瓜泥,盐,牛奶,柑曼怡酒及橄榄油A混入盆中用打蛋器搅拌均匀。

Sift in cake flour (A) in 2 batches. Add egg yolks to combine. Whisk to mix until smooth with no visible lumps. Set aside.
再把蛋糕粉料A分两次混入南瓜蛋糊里搅拌均匀,成为无粉粒的面糊。搁置待用。


In another dry and grease free mixing bowl, beat the egg whites (B) until frothy. Add in castor sugar in 2 batches and continue beating until stiff peaks.
把蛋白放入一个干燥即干净搅拌盆里,用打蛋器把蛋白B打出一些泡沫,然后分次加入砂糖,打成尾端挺立的蛋白霜即可。

Transfer 1/3 of the egg white meringue into the cake batter and carefully whisk to combine.
取1/3蛋白到蛋糕糊中,用橡皮刮刀轻轻翻拌均匀(从底部往上翻拌,不要划圈搅拌,以免蛋白消泡)。

Transfer the cake batter mixture back into the meringue bowl and fold until evenly mixed.
然后把蛋糕糊转入蛋白霜的盆中,用同样的手法翻拌均匀,直到蛋白和蛋糕糊充分混合。

Fold in sunflower seeds (C) to combine.
最后把葵花籽拌入。


Transfer the final cake batter into an 8 inch chiffon cake pan. Lightly tap the pan on the tabletop twice to release the big bubbles.
将混合好的蛋糕糊倒入8寸戚风蛋糕模具,抹平,用手端住模具在桌上用力震两下,把内部的大气泡震出来。

Bake in the middle rack of a preheat oven at 180C degrees for 10mins then lower temp to 150C degrees and bake for another 30-35 mins.
烤模送入已预热好至160C度的烤箱中层,烘烤约50分钟直到蛋糕熟透即可。

Once the cake is out of the oven, invert the baking mould over a glass bottle to allow to cool completely before unmoulding.
蛋糕出炉后,马上倒扣在玻璃瓶上散热。待完全冷却后即可脱模。


Do link back to Coco Sweet Tooth if you have used any information as published in this blog.

Friday, December 30, 2016

巧克力朗姆奶油乳酪蛋糕 Chocolate Rum Cream Cheese Pound Cake


It's been more 2 weeks since I laid hands on the oven as I was back in Malaysia for the winter solstice festival. Since we didn't get to celebrate Christmas with my buddies this year we didn't eat much as well. Now being back to Jakarta for 3 days and well rested I decided its time to make a simple pound cake for the household staff.
自从近期会马来西亚和家人一起度过冬至团圆直到圣诞节才回印尼的两个星期里都没做任何烘焙。今年的圣诞假期里都没跟朋友一起庆祝,也因此没什么品尝到以往般的食品。如今回到雅加达三天而又充份的休息后,心里又开始燃烧着烘焙之火便制做了一道简易即浓香的奶油乳酪蛋糕给予家中的员工们。

Unlike most pound cake which are dense, this is an extremely soft and silky version which I am totally happy with.
一般的奶油磅蛋糕都比其他蛋糕结实而偏硬,这道食谱制做出来的磅蛋糕却是松软及令我超满意!

Happy baking!
祝您有个愉快的烘焙时光!


巧克力朗姆奶油乳酪蛋糕

Chocolate Rum Cream Cheese Pound Cake

Ingredients 材料
(A)
235 g Unsalted Butter 无盐奶油 (soften to room temp 温室回温)
175g Cream Cheese 奶油乳酪 (soften to room temp 温室回温)
150g Castor Sugar 细砂糖
1/2 Tsp Salt 盐
5 Tbsp Full Fat milk powder 全脂奶粉
4 Egg Yolks 蛋黄 (large 大号)
2 Tbsp Pure Vanilla Extract 香草精
3 Tbsp Rum 朗姆酒
1 Tbsp Kahlua Liquor 甘露咖啡力娇酒
235g Cake Flour (sifted 过沥)
2 Tbsp Whipping Cream 淡奶油
60g Milk Chocolate (grated 切丝)

(B)
4 Egg Whites 蛋白 (large大号)
50g Castor Sugar 细砂糖
1/2 Tsp Cream of Tartar 塔塔粉


Method 做法


Preheat oven at 150C degrees. Grease and flour a 23 cm tube pan. Set aside.
烤箱预热至150C度。准备一个涂抹奶油及撒上面粉的23cm中空蛋糕模具。搁置备用。


In a mixing bowl, cream butter, cream cheese, sugar and salt on medium speed until smooth and well combined. 
把奶油,奶油乳酪,砂糖和盐一起倒入搅拌盆以中速搅打混匀。

Add milk powder and continue beating on medium speed for 6-7mins until pale and fluffy.
再加奶粉继续以中速搅打6-7分钟将奶油打至松发转淡白色。


Add in one egg yolk at a time. Repeat the step until all egg yolks are fully incorporated.
接着加一粒蛋黄,混匀后才连续以同样的步骤分次把蛋黄混入至完全混匀即可。

Add rum and kahlua mixture until combined. Add vanilla extract and mix on medium speed till incorporated and no visible signs of liquid.
这时便可加入朗姆酒和甘露咖啡力娇酒混匀。再加香草精一起以中速彻底的把液体混入奶油霜里。

With the mixer on low, add 1/2 portion of the sifted flour and whipping cream. till combined. Add remaining flour to incorporate. Do not overmix to develop the gluten or the cake will turn out dense and heavy.
将搅拌器的速度调低,先把1/2过沥蛋糕粉和淡奶油混入奶油霜里,混匀后再把剩余的半份蛋糕粉混入。切记不要过度搅拌以免面糊起筋而导致蛋糕体过度密实。


In another clean and grease free mixing bowl, beat egg whites (B) until frothy. Add castor sugar and cream of tartar in 2 additions. Continue to beat until firm peaks.
蛋白B先用打蛋器打出一些泡沫,然后分两次加入细砂糖和塔塔粉打成尾端挺立的蛋白霜。

Transfer 1/3 of the beaten egg whites into the cake batter, use a hand whisk and mix to combine.  Lightly fold in the remaining egg whites  and grated chocolate into the batter while try to avoid deflating the batter.
取出1/3份量的蛋白霜混入蛋糕糊中,用打蛋器把蛋白霜混入蛋糕糊,搅拌均匀后才把剩余的蛋白霜和巧克力碎混入蛋糕糊。再用橡皮刮刀轻轻及快速的把蛋白霜混匀,尽量避免过度搅拌以免打散蛋糕的气体。

Pour batter into the tube pan and tilt pan to level the batter. Drop the pan on the kitchen top to dispel
any air bubbles.
将蛋糕糊倒入模具,稍微倾斜模具来平放面糊。蛋糕模未进入烤箱前先在桌面上大力的摔敲一下去散任何气泡。


Bake cake at the second lowest level of a preheated oven for 50 mins or until a skewer inserted comes out clean.
把蛋糕转入已预热的烤箱中下底层烘烤50分钟至蛋糕熟透即可。

Allow the cake to cool slightly on the cooling rack for 20 mins before unmoulding and placing onto the rack to cool completely.
烤熟的蛋糕和模一起放置凉架20分钟后才脱模继续摆置铁架待凉。

Store cake in an air tight container or seal in cling wrap to retain the moisture until consumption.
冷却好的蛋糕建议放入密封的容器或是采用保鲜膜包上保湿。


(C) Glaze 巧克力淋酱 (Optional 自选)
80g Grated Milk Chocolate  巧克力碎
50g Water 清水


Bring water to boil. Pour over grated chocolate and stir until combined. Pour glaze over the cooled cake. Serve.
把水煮滚离火,立刻倒入巧克力碎不停搅拌至完全融化混合均匀即可淋在蛋糕上品尝。


Do link back to Coco Sweet Tooth if you have used any information as published in this blog

Thursday, November 24, 2016

咖啡朗姆核桃马芬 Coffee Rum Walnut Muffins


Sharing another yummy rich coffee liquored cake recipe adapted from Carol Hu's "The First Book of Baking for Beginners". This is one of the best reference baking books which helped me a lot when I first went into baking 4 years ago. All her books are packed with lots of practical recipes with step by step pictorial illustrations with high success rates. 
这道浓厚咖啡酒蛋糕是取自于湖涓涓的‘烘焙新手必备的第一本书’中所修改制做的。从我四年前开始学习烘焙至今,她的书籍是我众多的食谱书籍中给予最多帮助的书籍之一。书籍里所呈现的食谱都很生活化,食谱种类多样化而且还附上了每个制做过程的图片,只要跟着方式做很少会有失败的现象。


咖啡朗姆核桃马芬 
Coffee Rum Walnut Muffins

Ingredients 材料
(A)
100g Walnuts 核桃

(B)
125ml Milk 鲜奶
4 Tsp Instant Coffee Granules 即溶咖啡粉

(C)
200g Butter 奶油 (softened to room temp 室温回温)
160g Castor Sugar 细砂糖
5 Large Eggs 大鸡蛋 (room temp 室温)
2 Tsp Rum 朗姆酒
250g Cake Flour 低筋面粉
1.5 Tsp Baking Powder 泡打粉


Directions 步骤


Lightly toast the walnuts (A) at 150C degrees for 7-8 mins until crispy. Allow to cool before chopping to smaller bits. Set aside.
核桃A放入烤箱以150C度烤7至8分钟至香脆,放凉后切碎,搁置待用。  

Heat up milk (B) in the microwave oven for a minute. Stir in instant coffee (B) until dissolves. Set aside to cool before using.
鲜奶B采用微波炉叮热一分钟,接着把即溶咖啡粉B倒入混合均匀放凉备用。

Combine cake flour and baking powder (C) together into a bowl. Sift and set aside.
低筋面粉加泡打粉C一起混入小碗,用沥网过滤,搁置待用。


Preheat oven to 170C degrees.
烤箱预热至170C度。

Cream butter together with castor sugar using an electrical mixer until pale and fluffy. 
把奶油和细砂糖用打蛋器搅打至泛白霜状。

Add beaten eggs (C) in 4-5 additions until fully incorporated.
鸡蛋C打散分4至5次加入奶油霜,每次确认搅拌均匀才加入下一次。

Add rum and mix till combined.
再倒入朗姆酒,搅匀。

Alternate between adding sifted flour mixture and coffee mixture into the butter eggs mixture in 2 additions until incorporated.
又再把过沥的粉料及咖啡牛奶各自交替分两次加入至搅拌均匀即可。

Fold in 3/4 of the chopped walnuts (A) to combine. 
将3/4的碎核桃均匀地拌入面糊。


Spoon batter into the prepared cupcake liners till 3/4 full.
用汤匙把面糊舀入纸杯中至七分满即可。

Sprinkle the balance 1/4 walnuts onto the surface of the cake batter.
最后把剩余的1/4核桃碎撒在蛋糕面糊上。

Bake in the middle rack of a preheated oven at 170C degrees for 10 mins then reduced to 160C degrees for another 10 mins until the skewer inserted comes out clean. 
送入已预热至170C度的烤箱的中层烘烤10分钟,再继续以160C度烘烤10分钟,直到竹签插入中心没有沾粘即可出炉。

Allow the cakes to cool on the cooling rack before serving.
蛋糕出炉后马上摆上铁架待凉即可品尝。


Do link back to Coco Sweet Tooth if you have used any information as published in this blog

Monday, November 7, 2016

法式咖啡柑曼怡千层蛋糕 French Style Coffee Grand Marnier Mille Crepes


This is a super easy and yet sure to impress cake recipe which is extremely yummy and more economical to make your own.
我超爱这道即简易又非常讨好的蛋糕食谱,自己亲手做总是胜于外头贩卖的法式千层蛋糕,即经济又好吃。


The listed ingredients here is sufficient to make between 22-25 of 22cm round crepe layers. If you are not keen on taller cakes, you might want to cut down on the ingredients。
在这道食谱中所描述的材料足予制成22至25片的22cm圆形蛋糕饼皮,您若是偏向于普通高度的蛋糕体可以在材料的份量上调整。


法式咖啡柑曼怡千层蛋糕
French Style Coffee Grand Marnier Mille Crepes

To Make Crepes 蛋糕皮料 (A)
775g Soya Milk 豆浆
7 Grade A Large Eggs 鸡蛋 (大号)
90g Icing Sugar 糖粉
180g Plain Flour 中筋面粉

(B)
1 Tbsp Instant Coffee Granules 速溶咖啡精
2 Tbsp Hot Water 滚水

(C)
90g Salted Butter (melted by double boiling) 隔水炖溶咸奶油

(D)
3 Cups Whipping Cream 植物性鲜奶油 
1 Tsp Vanilla Extract 香草精
1/2 Cup Icing Sugar 糖粉
3 Tsp Grand Marnier 柑曼怡酒


Method 做法

Get ready a 22-24cm non stick flat frying pan, 1 palette knife, cake turntable and an 8" flat serving plate or cake board.
準备好一个22-24cm不粘平底锅,抹刀1把,蛋糕转盘和一个8“平底盘子或蛋糕板。

Combine ingredients (B) until evenly mix. Set aside to cool for 5 mins.

将材料B一起混合入个碗内,混匀后搁置5分钟待凉备用。


Combine all ingredient (A) & (B) into a large mixing bowl and mix until the batter is smooth. Strain through a sieve. Cover batter with cling wrap and allow to sit / rest for 30 minutes. 
将材料(A)和(B)放入一个大碗里搅拌均匀后过滤, 休面30分钟.

Prepare melted butter from ingredient (C) and set aside to cool for later use.
把无盐奶油C隔水炖溶后,离火,搁置待用。

Add in melted butter to batter (A) and mix well just prior to frying the crepes. 
煎蛋糕层之前加入溶化的无盐奶油拌匀.


Heat a non-stick frying pan over medium heat. Use a ladle to scoop the crepes batter into the pan while tilting to lightly fill the pan with the cake batter. Pour off any excess batter back into the mixing bowl. Cook crepe until the surface starts to bubble and the bottom layer has set.
以中火预热平底锅,用勺子舀入适量的面糊,迅速将锅转一圈至面糊薄薄地沾满锅底直到面皮底面煎熟。尽量不要倒入过多面糊,若有表面上有剩余的面糊尽可倒回面糊碗中。


When the edges turn to pale golden, use a spatula to ease away the layer from the pan. At this point, you may carefully lift up the crepe by hand or any other tools to make sure the crepes does not break. Place the cooked crepes on a baking tray while finishing the remaining batter. Stir well to prevent the batter from thickening before cooking each layer. Repeat the process until the batter is all used up.当饼皮煎至边沿微黄时, 用划刀把饼皮划离锅, 再轻轻的用手把烧好的饼皮取出放在在一个容器或烤盘上, 重复做法把面糊完成. 千万要记得每当倒入面糊入锅时必须先搅匀, 以防止面糊浓稠。

Combine all ingredients (D) into a large mixing bowl and beat with a hand held electric hand beater / mixer until thickened and stiff。Set aside.
将材料(C) 倒入一个大盆中然后用手持电动打蛋器将植物性鲜奶油, 香草精,糖粉及柑曼怡酒精打至硬发。搁置待用。 


To assemble cake, place cake board or plate on the turntable. Place one piece of crepe layer on the board / plate. Spread a thin layer of filling on top. Stack on another piece of crepe. Lightly flatten each layer with palm to sandwich the cream onto the crepe. Repeat the process until the last layer. Decorate the final layer as desired.  
组合蛋糕, 将蛋糕板放在蛋糕转盘上,铺一层饼皮,抹一层薄薄的馅料在表面,然后又再铺上一层饼皮,用手轻按餅皮中间部份使馅料分布均匀。重复同样的步骤至完成。 最后一层可以随意装饰。剩余的馅料可以收藏入冰箱冷藏。

Cover the cake with wrap and chill cake overnight before serving.
把蛋糕盖好, 放入冰箱冷藏隔夜才切出享用。


Do link back to Coco Sweet Tooth if you have used any information as published in this blog.

Monday, February 29, 2016

柑曼怡海棉小西饼 Grand Marnier Sponge Biscuits


Grand Marnier is actually a orange flavored cognac liquer that originates from France in 1880. I only started using this liquor into some of my baking projects after experimenting one of dailydelicious recipes 2 years ago. Because of that, I purposely bought a bottle of that cognac hoping to introduce into more of my works. Still, a whole bottle of it is too much since my husband and I stopped drinking completely for many years.

柑曼怡也是在1880年原自法国的一种香橙味的科涅克白兰地。我是于两年前从dailydelicious的博客食谱学习采用于数些烘培上。就因此我还的别购买了一大瓶装的柑曼怡酒,为了希望可以多试验更多的食谱。此外我和先生都戒酒多年,想要快点用完这一瓶柑曼怡酒却是有点困难。


This is another lovely recipe from Carol Hu's "First Book of Baking for Beginners" which I have adapted and incorporated the use of the neglected liquor. Despite its being named as biscuits, the soft texture seem more like a soft sponge cake. Anyway, I am very happy with this recipe and very excited to share this with you. Hope you enjoy making it as much as I did.
今天这道取自湖涓涓的‘烘焙新手必备的第一本书’正好可以用上那瓶被冷落的柑曼怡酒。虽然名字上是西饼,制做出来倒是威风蛋糕松软的效果。总结上我很满意这道食谱,非常兴奋地与您分享。希望您也能如我一样享受地享受制做这道小西饼。

柑曼怡海棉小西饼 
Grand Marnier Sponge Biscuits

Ingredients 材料
(A)
2 Egg Yolks 蛋黄
10g Castor Sugar 细糖
20g Corn Oil 玉米油
20ml Milk 鲜奶
2 Tsp Grand Marnier 柑曼怡酒
40g Cake Flour 蛋糕粉

(B)
2 Egg Whites 蛋白
1 Tsp Lemon Juice 柠檬汁
30g Castor Sugar 细糖

(C)
Icing Sugar 糖粉

(D)
90g Unsalted Butter 无盐牛油
50g Icing Sugar 糖粉
1-1/2 Tsp Grand Marnier 柑曼怡酒


Method 做法

Prepare and measure all ingredients accordingly. Use cold eggs from the fridge.
所有材料量秤好,鸡蛋使用冰的。

Line baking trap with parchment paper or silicon baking mat.
烤盘上铺上烘焙纸或者烤盘垫

Preheat oven to 170C degrees.
烤箱预热170度。

Combine egg yolks and castor sugar into a mixing bowl and mix with a hand whisk till even.
将蛋黄加幼砂糖用打蛋器搅拌均匀。

Add corn oil and combine.
然后将玉米油加入搅拌均匀。

Add in sifted flour, milk and grand marnier liquor in two batches, whisk till smooth and incorporated. Set aside.
把过沥的粉料, 牛奶和柑曼怡酒精分两次交错混入,搅拌均匀成无粉粒的面糊。搁置待用。


In a dry and grease free mixing bowl, whisk the egg whites (B) until frothy. Add lemon juice and continue whisking until the meringue thicken and increase in volume before adding in castor sugar. Increase the mixer to higher speed and continue whisking until firm peaks form. 
把材料B的蛋白倒入另一个搅拌盆里,用搅拌机将蛋白(B)打至粗泡状。将柠檬汁倒入继续搅打至体积变大后再把幼糖加入,以快速把蛋白打成尾端稍微弯曲的蛋白霜即可。

Transfer the egg yolk batter (A) into the beaten egg whites, use a rubber spatula to combine.
将拌匀的面糊A倒入蛋白霜内混合,以橡皮刮刀由下而上翻转的方式混均匀。


Transfer batter into a piping bag inserted with a 1cm round nozzle.
混合完成的面糊装入挤花袋中,使用1cm圆嘴挤花嘴。

Pipe and arrange a 2.5cm diameter ball onto the baking tray.
在烤盘上间隔挤上直径2.5cm圆形面糊.

When completed, dip a finger with water then smoothen the surface of the batter.
将面糊全部挤完后,手指沾水把面糊表面抹平。


Sift a layer of icing sugar (C) over the biscuits batter.
在挤完的面糊表面筛上一层糖粉(C)以免表面沾粘。

Transfer baking tray into the middle rack of a preheated oven and bake at 170C degrees for 12-14 min until the surface has browned.
送入已预热至170C度的烤箱中层烘烤12-14分钟至表面呈现黄色即可。

To prepare the sponge biscuits fillings (D), cut butter to cubes and allow to soften to room temperature. In a mixing bowl, cream the butter until pale and fluffy. Add icing sugar to combine and lastly stir in Grand Marnier until even. 
奶油馅料D做法是先将无盐奶油切小块温室回温,用打蛋器打散成乳霜状。接着加入糖粉混合后再加入柑曼怡酒精混匀即可。

Allow the sponge biscuits to cool completely before applying the butter cream fillings.
出炉完全放凉后,再将奶油馅料抹在两片饼中间后夹起来即可。


Notes:

I mix 1/2 the balance of the cake batter with 1 Tbsp of Cocoa Powder. If you would also like to make the chocolate version, you may incorporate the cocoa powder as well.
我在剩余的蛋糕糊内加入1大汤匙的可可粉来做两种不同口味的西饼。你也可以将做好的蛋糕面糊分成两份,一份加入可可粉而另一份保持原为。


Do link back to Coco Sweet Tooth if you have used any information as published in this blog. 


Printfriendly

Related Posts Plugin for WordPress, Blogger...