Showing posts with label Swiss Rolls. Show all posts

Thursday, December 1, 2016

香浓椰糖巧克力蛋糕卷 Gula Melaka Chocolate Swiss Roll


This is a great rolled cake recipe adapted from Keiko Ishida's 'Sweet Treats Made With Love'. If you do come across her book, I recommend you to get one.
这是一道好好吃的蛋糕券食谱取自Keiko Ishida's 'Sweet Treats Made With Love'. 是一本非常指的收藏的书籍,我大力推荐!


香浓椰糖巧克力蛋糕卷
Gula Melaka Chocolate Swiss Roll


(A) White Chocolate Cream 白巧克力奶油霜
150g Whipping Cream 淡奶油 (35% Fat 脂)
45g White Chocolate 白巧克力

Heat up whipping cream (A) in a saucepan. Once the cream starts to boil, pour over a bowl of white chocolates and allow the mixture to sit for 30 seconds. Stir the mixture until the chocolate dissolves and the mixture turns smooth. Allow to cool then refrigerate overnight before using.


(B) 海绵蛋糕底 Sponge Base
60g Plain Flour 中筋面粉 (sifted 过沥)
23g Rice Flour 粘米粉
60g Unsalted Butter 无盐牛油 (melted 溶化)
135g Egg Yolks 蛋黄

210g Egg Whites 蛋白
30g Castor Sugar 细砂糖
25g Gula Melaka 椰糖

Method 做法

Preheat oven to 200C degrees.
烤箱预热至200C度。

Melt butter over a pot of simmering water. Set aside
牛油放入耐热碗中,摆入已烧热的热水中隔热水融化。 搁置备用。

Combine plain and rice flour (B) together into a bowl. Sift twice and set aside.
把材料B的粉料一起混入碗里,混匀。过沥两次后搁置待用。


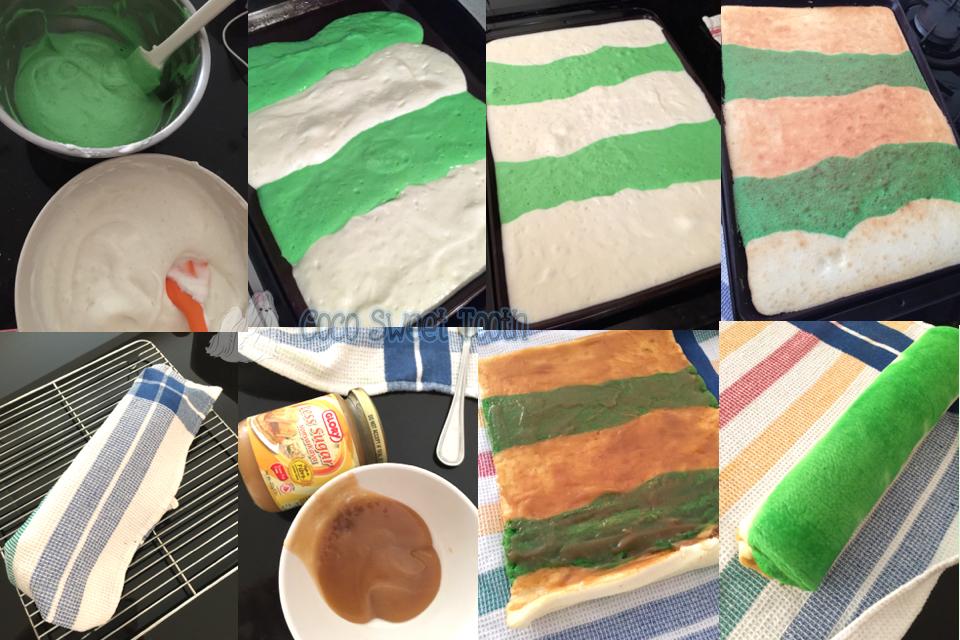
In another clean and grease free mixing bowl, beat egg whites (B) until frothy. Add castor sugar and gula melaka in 2 additions. Continue to beat until firm peaks. 
蛋白B先用打蛋器打出一些泡沫,然后分两次加入两种糖料B,继续打成尾端挺立的蛋白霜。


Lightly fold in beaten egg yolks (B) into the meringue till combined.  Add sifted flour mixture (B) and fold to combine. Lastly fold in hot melted butter (B) till incorporated.
轻轻地把打散的蛋黄B拌入蛋白霜,又再加过沥好的粉料B,用橡皮刮刀拌入均匀。最后就把溶化的热牛油B也拌入至混合成蛋糕糊即可。

Gently transfer the cake batter into a greased heat proof 27cmx31.5cm silicone roulade baking sheet. Level the surface, tap the baking sheet on the countertop to release trapped air pockets. Transfer the baking sheet into the middle rack of a preheated oven and bake at 200C degrees for 10-13 mins until the surface has browned and cake springs back when press.
把蛋糕糊轻轻的倒入已抹油的27cmx1.5cm瑞士卷垫烤盤, 用小刮板将表面抹平。烤盘在桌面上轻敲几下震出气泡后送入预热的烤箱中层以200度烘烤10-13分钟左右或至到表面呈金黄色,触感有弹性即可。


Invert the cake onto a damp kitchen towel and remove the baking sheet. Immediately roll up the cake with the kitchen towel before placing it to cool on a cooling rack.

蛋糕出炉后,马上倒扣摆上一块湿台布,把蛋糕卷垫拿开趁热用台布把蛋糕卷起来摆在铁架上散热。


Whip the white chocolate cream until light and fluffy using electric hand mixer. Unroll the cooled cake, spread an even layer of the chocolate cream over the cake.

取出隔夜的巧克力淡奶油霜,用手提打蛋机把奶油霜打至松发然后将已冷却的蛋糕卷打开,在蛋糕层上均匀的涂抹一层巧克力淡奶油霜。


Gently roll up the cake to make a swiss roll. Wrap with cling wrap and chill in the freezer for 15 mins for the swiss roll to set. Trim both ends and slice to serve.

双手轻轻的借助擀面棍把蛋糕紧密的卷起来。再用保鲜纸包裹后放进冰箱冷冻15分钟让蛋糕定型便可切去两头切块享用。


Do link back to Coco Sweet Tooth if you have used any information as published in this blog.


Saturday, April 2, 2016

蛋白班兰蛋糕卷 Egg Whites Pandan Swiss Roll


I was left with a tub of egg whites from the recent making of Indonesia lapis layered cakes 2 weeks ago. Hence I searched from the net for recipes to ease up the leftover egg whites and I came across a white cake recipe from Ann Low's blog which seemed easy and yummy.
前两个星期我因制做了两道印尼千层蛋糕而剩下一大罐的蛋清。为了用掉那些蛋清,我便在网络上寻找能帮助运用蛋清的烘培食谱,最后便于Ann Low's 的博客里看上了一道即简易而又美味的蛋白蛋糕卷的食谱。


To enhance the taste and outlook of the roll cake, I have made some adaptations to arrive at my duo flavor version.
我在原著的食谱里做了少许修改来制做这道双味蛋糕卷的版本。

Thank you Ann Low for this inspiring cake recipe. 
非常感谢Ann Low食谱给予的灵感。


蛋白班兰蛋糕卷
Egg Whites Pandan Swiss Roll


Ingredients 材料

(A)
3 Tbsp Corn Oil 玉米油
60g UHT Fresh Milk 鲜奶

20g Caster Sugar 细糖
1/4 Tsp Salt 盐
40g Plain Flour 中筋面粉
10g Rice Flour 粘米粉
1/2 Tsp Vanilla Powder 香草粉

(B)
2 Tbsp Corn Oil 玉米油
40g UHT Fresh Milk 鲜奶

15g Caster Sugar 细糖
29g Plain Flour 中筋面粉
7g Rice Flour 粘米粉
1 Tbsp Pandan Extract 班兰精

(C)
282g Egg Whites 蛋白
60g Caster Sugar 细糖

(D)
130g Pandan Kaya Jam 班兰加央

Directions 做法


Combine plain flour, rice flour and vanilla powder of (A) evenly. Sift and set aside. 
材料A里的中筋面粉,粘米和香草粉一起加入碗用沥网过筛。搁置待用。


Repeat the same process for the flour ingredients from (B). Set aside.
也把材料B的粉料如上的做法然后搁置待用。


Line and grease a 38x17cm baking tray with parchment paper. 
在38x17cm的烤盘铺上烘焙纸,纸上涂抹少许油脂。


Preheat oven at 160C degrees
烤箱预热160度。


In a mixing bowl, add corn oil, milk, salt and sugar (of A) together and mix evenly. Sift in sifted flour mixture (A) and use a hand whisk to combine. Set aside.
把材料A的玉米油,鲜奶,盐 和糖一起倒入碗,搅匀。再把之前过沥好的粉料A沥入,用打蛋器捣匀。搁置待用。


In another mixing bowl, combine corn oil, pandan extract, milk and sugar (of B) together until mixed. Sift in sifted flour mixture (B) and use a hand whisk to combine. Set aside.
在另一个搅拌碗中,把材料B的玉米油,鲜奶,班兰精和糖一起倒入碗,搅匀。再把之前过沥好的粉料B沥入,用打蛋器捣匀。搁置待用。


In a dry and grease free mixing bowl, whisk the cold egg whites (C) until frothy. Add 1/2 of the castor sugar and continue whisking until the meringue thicken and increase in volume before sifting in the balance castor sugar. Increase the mixer to higher speed and continue whisking until firm peaks and when the meringue does not drop out when the bowl is flipped upside down. This is crucial step to prevent the cake from breaking during rolling.
把材料C的冷藏蛋白倒入另一个搅拌盆里,用搅拌机将蛋白(C)打至粗泡状。将一半的幼糖倒入继续搅打至体积变大后再把剩余的幼糖沥入,以快速把蛋白打至发泡而蛋白会固定于容器内,倒扣时也不会流动即可,否则在卷蛋糕的时候容易破裂。 


Divide the meringue into 2 portions of 136g and 205g respectively.
将打发的蛋白霜分成两份量。一份为136克而另一份为205克。


From the 1st portion of 136g , add 1/3 of the beaten egg whites into the pandan cake batter (B) and fold to incorporate. Continue to fold in the balance beaten egg whites with rubber spatula until evenly combined. Set aside. 
从136克的第一份蛋白霜里,取出1/3份量的蛋白霜拌入班兰面糊B中用橡皮刮刀拌合。接着才加入其余的蛋白霜,轻轻的从容器底部刮起拌匀。搁置待用。


From the 2nd portion of 205g , add 1/3 of the beaten egg whites into the vanilla cake batter (A) and fold to incorporate. Continue to fold in the balance beaten egg whites with rubber spatula until evenly combined. 
从205克的第二份蛋白霜里,取出1/3份量的蛋白霜拌入香草面糊A中用橡皮刮刀拌合。接着才加入其余的蛋白霜,轻轻的从容器底部刮起拌匀。


Pour the 2 cake batters alternately into the prepared baking tray. Level the surface, tap the baking tray on the countertop to release trapped air pockets. Transfer the baking tray into the middle rack of a preheated oven and bake at 160C degrees for 15-16 mins until the surface has browned and cake springs back when press. 
把两种蛋糕糊交替地倒入烤盘。 用小刮板将表面抹平。烤盘在桌面上轻敲几下震出气泡后送入预热的烤箱中层以160度烘烤15-16分钟左右或至到表面呈金黄色,触感有弹性即可。


Invert the cake onto a damp kitchen towel and remove the baking tray and parchment paper. Immediately roll up the cake with the kitchen towel before placing it to cool on a cooling rack. 
蛋糕出炉后,马上倒扣摆上一块湿台布,把烘培纸撕开趁热用台布把蛋糕卷起来摆在铁架上散热。 


Heat up pandan kaya jam in microwave for 30 seconds to soften. 
把班兰加央放入微波炉30秒加热软化。


Unroll the cooled cake, spread a layer of the pandan kaya jam over the cake top. 
将已冷却的蛋糕卷打开,把班兰加央涂抹上蛋糕表面。 


Roll up the cake
再次把蛋糕卷起来。 


Once the cake is rolled up, twist the two sides of the kitchen towel / parchment paper and refrigerate the wrapped cake for 1 hour to set. 
卷完后用蛋糕纸包住蛋糕体,两端稍微扭紧,冷藏1小时待蛋糕卷定型。 


Remove parchment paper, trim both ends and slice to serve. 
去掉蛋糕纸,切去两头就可享用。 


Do link back to Coco Sweet Tooth if you have used any information as published in this blog. 


Saturday, February 27, 2016

咖啡戚风香酒卷 Coffee Liquer Swiss Roll.........Soft and Yummy!


For several days, I was itching to make a roll cake but was too occupied to do so. Finally, I mustered the determination to run through my collections of recipe books and settled for this easy and yet delicious swiss roll recipe from Carol Hu's "First Book of Baking for Beginners".


前几天我一直有着想制做蛋糕卷的冲动但因太忙而没下手。后来,自己硬着头皮立下非做的意愿才去收集的食谱书籍里找出这道简易又富酒香的美味蛋糕食谱取自湖涓涓的‘烘焙新手必备的第一本书’。

If you are a coffee person then this is just what you might want to try making. I have made some modifications from the original recipe to cater to my husband's tastebuds.

你若也是咖啡爱好者的话可以尝试制做看看。我在这道蛋糕食谱里做了少许修改来配合丈夫口味上的要求。


咖啡戚风香酒卷
Coffee Liquer Swiss Roll


Ingredients 材料

(A)
4 Egg Yolks 蛋黄
30g Castor Sugar 幼糖
32g Corn Oil 玉米油
40g Milk 牛奶
2 Tbsp Instant Coffee 即溶咖啡粉
56g Cake Flour 低筋面粉
25g Rice Flour 在来米粉

(B)
4 Egg Whites 蛋清
1 Tsp Lemon Juice 柠檬汁
50g Castor Sugar 幼糖

(C)
200ml Fresh Whipping Cream 动物性鲜奶油
30g Castor Sugar 幼糖
1 Tsp Kahlua Liquor 卡鲁哇咖啡酒


Method 做法


Prepare and measure all ingredients accordingly. Use cold eggs from the fridge.

所有材料量秤好,鸡蛋使用冰的。

Combine cake and rice flour evenly. Sift and set aside.
低筋面粉和在来米粉用沥网过筛。搁置待用。

Microwave the milk for a minute. Stir in instant coffee granules until dissolved. Set aside to cool. 
牛奶放入微波炉加热1分钟,将即溶咖啡粉加入混合,待凉备用。


Line and grease the baking tray with parchment paper. As I was using a 37cmx27cm heat proof silicone roulade baking sheet, I skip the lining part.
烤盘铺上已抹油的烘焙纸。我采用了的是的瑞士卷垫烤盤, 卷垫低也涂上油脂。


Preheat oven at 170C degrees

烤箱预热170度。


Combine egg yolks and castor sugar into a mixing bowl and mix with a hand whisk till even.
将蛋黄加幼砂糖用打蛋器搅拌均匀。

Add corn oil and combine.
然后将玉米油加入搅拌均匀。

Add in sifted flours and coffee mixture in two batches, whisk till smooth and incorporated.
把过沥的粉料,咖啡牛奶分两次交错混入,搅拌均匀成无粉粒的面糊。


In a dry and grease free mixing bowl, whisk the egg whites (B) until frothy. Add lemon juice and 1/2 of the castor sugar and continue whisking until the meringue thicken and increase in volume before adding in the balance castor sugar. Increase the mixer to higher speed and continue whisking until firm peaks and when the meringue does not drop out when the bowl is flipped upside down. This is crucial step to prevent the cake from breaking during rolling.
把材料B的蛋白倒入另一个搅拌盆里,用搅拌机将蛋白(B)打至粗泡状。将柠檬汁及一半的幼糖倒入继续搅打至体积变大后再把剩余的幼糖加入,以快速把蛋白打至发泡而蛋白会固定于容器内,倒扣时也不会流动即可,否则在卷蛋糕的时候容易破裂。

Slowly whisk in 1/3 of the beaten egg whites to incorporate into the egg yolk batter (A). Gently fold in the balance beaten egg whites with rubber spatula to combine.
取出1/3份量的蛋白霜混入蛋黄面糊中搅匀,用打蛋器轻轻地稍微拌合。接着才加入其余的蛋白霜,改用橡皮刮刀轻轻的从容器底部刮起拌匀。


Gently transfer the cake batter into a greased heat proof silicone roulade baking sheet. Level the surface, tap the baking sheet on the countertop to release trapped air pockets. Transfer the baking sheet into the middle rack of a preheated oven and bake at 170C degrees for 12-15 mins until the surface has browned and cake springs back when press.
把蛋糕糊轻轻的倒入已抹油的瑞士卷垫烤盤, 用小刮板将表面抹平。烤盘在桌面上轻敲几下震出气泡后送入预热的烤箱中层以170度烘烤15分钟左右或至到表面呈金黄色,触感有弹性即可。

Invert the cake onto a damp kitchen towel and remove the baking sheet. Immediately roll up the cake with the kitchen towel before placing it to cool on a cooling rack.
蛋糕出炉后,马上倒扣摆上一块湿台布,把蛋糕卷垫拿开趁热用台布把蛋糕卷起来摆在铁架上散热。

The colder the whipping cream the easier it is to whip. Whip the whipping cream in a chilled mixing bowl with electrical mixer from medium to high speed until fluffy. Whisk in sifted icing sugar and vanilla extract and continue whisking till stiff peaks.
这是候把材料C的动物性鲜奶油放入已冷却的容器内,用搅拌机由慢而快的速度搅打至变浓稠时加入幼糖,卡鲁哇咖啡酒继续搅打。直到打发至体积变大而不会流动的状态即可。


Unroll the cooled cake, spread a layer of the kahlua cream over the cake top.
将已冷却的蛋糕卷打开,把打发的卡鲁哇咖啡酒鲜奶油涂抹上蛋糕表面。

Place a rolling pin underneath the parchment paper the cake is sitting on. With both hands and the rolling pin to push the cake forward to roll up the cake. 
将擀面棍放在蛋糕纸下方,以双手借助擀面棍紧密的卷起蛋糕。

Once the cake is rolled up, twist the two sides of the parchment paper and refrigerate the wrapped cake for 1 hour to set.
卷完后用蛋糕纸包住蛋糕体,两端稍微扭紧,冷藏1小时待蛋糕卷定型。

Remove parchment paper, trim both ends and slice to serve.
去掉蛋糕纸,切去两头就可享用。


Do link back to Coco Sweet Tooth if you have used any information as published in this blog. 


Wednesday, January 6, 2016

法式杏仁海绵蛋糕卷 Joconde Biscuit Roll Cake


Last year I bought quite a handful of recipe books from Taobao website but only managed to read them recently. I was browsing for recipes to use up the leftover whipped cream from the making of black forest cake last week and I don't like the idea of refrigerating the cream for too long.
去年我在淘宝网上购买了很多烘焙书籍一直到今年才正式拿出来阅读。上个星期因制做了黑森林蛋糕而剩余了不少淡奶油霜,又不想把奶油收藏太久便随手去书房找个蛋糕食谱把奶油用掉。

Hence I selected a rolled cake recipe from this book 孟老师的‘美味蛋糕卷 which features only rolled caked recipes. This book has more than 50 rolled cakes recipes and bundled with 2 DVD tutorials. What a great bargain!
结果找上了孟老师的‘美味蛋糕卷’书籍。这本书全都是记载着蛋糕卷的食谱,书里头有超过50道的蛋糕卷食谱,书的内容简易还附送两个蛋糕制造过程的DVD。超值的食谱书籍啊!


法式杏仁海绵蛋糕卷
Joconde Biscuit Roll Cake

Ingredients 基本材料
(A)
20g Unsalted Butter 无盐奶油
60g Almond Powder 杏仁粉
30g Icing Sugar 糖粉
120g Eggs 全蛋
 50g Cake Flour 蛋糕粉

(B)
100g Egg Whites 蛋白/蛋清
60g Castor Sugar 幼糖

(C)
180g Whipping Cream 动物性鲜奶油
1 Tbsp Icing Sugar 糖粉
1 Tsp Vanilla Extract 香草精

(D)
1 Can Mandarin Orange Peel 罐头鲜橙果肉

Directions 做法

Preheat oven at 180C degrees
烤箱预热180度。

Melt butter in double boiler. Set aside.
将无盐奶油放在容器以隔水加热方式融化。搁置待用。

Combine and sift almond flour with icing sugar into a mixing bowl. Add into the egg mixture (A) and whisk into batter. Set aside.
杏仁粉和糖粉一起过沥后,加入全蛋混合(A)用打蛋器搅拌至颜色稍微变淡的杏仁糊。搁置待用。

In a dry and grease free mixing bowl, whisk the egg whites (B) until frothy. Add 1/2 of the castor sugar  and continue whisking until the meringue thicken and increase in volume before adding in the balance castor sugar. Increase the mixer to higher speed and continue whisking until firm peaks and when the meringue does not drop out when the bowl is flipped upside down. This is crucial step to prevent the cake from breaking during rolling.
把材料B的蛋白倒入另一个搅拌盆里,用搅拌机将蛋白(B)打至粗泡状。将一半的幼糖倒入继续搅打至体积变大后再把剩余的幼糖加入,以快速把蛋白打至发泡而蛋白会固定于容器内,倒扣时也不会流动即可,否则在卷蛋糕的时候容易破裂。


Slowly whisk in 1/3 of the beaten egg whites to incorporate into the almond egg mixture (A). Gently fold in  the balance beaten egg whites with rubber spatula to combine.
取1/3分量的蛋白霜加入杏仁糊(A),用打蛋器轻轻地稍微拌合。接着才加入其余的蛋白霜,改用橡皮刮刀轻轻的从容器底部刮起拌匀。

Sift the cake flour into the almond batter and gently fold with rubber spatula to incorporate the flour until even.
把蛋糕粉沥入杏仁蛋白霜糊内。用橡皮刮刀轻轻的从容器底部刮起拌匀至无颗粒的面糊。


Scoop a portion of the cake batter and fold into the melted butter to combine. Transfer back the mixture back to the cake batter and swiftly fold to incorporate.
取少许蛋糕面糊倒入已融化的无盐奶油内,用橡皮刮刀快速拌匀后倒入回蛋糕糊内把所有材料刮拌均匀。

Gently transfer the cake batter into a greased heat proof silicone roulade baking sheet. Level the surface, tap the baking sheet on the countertop to release trapped air pockets. Transfer the baking sheet into the middle rack of a preheated oven and bake at 180C degrees for 12-15 mins until the surface has browned and cake springs back when press.
把蛋糕糊轻轻的倒入已抹油的瑞士卷垫烤盤, 用小刮板将表面抹平。烤盘在桌面上轻敲几下震出气泡后送入预热的烤箱中层以180度烘烤15分钟左右或至到表面呈金黄色,触感有弹性即可。

Invert the cake onto a damp kitchen towel and remove the baking sheet. Immediately roll up the cake with the kitchen towel before placing it to cool on a cooling rack.
蛋糕出炉后,马上倒扣摆上一块湿台布,把蛋糕卷垫拿开趁热用台布把蛋糕卷起来摆在铁架上散热。

The colder the whipping cream the easier it is to whip. Whip the whipping cream in a chilled mixing bowl with electrical mixer from medium to high speed until fluffy. Whisk in sifted icing sugar and vanilla extract and continue whisking till stiff peaks.
材料C的动物性鲜奶油放入已冷却的容器内,用搅拌机由慢而快的速度搅打至变浓稠时加入糖粉,香草精继续搅打。直到打发至体积变大而不会流动的状态即可。


Once the cake cools, unroll the cake and place it on parchment paper. Apply beaten whipped cream over the surface leaving a 3cm gap along the edges clean. Arrange the mandarin orange peel on the surface and press it firmly onto the cream.
待蛋糕稍散热后,打开台布把蛋糕转铺在蛋糕纸上, 用橡皮刮刀将奶油霜铺在蛋糕正面体上。用抹刀把奶油霜推开抹匀,而蛋糕的尾部3厘米处不须抹上奶油霜。最后放上鲜橙果肉片就可以开始卷蛋糕了。

Place a rolling pin underneath the parchment paper the cake is sitting on. With both hands and the rolling pin to push the cake forward to roll up the cake. 
将擀面棍放在蛋糕纸下方,以双手借助擀面棍紧密的卷起蛋糕。


Once the cake is rolled up, twist the two sides of the parchment paper and refrigerate the wrapped cake for 1 hour to set.
卷完后用蛋糕纸包住蛋糕体,两端稍微扭紧,冷藏1小时待蛋糕卷定型。

Remove parchment paper, trim both ends and slice to serve.
去掉蛋糕纸,切去两头就可享用。


Do link back to Coco Sweet Tooth if you have used any information as published in this blog.


Thursday, June 25, 2015

Vanilla Swiss Roll 瑞士蛋糕卷

Swiss roll, also name as jelly roll or cream roll, is actually rolled up sponge cake filled with cream or filling. Like chiffon and the traditional buttercream birthday cakes I grew up with, it is a dessert I never got tired of eating. And now being a vegetarian, I still develop cravings for it every now and then. My way of suppressing these cravings are by directly confronting these cravings by baking and feasting the output by sight through spending time on the photographing part. By the time I am done with the photo selection, editing and blogging, any desire or cravings for the said food would have been reduced to a distant memory until the next surface.

Whenever my husband mentioned his cravings for swiss roll, I would shrink back away and pretend unaware of his request. That I believe many of you out there who started baking might have the same phobia like me.... the fear of cracking the layer while rolling the cake, right?

This is my fourth attempt on making rolled cakes and this recipe from kitchen tigress produces the easiest cake layer for rolling, without having to risk scalded hands by rolling the cake immediately when its out of the oven.  Her recipes are all so easy and hands on with minimum usage of tools, lesser stuff to wash up which pleases me immensely. The cake turned out soft but manageable enough for rolling even after the cake has cooled.  

I am using the cream cheese fillings leftover from the making of Snow Cheesecake for this layer cake. Feel free to apply any fillings of your choice of flavors. Happy baking!


VANILLA SWISS ROLL (瑞士蛋糕卷) 
(Recipe Adapted from Kitchen Tigress and Bernice Kitchen for one 11" roll)
Ingredients

4 Egg Whites  (Grade A Eggs with min 60g nett weight)
55g Castor Sugar


4 Egg Yolks (Grade A Eggs with min 60g nett weight)
55 g cake flour
1 tsp vanilla extract
60g Salted Butter (melted and cooled)


Filling 
50g Cream Cheese (softened to room temp)

10g Sweetened Condensed Milk

20g Whipping Cream 
Some Strawberries

  • Cream the cream cheese with condensed milk until light and fluffy. Add in whipping cream and continue beating till well combined.  
Decoration

Icing Sugar (Optional)


Method


Grease and line a 11"x11"x2" pan with parchment paper and butter. Set aside.


Preheat the oven to 200C degrees.

In a clean, dry and spotless mixing bowl, whisk the egg whites with an electrical mixer at medium low speed for 1 minute, or until frothy. Gradually add in sugar and continue whisking at medium high speed until the egg whites reaches soft peak stage. Continue whisking the mixture until firm peak stage (the stage where egg whites are white, fluffy, firm and still glossy with a hooked peak). 


Add egg yolks to the egg whites mixture in 4 separate batches. Using a hand whisk, gently whisk in the egg yolks in 4 batches until evenly mixed. 


Sift in cake flour into the above batter. Mixing in the flour with a hand whisk till just even. Add vanilla extract and melted butter. Gently and swiftly fold the batter with spatula till just evenly mixed, knocking the mixing bowl against worktop 2-3 times to release bigger air bubbles.


Transfer batter into prepared cake pan and spread the batter as evenly as possible. Jiggle the pan to level the batter. Knock the baking pan against the kitchen top twice. 

Bake at middle shelf of the oven at 200C degrees for 10-11 minutes. Remove from oven and drop the  pan from a height of 1 feet from the kitchen counter top several times. Unmould the cake onto the wire rack. Peel parchment paper from sides of the cake. Leave to cool. 

Place cake on new sheet of parchment paper, face down. Remove parchment paper from bottom cake. Spread evenly with the suggested cream cheese filling and arrange some cut strawberries on top. 

Using the parchment paper as a guide, gently and firmly roll up the layer to form a rolled cake. Wrap the rolled cake in parchment paper with seams side down. Store in fridge for 2-3 hours before serving.

Dust with icing sugar (optional) and cut into slices to serve. 


Printfriendly

Related Posts Plugin for WordPress, Blogger...