Showing posts with label Little Thumbs Up Aug 2015. Show all posts

Saturday, August 22, 2015

奶油奶酪红豆面包 Cream Cheese Red Bean Loaf


This is a drastic makeover recipe from the original recipe book of Alex Goh's 'Magic Bread'. I started making this bread with the intention to follow through his recipe but somewhere along the line of preparation I got carried away by the my crazy ideas to play with ingredients.
这是一道从原著吴景发的'Magic Bread里的原配方经过大改造的一道食谱。我原先是想安份地依照他食谱制做一个红豆面包,但是一旦下手做起来就不知不觉下得意忘形,玩起花样把原著的配方大大修改成这一个面包。


I guess such behavior is not new to many 'seasoned' food bloggers out there, who have accumulated years of cooking and baking mileage to come up with their own recipes. As for me, I am more into adaptation than creation.
我想,这样的行为对于许多积累多年烹饪及烘培的‘经验丰富’食物博客,因该是常发生的事。至于我,还没到那个水准,以其创出新的食谱我比较善于修改别人的创作。

Anyway, I am rather pleased with the outcome of this bread. Before the bread was fully done, it started to send beckoning signal to everyone in the household by filling everyone's nostrils with the addictively pungent smell of bakery bread. The texture? Very moist and soft. Good try!
总之,我很满意这个面包。非常的成功! 当面包还在烘烤时,整间屋子都让那浓厚的面包香给迷住了。烘出来的面包不止香厚而且还很湿软。好吃!

奶油奶酪红豆面包
Cream Cheese Red Bean Loaf

Water Roux 汤种面糊 (A)
40g Bread Flour 面包粉/高筋面粉
200g Water 水

Bread Dough 面包面团材料(B)
90g Cream Cheese 奶油奶酪
150ml Milk 牛奶
120g Water Roux 汤种面糊(A)
440 Bread Flour 面包粉/高筋面粉
50g Cake Flour 低筋面粉
2 Tsp Instant Yeast 速发干酵母
90g Brown Sugar 红糖
1/2 Tsp Salt 盐
80g Red Beans 红豆 (cooked and softened 煮软)
2 Egg Yolks 蛋黄
1 Medium Egg 鸡蛋

(C)
45g Unsalted Butter 无盐奶油


Filling 馅料 (D)
Red Beans 红豆 (cooked and softened 煮软)

Method 步骤

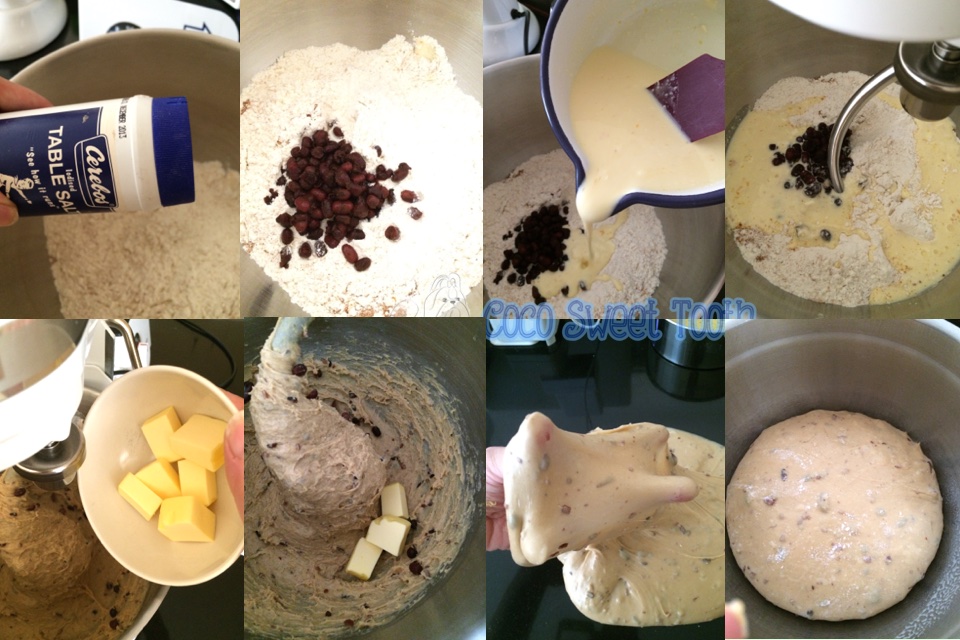
Combine ingredients (A) into a heatproof saucepan and cook over medium heat while stirring continuously until the mixture thickens with no visible lumps. Once the mixture reaches 65C degrees the water roux is ready. I just cook and stir until it has thickened like baby porridge. 
将材料A里的水和高筋面粉加入耐热锅/盆搅拌均匀成面糊,然后以中小火加热,边煮边搅拌一直煮到面糊开始变浓稠就关火继续搅拌至无粒粒或如婴儿粥般就好了。

Transfer the water roux paste to a clean bowl and place a piece of cling wrap directly over the top of the mixture to prevent skin from forming on the surface. Allow the mixture to cool before using. Refrigerate the water roux once it has cooled. I kept the leftovers in the fridge for not more than 4 days.
把汤种面糊倒入一个干净的碗内然后表层铺上一层保鲜纸以防面糊表面上生一层皮。汤种糊一旦冷却后便可加入面包材料里混合。剩余的汤种面糊可收入冰箱不超过4天。

In a saucepan, heat up cream cheese with milk until melted. Set aside to cool.
把奶油奶酪加入牛奶,以小火煮至融化。离火,搁置待凉。


Once the cream cheese milk mixture has cooled, combine all ingredients (B) into the bowl of a stand mixer with dough hook and mix with lower speed until all ingredients are well combined. Increase the mixer speed to medium and continue to knead for approx 15-18 mins, until the dough becomes smooth and pass the window pane test.
当奶油奶酪混合糊冷却后便将所有材料(B) 倒入搅拌器的钢盆中以慢速度搅拌搓揉成为一个不粘手的面团. 然后依照片揉面标准程序继续以中速把面团搅拌(大约15-18分钟)成为撑得起薄膜的面团.

Transfer the dough to a slightly greased bowl, cover bowl with either cling wrap or cloth. Allow the dough to proof for 1 - 2 hours or until the dough doubled in size.
将揉好的面团滚圆, 收口朝下捏紧放入涂抹少许油的盆中, 罩上拧干的湿布或保鲜膜, 放置到温暖很密闭的空间进行第一次发酵约1-2小时钟或至少两倍大.

Test the readiness of the dough with a finger lightly dusted with low gluten or cake flour. The dough is ready when it remain indented after the finger pokes into it.
第一次发酵完成后, 用手指沾上低筋面粉, 然后直接插入面团中心. 如果插出的洞陵没有弹回的迹象, 便完成第一次发酵. 


Punch down the dough. Divide the dough into 2 equal portions and mould it round. Let it rest for another 15 mins.
工作桌上洒上一些高筋面粉. 将发酵好的面团从盆子中移出.  面团表面也洒上一些高筋面粉, 然后将面团用手压下去将气体挤出来. 把面团平均分割成2等份, 然后滚成圆形, 盖上拧干的湿布或保鲜膜再让面团休息15分钟.

Lightly dust the work top with bread flour, using a rolling pin, roll out each dough into a  long rectangle. Scatter some red bean fillings and roll up the the rectangular dough like a roulade and place in 2 well greased 13x24x7cm bread pan. Tuck the ends down. 在工作台上撒少许面包粉,用杆面杖将各自面团擀成一个长方形, 面团上撒少许红豆馅。将面团短的那一向圈起来,摆入两个刷上不融化奶油的13x24x7cm深的土司烤模里

Spray some water over the loaf with a fine mist nozzle. Final proof the loaf in a unheated oven for another 50-60 mins.
面团表面喷些水然后将烤模放入未开火的烤箱中盖上烤箱门, 再侍发酵50-60分钟至两倍大.


8-10 Mins prior to baking time, remove baking pan from oven and turn on the oven heat to 190C degrees.
发酵好前8-10分钟, 将烤面团模从烤箱中取出, 烤箱打开预热刊至180C度.


Bake the buns in the lower level of a preheated oven at 180C degrees for 35-40 mins.
放进已经预热至180C度的烤箱中下层烘烤35-40分钟.


Remove bread from oven and turn it out onto cooling rack to cool.
烤好后马上倒扣出来放在铁网架上放凉


littlethumbups1-1
 This post is linked to the event Little Thumbs Up ~ August 2015
and hosted by Jess of Bakericious

- See more at: http://www.bakeforhappykids.com/#sthash.2eI3wlRb.dpuf


Do link back to Coco Sweet Tooth if you have used any information as published in this blog.

This post is linked to Cook Your Books Event #26 hosted by Joyce of Kitchen 
Flavours

Tuesday, August 18, 2015

无麸质红豆红薯马芬蛋糕 Gluten Free Red Bean Sweet Potato Muffins ........For Cookie's 3rd Birthday

Its been slightly more than a year since Jolly Cookie came into our lives. This is the 2nd birthday cake I have made for her birthday that is also gluten free (as before) to cater to my oldest shitzu Lady Coco  who was borned with severe hereditary allergy to gluten as well as a whole lists of ingredient found in commercial dog food.

我们领养了一年多的北京犬Cookie上周刚满三岁。这是我第二次为它制作的蛋糕,同时也是一个无麸质版的健康蛋糕。这主要是为了配合家中已年老而又天生遗传对多种食物过敏的西丝犬Lady Coco 所特别配制的配方。它自小就不能服食许多商业贩卖的狗粮,多年来都是吃家里特别准备的食物。

Instead of making something fancy for Cookie, I decided to come up with this simple and down to earth recipe which I also intentionally created for a very close buddy who wants to make a cake for her pooch's coming birthday. 
以其制造外表花俏的蛋糕给予爱犬Cookie,我选择了这个较传通式又容易做的健康蛋糕,主要也是因为一位好朋友的请求而刻意准备这个配方。这位朋友的爱犬生日即将到临而她也想为狗儿亲自下手做蛋糕给予爱犬。

There are lots of birthday cake recipes for doggy out there, in which, mostly use peanut butter as one of the core ingredient. After reading an article about the possible danger of exposing our beloved pooch to certain brand of peanut butter, I immediately ruled out the use of this ingredient just to be on the safe side.
在网上虽能找到许多有关制作宠物糕点的食谱,但是,多数的配方都以花生酱为主材料,而自从阅读了一个报告里所提及到有些品牌的花生酱里含有危害宠物健康的化学成份后便马上排除采用花生酱来制作爱犬的任何食品。还是安全起见为妙!


According to my maid, the cake is soft and yummy. Good enough for human consumption and tempting enough to my 3 wonderful furry baby girls.
虽然我没品尝这个蛋糕,我的女庸倒是很喜欢吃。她说蛋糕湿软即可口,结果还带回几个小蛋糕回去给丈夫品尝。看来啊这个蛋糕不只是合家里狗狗们的口味,就连女庸家属也能接受。

Happy Birthday Cookie!  May you always be blessed with good health, vitality and joy! 
祝Cookie生日快乐!愿你身体健康,活力充沛及开开心心!


无麸质红豆红薯马芬蛋糕 
Gluten Free Red Bean 
Sweet Potato Muffins

Ingredients 材料 (A)
50g  Red Beans 红豆
125g Sweet Potatoes 红薯 (cubed切丁)
100g Brown Sugar 红糖
50g Thick Coconut Milk 椰浆
50g Corn Oil 玉米油
2 Large Eggs 大号的鸡蛋

(B)
50g Tapioca Flour 木薯分
50g Potato Flour 马铃薯粉
1/2 Tsp Baking Powder 发酵粉


Method 做法

Soak red beans overnight. Drain and boil with sufficient water until tender. Drain and set aside.
红豆泡水浸泡隔夜。丢去隔夜浸泡的水,再倒入剩了水的锅煮至熟透。沥干备用。

Combine and sieve the flour ingredients (B) together. Set aside.
将粉料B过筛在一起。搁置备用。


Boil sweet potatoes in a pot with sufficient water under medium heat for 10-12 mins until tender. Drain。
把红薯放入剩了水的锅烧煮10-12分钟至红薯熟软即可。沥干。

Preheat oven at 175C degrees.
烤箱预热至175℃度。


While the boiled sweet potatoes are still warm,  transfer it together with the cooked red bean into a food processor and using pulse until coarsely blended. Add in sugar and eggs and continue to blend into paste. Add coconut milk to be followed by oil. 
趁红薯还热时马上和红豆一起倒入捣拌机打碎,加入糖,鸡蛋继续捣碎成糊状。依序把椰浆和食油倒入。

Continue mixing the batter until combined. Stir in the flour mixture and give the batter another 10-15 secs of whirl until incorporated.
继续搅拌面糊至匀合。拌入粉料再让捣拌器以10-15秒里将面糊混合均匀。


Transfer batter into prepared 5" muffin liners / cups and bake in a preheat oven at 170C degrees for 20-22 mins or until a toothpick inserted comes out clean.
把面糊倒入5寸马芬蛋糕模具里,放入已预热的烤箱以170℃度烘烤20-22分钟至熟透为止。


littlethumbups1-1

 This post is linked to the event Little Thumbs Up ~ August 2015
and hosted by Jess of Bakericious

- See more at: http://www.bakeforhappykids.com/#sthash.2eI3wlRb.dpuf


Sunday, August 16, 2015

摩卡豆腐甜甜圈 Springy Mocha Tofu Doughnuts


This is an baked, oil free and healthy version of doughnuts. Extremely springy and chewy soft when cooled. Taste just as great when given a light toast in a oven toaster or you would prefer the steam bun method like what my hubby likes. Goes well with fruit jams when consumed as bread for breakfast.

这是一道无油即健康版本的甜甜圈。很有弹性及口感,尤其是冷却后吃更有嚼劲。可以使用面包小烤箱预热,也可以蒸包子般蒸热吃。我先生就比较喜爱吃蒸热的隔夜面包糕点。除了撒糖粉,涂抹果酱当早餐吃也不错。


摩卡豆腐甜甜圈 
Springy Mocha Tofu Doughnuts

Ingredients 材料
150g Firm or Silken Tofu 豆腐
100g Cake Flour 蛋糕粉
55g Organic Brown Sugar 有机红糖
1-1/2 Tsp Baking Powder 发酵粉
1 Egg 鸡蛋
2-4 Tbsp Milk 鲜奶
1 Tsp Mocha Extract 摩卡精

Dusting 撒粉
Powdered sugar 糖粉
Milo / Cocoa Powder 可可粉


Method 做法

Combine and sieve the cake flour and baking powder together. Set aside.
将粉料(蛋糕粉和发酵粉)过筛在一起。搁置备用。

Blend the tofu in a food processor for 5 second, add sugar and egg. Continue blending until fine. Add mocha extract and combine.
把豆腐混入搅拌机捣搅5秒后加入糖和鸡蛋继续搅拌成糊。加1小匙摩卡精捣匀。


Add 1/2 of the flour mixture followed by 2 Tbsp of milk and continue blending. Add in the balance flour mixture and fold. Add more milk if batter is dry and not manageable. 
倒入1/2的粉料搅拌混合再加入2大汤匙鲜奶搅一搅匀后才放入剩余的粉料。这时若是面糊过于干可以增加1-2汤匙鲜奶至到面糊容易处里。


Transfer the batter into a pastry bag. Line baking tray with parchment paper or making mats. Pipe doughnut circles onto the mat and bake in a preheated oven at 180°C for 15 minutes.
烤盘铺上烘培纸或烘培垫,把面糊放入裱花袋,在烤盘上挤出甜甜圈的型状然后放入已预热的烤箱以180°C度烘烤15分钟。


Dust baked doughnuts with powdered sugar or without.
烤好的甜甜圈可撒糖粉或可可粉。若不也是很美味。


littlethumbups1-1

 This post is linked to the event Little Thumbs Up ~ August 2015
and hosted by Jess of Bakericious

- See more at: http://www.bakeforhappykids.com/#sthash.2eI3wlRb.dpuf


Saturday, August 15, 2015

素香蕉榛子松饼小蛋糕 Vegan Banana Hazelnut Muffins

Being a vegan I had never tried making any vegan cake for I wasn't to keen to experiment with ingredients substitution to replace the use of egg while maintaining the suppleness of the cake texture. 
作为一个素食主义者,我从未刻意尝试制作全素,无蛋无动物奶油类的蛋糕。每当想到要寻找及採用鸡蛋或动物质奶油的取代品后就没去动手做了。

While I am aware of bananas as a very good substitute, in truth, I have never been fond of eating banana or anything that taste like one. Today, I decided to bake a vegan version of muffins using my least favorable fruit for my hubby who practice veganism on every Monday, 1st and 15th of every Chinese Lunar calendar month.  During these days, he will practice an entire day of home cooked vegan meals for breakfast and dinner. He would also bring along packed lunch from home since it isn't convenient to find vegetarian restaurant within the vicinity of his work place.
虽然很清楚香蕉是素食蛋糕里时常用到来取代鸡蛋,事实上,真正的原因是我自小就对香蕉及香蕉制作的食品级为排侧。这次,我为了准备给予每星期一,初一,十五及任何神诞都守全素戒的丈夫,只好动手尝试作作。


Judging from the outcome of the muffins, I totally understood why bananas are good egg substitutes for cake baking. The muffins came out moist and soft like a good sponge cake. My verdict......this is a good recipe, if you do not mind the banana flavor.
当蛋糕烤出来后才真正体会到为何香蕉是很好的鸡蛋取袋品,烘出来的蛋糕湿润柔软有如海绵蛋糕一般。我的结论。。。。这是一道不错的配方,若是你不介意香蕉的味道。


素香蕉榛子松饼小蛋糕 
Vegan Banana Hazelnut Muffins
Recipe adapted from Namely Marly

Ingredients 材料 (A)
1 Cup Soy Milk 豆奶
2 Tsp Apple Cider Vinegar 萍果醋

(B)
125g Wheat Flour 小麦粉
125g Cake Flour 蛋糕粉
1 Tsp Baking Soda 小苏打粉
1 Tsp Baking Powder 发酵粉
1/2 Tsp Cinnamon Powder 肉桂粉
1 Tsp Vanilla Powder 香草粉
1/2 Tsp Salt 盐
30g Ground Hazelnut Powder 榛子粉


(C)
280g or 3 Large Ripe Bananas 成熟的香蕉
175g Brown Sugar 红糖
145g Corn Oil 玉米油


Directions 做法

Preheat oven at 175C degrees.
烤箱预热至175℃度。

In a small bowl, combine soy milk with apple cider vinegar (A) and set aside to allow mixture to combine.
把豆奶和萍果醋A一起拌入混合匀,搁置备用。

In a separate mixing bowl, sieve and mix all dry ingredients (B) together. Set aside.
把材料B所有粉料放入另一个碗里一起混合,过筛,搁置备用。

Transfer cut bananas (C) into a food processor and processed until mashed. Add brown sugar, corn oil  into the mashed banana mixture and continue blending for another 10-15 seconds until combined.
把香蕉C混入搅拌机捣碎成泥,再把其余材料里的糖和玉米油拌入继续捣拌10-15秒至混合。


Slowly sieve in 1/2 of the flour mixture (B) into the blended banana sugar batter and fold. Stir in the soy milk vinegar mixture (A) until well combined before  folding in the balance flour ingredients (B).
将材料B的混合粉料筛入香蕉红糖混合糊C里轻轻翻拌匀,拌入豆浆醋液A至混合再把其余的粉料拌入翻拌至匀。


Transfer batter into prepared muffin liners / cups and bake in a preheat oven at 170C degrees for 20-25 mins or until a toothpick inserted comes out clean.
把面糊倒入松饼模具里,放入已预热的烤箱以170℃度烘烤20-25分钟至熟透为止。


littlethumbups1-1

 This post is linked to the event Little Thumbs Up ~ August 2015
and hosted by Jess of Bakericious

- See more at: http://www.bakeforhappykids.com/#sthash.2eI3wlRb.dpuf

Printfriendly

Related Posts Plugin for WordPress, Blogger...