Friday, January 13, 2017

乳酪金枪鱼通心粉 Baked Tuna and Cheese Macaroni


After a long holiday break and still lazy to do heavy cooking, we ended up making this simple and yummy one pot or casserole dish for the entire household. Minimal work with less dishes to wash, hurray!
由于近期的众多假期,我至现在还是懒懒地提不起劲大事般地下厨。最后只是随意的制做出这道简易即美味的一锅餐肴足以填满全家的肚子。即省功夫又不虚洗多余的碗碟,太好了!


乳酪金枪鱼通心粉
Baked Tuna and Cheese Macaroni

Ingredients 材料
(A)
100g Canned Tuna 罐头金枪鱼
60g Cherry Tomatoes 圣女果 (halved 切半)
1-2 Potatoes 马铃薯 (diced 切丁)
1 Cup Frozen Mixed Vegetables 冷冻混合蔬菜
2 Onions 洋葱 (diced 切丁)
2 Bay Leaves 月桂叶
5 Cups Milk 鲜奶

(B)
50g Salted Butter 咸牛油
4 Tbsp Plain Flour 面粉
1 Tbsp Mustard Powder 芥末粉

(C)
2 Grade A Eggs 大号鸡蛋
80g Cheddar Cheese 切达奶酪 (grated 切丝)
1-2 Tsp Coarse Black Pepper 黑胡椒粒
1-2 Tsp Dried Parsley 干香菜
Salt 盐
Pepper 胡椒粉

(D)
250g Macaroni 通心粉
2 Tsp Salt 盐

(E)
Mozzarella Cheese 莫扎里拉奶酪 (grated 切丝)
Cheddar Cheese 切达奶酪 (grated 切丝)


Method 做法


Preheat oven to 170C degrees.
烤箱预热至170C度。

Cook potatoes (A) in boiling water to 5-8 mins until slightly softened. Drain and set aside.
马铃薯丁A送入煮滚滚水的锅里以大火煮5-8分钟至稍微软熟。沥干搁置。
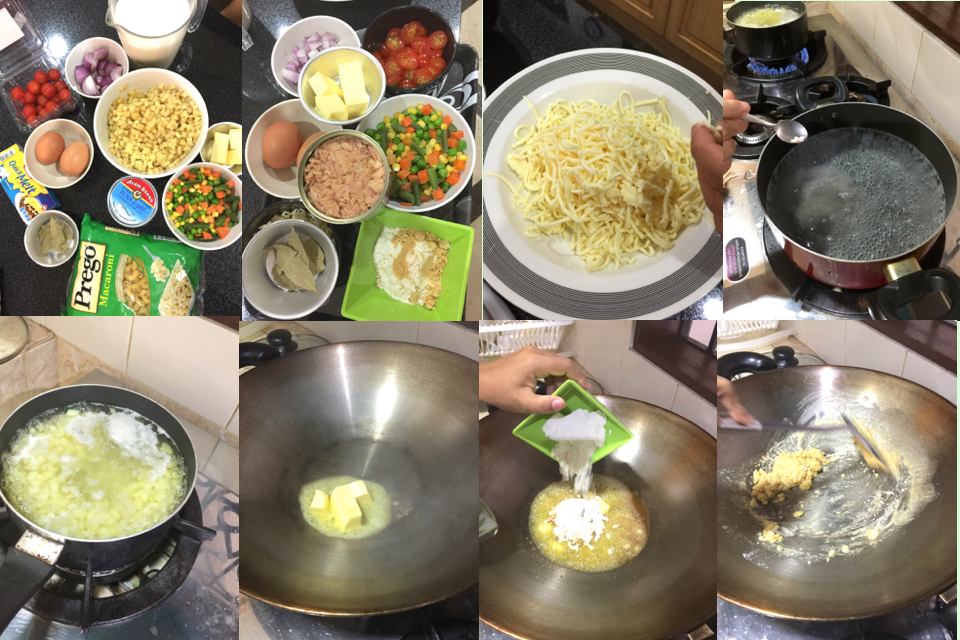

In a pot of 1.5L boiling water, add (D) salt and macaroni and cook the pasta until al dente. Drain.
在另一个煮锅里烧热1.5公升滚水后,加入材料D的盐,通心粉将面煮至7分熟,捞出备用。

The same time while boiling the pasta, heat up a deep cooking pot and melt the butter (B). Stir in flour and mustard powder and continue stir frying for several mins until the combine and free of lumps. Stir in (A) and allow to simmer under medium low heat for 10 mins. Discard bay leaves.
在煮熟通心粉时,另外烧热炒锅,放入牛油B,面粉和芥末粉拌炒片刻至均匀后再拌入全部的材料A炒匀,继续用中小火焖煮10分钟后取出月桂叶。


Scoop a few ladles of the boiling milk mixture into a small bowl. Whisk and add eggs (C) in 2 additions while stirring continuously until the eggs are fully  incorporated. Transfer the bowl of egg milk mixture into the cooking pot.
舀起一杯沸腾的牛奶放入一个小碗里,不停的搅拌分次地把鸡蛋C混入沸腾的牛奶液直到完全混合便转入锅里,混匀。

Stir in grated cheese (C) and the remaining ingredients from (C). Season with salt and pepper according to preference. Fold in the cooked macaroni (D) to combine.
拌入切达奶酪丝C和其余材料C的混料。放入适量的盐,胡椒粉调味后便可拌入煮熟的通心粉D,混匀。


Transfer all into a casserole dish and top the surface with (E) grated cheddar and mozarella cheese.
转送入个耐热砂锅,在表层铺上适量的莫扎里拉奶酪和切达奶酪和切达奶酪丝。

Bake in the center rack of the preheated oven for 35 mins.
把砂锅放置入已预热的烤箱的中层烘烤35分钟即可。


Do link back to Coco Sweet Tooth if you have used any information as published in this blog.

Tuesday, January 10, 2017

浓香巧克力面包 Sinfully Rich Chocolate Buns


My aunt gave me 3kg of baking chocolates recently and that spurs me into making more chocolate flavored pastries and bread which our household utterly love.
前一阵子我新加坡的二姑送了我三大公斤的巧克力豆而激发我制做出更多巧克力口味的甜品给予家中爱吃巧克力的成员们。

To create softer bread texture, I opted to use overnight tangzhong method into this recipe and very happy with the results.
为了达到更松软的面包质体,我选择花多些功夫和时间准备隔夜汤种面团然后再混入主面包的材料里即达到非常理想的效果。


浓香巧克力面包
Sinfully Rich Chocolate Buns

Ingredients 材料
(A) Tangzhong 汤种
15g Bread Flour 面包粉
35g Water 清水
35g Milk 牛奶

(B)
70g Overnight Tangzhong 隔夜汤种(A)
230g Bread Flour 面包粉
20g Cake Flour 蛋糕粉
1 Tbsp Cocoa Powder 可可粉
40g Dark Muscavado Sugar 黑砂糖
30g Castor Sugar
4g Instant Yeast
4g Salt 盐
100ml Chocolate Milk 牛奶巧克力
30g Egg 鸡蛋
40g Milk Chocolate (grated 切丝)

(C)
30g  Unsalted Butter 无盐奶油

(D) Fillings 馅料
Cheddar Cheese 切达乳酪
Chocolate Buttons 巧克力豆

(F) Topping 表面装饰
Egg Wash 全蛋液
Melted Chocolate 融化巧克力酱


Method 做法


Combine (A) into a saucepan and cook over medium heat while stirring continuously until the mixture thickens to the constancy of baby porridge the tangzhong is deemed ready.
将材料A的鲜奶,水及面粉一起混入锅里搅拌均匀成面糊后,以中小火加热,边煮边搅拌直到面糊开始转浓稠便离火,继续搅拌至无粒粒如婴儿粥般即可。


With the exception of butter (C), combine ingredients (B) into a mixing bowl and knead until all ingredients are well combined.
除了牛油(C)以外,将所有材料(B)混入一个盆中搅拌搓揉成为一个不粘手的面团.


Add in butter (C) and continue kneading for approx 20-25 mins, until the dough becomes smooth and pass the window pane test.
把牛油(C)混入面团然后依揉面标准程序继续搓揉大约20-25分钟,搓成为撑得起薄膜的面团.

Place dough into a slightly greased bowl. Cover bowl with cling wrap and allow the dough to proof for 1-2 hours or until it doubled in size.
将揉好的面团滚圆,收口朝下捏紧放入涂抹少许油的盆中,盖上保鲜纸放置到温暧密闭的空间进行第一次发酵约1-2小时至面团变两倍大为止。


Punch down the dough. Divide the dough into 9 equal portions and mould it round. Let it rest for another 15 mins.
将面团用手压除气体,再把面团平均分割成9等份, 滚圆盖上拧干的湿布或保鲜膜再让面团松弛15分钟.

Sprinkle the worktop with bread flour, flatten each dough into a disc or rectangular shape. Wrap adequate amount of fillings (D) and seal the edges. Repeat the process for the balance 8 ps of dough.座面上撒些高筋面粉,将休息好的面团用擀面棍把面团压扁成圆或长方型,包入馅料D捏紧收口。再重复同样的做法把其余的8份面团完成。

Arrange the dough on baking tray line with greased parchment paper or silicon mat. Space the doughs 4 inches apart to make room for the doughs to expand.
将整形好的面团排入已刷上不融化牛油(或铺上烘培纸)的烤盘上。面团之间应保留4寸的距离,给予面团膨胀的空间。


Spray some water over the surface with a fine mist nozzle. Final proof the bread in a unheated oven for another 50-60 mins.
将烤模放入未开火的烤箱中, 面团表面喷些水然后盖上烤箱门, 再侍发酵50-60分钟至两倍大。

8-10 Mins prior to baking time, remove baking pan from oven and turn on the oven heat to 180C degrees.
发酵好前8-10分钟, 将烤面团模从烤箱中取出, 烤箱打开预热刊至180C度.

Apply egg wash over the dough. Bake in the middle rack of a preheated oven at 180C degrees for 15-16mins or until cooked.
面团刷上一层蛋液,把烤盘送入已预热至180C度的烤箱内烘烤15-16分钟至面包烤熟即可。

Remove bread from oven and allow to cool on cooling rack.
烤好后放在铁网架上放凉。

Garnish the surface with melted chocolate.
待面包冷却后便可在表层上淋上融化巧克力酱。


Do link back to Coco Sweet Tooth if you have used any information as published in this blog.

Monday, January 2, 2017

龙珠果面包蛋糕 Dragon Fruit Bread Cake


Following my last successful attempt incorporating dragon fruit into bread making, I went on to spice up the bread by integrating this phytonutrient rich fruit with cake batter and turning it into a bread cake.
自从前阵子采用了龙珠果于面包制作得到了良好的效果后,我又再次将这植物营养素丰富的果肉配用于面包及蛋糕糊的结合作品上调出这道面包蛋糕。


龙珠果面包蛋糕
Dragon Fruit Bread Cake

Ingredients 材料
(A) Tangzhong 汤种
65g Bread Flour 高筋面粉
55g Water 清水

(B)
225g Bread Flour 高筋面粉
15g Cake Flour 蛋糕粉
4g Instant Yeast 即用酵母粉
45g Castor Sugar 细砂糖
3g Sea Salt 海盐

(C)
45g Cold Dragon Fruit Puree 龙珠果泥
50g Cold Whipping Cream 淡奶油
40g Cold Milk 冷鲜奶
30g Cold Eggs 冷鸡蛋

(D)
20g Unsalted Butter 无盐牛油油

(E) Cake Layer 蛋糕层
160g Castor Sugar 细砂糖
6 Eggs 鸡蛋

(F)
260g Plain Flour 中筋面粉
1 Tsp Baking Powder 发酵粉

(G)
100g Milk 鲜奶

(H)
120g Salted Butter 咸奶油 (melted 融化)
2 Tsp Vanilla Extract 香草精


Method 做法


Combine ingredients (A) and mix until well to form a dough. Place a piece of cling wrap directly onto the paste and allow to cool. Refrigerate for at least 12 hours before using.
将材料A的滚水加入面糊A中搅拌成团,马上在面糊表层铺上一层保鲜纸等冷却后冷藏12小时后才可使用。


With the exception of butter (D), combine 112g of Tangzhong (A), (B) and (C) into a mixing bowl and knead until all ingredients are well combined.
除了牛油(D)以外,将112g汤中(A), (B)及(C)混入一个盆中搅拌搓揉成为一个不粘手的面团.

Add in butter (D) and continue kneading for approx 20-25 mins, until the dough becomes smooth and pass the window pane test.
把牛油(D)混入面团然后依揉面标准程序继续搓揉大约20-25分钟,搓成为撑得起薄膜的面团.


Place dough into a slightly greased bowl. Cover bowl with either cling wrap or cloth and allow the dough to proof for 1-2 hours or until it doubled in size.
将揉好的面团滚圆,收口朝下捏紧放入涂抹少许油的盆中,盖上拧干的湿布或保鲜纸放置到温暧密闭的空间进行第一次发酵约1-2小时至面团变两倍大为止。


Punch down the dough. Divide the dough into 2 equal portions and mould it round. Let it rest for another 15 mins.
将面团用手压除气体,然后把面团平均分割成2等份, 滚圆盖上拧干的湿布或保鲜膜再让面团松弛15分钟.


Grease and line bottom and sides of 2 nos of 21cmx12.5cmx11.5cmD loaf pan. Set aside.
准备两个21cmx12.5cmx11.5cmD面包模具,模具低和则边铺上烘焙纸然后刷上一层油质以免粘黏,搁置备用。


Sprinkle the worktop with bread flour, use a rolling pin to roll each dough into long rectangle shape with width to fit the baking pan. Start rolling out from the longer end of the dough into a swiss roll. Repeat the process for the balance dough.
台座上撒些高筋面粉,将休息好的面团用擀面棍把面团擀成长方形,长度同烤模向宽,然后由长段卷起。再重复同样的做法把其余的面团完成。

Place each bread dough (seams down) into individual 21cmx12.5cmx11.5cmD loaf pan.
将卷好的两份面团收口朝下朝内各自排入21x12.5x11.5cmD
面包烤模中。


Spray some water over the surface with a fine mist nozzle. Final proof the bread in a unheated oven for another 50-60 mins.
将烤模放入未开火的烤箱中, 面团表面喷些水然后盖上烤箱门, 再侍发酵50-60分钟至两倍大.


Combine and sift together (F) into a bowl. Set aside.
把材料F一起混合,过沥入碗中搁置备用。

In another mixing bowl, whisk eggs with castor sugar (E) until pale and fluffy. 
在另一个搅拌盆中把E的鸡蛋和砂糖打发均匀至浓稠。


Sift in sifted flour mixture (F) in two additions with adding (G) in between. Light whisk to combine.
分两次沥入过沥的粉料F,间中加入G然后用打蛋器搅匀。

Combine (H) together until mixed. Scoop 1/4 of cake batter into the vanilla butter mixture and whisk to combine.
把材料H一起混合入小碗,混匀。接着取出1/4蛋糕糊混入H搅匀成糊。

Transfer the mixture back into the balance cake batter. Fold to combine.
再转入其余的蛋糕糊一起拌匀。

Divide batter into 2 equal portions and pour it over the well proofed bread doughs.
将面糊分成两等份,倒入已
发酵好的面包团上即可烘烤。

Bake in the middle rack of a preheated oven at 175C degrees for 30 mins.
把模具放进已经预热至175C度的烤箱中层烘烤30分钟即可.

Remove bread from oven and turn it out onto cooling rack to cool.
烤好后马上倒扣出来放在铁网架上放凉。


Do link back to Coco Sweet Tooth if you have used any information as published in this blog

Sunday, January 1, 2017

咖啡燕菜千层糕 Coffee Agar Agar Layer Cake

Happy New Year!
新年快乐!


Beginning a new chapter to more exciting kitchen ventures and a big thank you to all the great bloggers and Facebook supporters who truly inspires me since I started learning baking 3 years ago. There are still so much more to learn and let's motivate experiment and to share out better recipes.
新的一年意味着一个更精彩即充满着更多的下厨考验,在此我要感谢所有这3年里我开始学习烘焙的博客和Facebook网友们的支持,还有他们的烘焙烹饪方面给予的启发。必然学问是无止尽而且还有很多所要学习的,让我们彼此激励对方一起尝试不同的食谱,分享出更好的食谱给予大家。

Here is an adapted recipe from Alan Ooi's "In Love With Cakes".
在此所分享的蛋糕食谱取自于黄思纶的‘我爱蛋糕’食谱书籍。


咖啡燕菜千层糕
Coffee Agar Agar Layer Cake


Ingredients 材料
(A)
175g Salted Butter 咸奶油
125g Castor Sugar 细砂糖
1 Tsp Vanilla Extract 香草精
3 Large Eggs 大号鸡蛋
175g Self Raising Flour 自发面粉

(B)
825ml Water 清水
140g Brown Sugar 红糖
5 Tsp Agar Agar Powder 燕菜粉
3 Tsp Instant Coffee Powder 即溶咖啡粉
2 Tsp Chhocolate Emulco 巧克力香精

(C)
400ml Coconut Milk
400ml Water 椰浆
110g Castor Sugar 细砂糖
100ml Fresh Milk 鲜奶
50g Corn Flour 玉米粉
1/3 Tsp Salt 盐
2 Tbsp Agar Agar Powder 燕菜粉


Method 做法


Preheat oven to 180C degrees. Grease and line a 24x24cm baking pan.
烤箱预热至180C度。准备一个24x24cm方型模具。盘底涂抹食油铺上一层烘焙纸。

In a mixing bowl, cream butter and sugar (A) until light and fluffy.  Add vanilla extract to combine.
把A的奶油及细砂糖倒入搅拌盆内,用打蛋器打至松发。加入香草精搅匀。

Gradually add eggs (A) in 3 additions and mix until even before adding another.
然后分次把3粒鸡蛋A混入,每个鸡蛋均匀的混入后才加入一直到混匀为止。


Sift in flour (A) and lightly fold to combine. Pour into prepared mould.
沥入粉料A,拌匀转入预备好的4x24cm方型模具。

Bake in a preheated oven at 180C degrees for 22-25 mins until baked.
放入预热至180C度的烤箱烤22-25分钟至熟透即可。


Unmould cake and leave to cool on wire rack.
蛋糕烤熟后脱模,置于铁架待凉备用。

Combine (B) into a saucepan and cook while stirring until boil. Transfer cooked mixture into a deep 22-23cm square baking pan and leave until 80% set.
把材料B混入煮锅,一直搅拌煮滚里活。倒入一个22-23cm方型蛋糕模具待放至8分凝固。


Repeat the same process by boiling (C) in a saucepan. Pour over the almost set coffee layer and leave till 80% set.
重复同样的做法把材料C放入煮锅煮滚。倒入在已8分凝固的咖啡燕菜层B上,待放至8分凝固。


Trim the baked cake (A) layer and assemble over the coconut milk agar agar (C) layer. Gently press the sponge cake (A) onto the agar agar layer.
把蛋糕A稍微切割掉边缘足以装入及盖上椰浆燕菜层C上,并轻轻按压。

Allow to cool before chilling the cake in the refrigerator.
待冷却后放入冰箱冷冻。


Do link back to Coco Sweet Tooth if you have used any information as published in this blog

Friday, December 30, 2016

巧克力朗姆奶油乳酪蛋糕 Chocolate Rum Cream Cheese Pound Cake


It's been more 2 weeks since I laid hands on the oven as I was back in Malaysia for the winter solstice festival. Since we didn't get to celebrate Christmas with my buddies this year we didn't eat much as well. Now being back to Jakarta for 3 days and well rested I decided its time to make a simple pound cake for the household staff.
自从近期会马来西亚和家人一起度过冬至团圆直到圣诞节才回印尼的两个星期里都没做任何烘焙。今年的圣诞假期里都没跟朋友一起庆祝,也因此没什么品尝到以往般的食品。如今回到雅加达三天而又充份的休息后,心里又开始燃烧着烘焙之火便制做了一道简易即浓香的奶油乳酪蛋糕给予家中的员工们。

Unlike most pound cake which are dense, this is an extremely soft and silky version which I am totally happy with.
一般的奶油磅蛋糕都比其他蛋糕结实而偏硬,这道食谱制做出来的磅蛋糕却是松软及令我超满意!

Happy baking!
祝您有个愉快的烘焙时光!


巧克力朗姆奶油乳酪蛋糕

Chocolate Rum Cream Cheese Pound Cake

Ingredients 材料
(A)
235 g Unsalted Butter 无盐奶油 (soften to room temp 温室回温)
175g Cream Cheese 奶油乳酪 (soften to room temp 温室回温)
150g Castor Sugar 细砂糖
1/2 Tsp Salt 盐
5 Tbsp Full Fat milk powder 全脂奶粉
4 Egg Yolks 蛋黄 (large 大号)
2 Tbsp Pure Vanilla Extract 香草精
3 Tbsp Rum 朗姆酒
1 Tbsp Kahlua Liquor 甘露咖啡力娇酒
235g Cake Flour (sifted 过沥)
2 Tbsp Whipping Cream 淡奶油
60g Milk Chocolate (grated 切丝)

(B)
4 Egg Whites 蛋白 (large大号)
50g Castor Sugar 细砂糖
1/2 Tsp Cream of Tartar 塔塔粉


Method 做法


Preheat oven at 150C degrees. Grease and flour a 23 cm tube pan. Set aside.
烤箱预热至150C度。准备一个涂抹奶油及撒上面粉的23cm中空蛋糕模具。搁置备用。


In a mixing bowl, cream butter, cream cheese, sugar and salt on medium speed until smooth and well combined. 
把奶油,奶油乳酪,砂糖和盐一起倒入搅拌盆以中速搅打混匀。

Add milk powder and continue beating on medium speed for 6-7mins until pale and fluffy.
再加奶粉继续以中速搅打6-7分钟将奶油打至松发转淡白色。


Add in one egg yolk at a time. Repeat the step until all egg yolks are fully incorporated.
接着加一粒蛋黄,混匀后才连续以同样的步骤分次把蛋黄混入至完全混匀即可。

Add rum and kahlua mixture until combined. Add vanilla extract and mix on medium speed till incorporated and no visible signs of liquid.
这时便可加入朗姆酒和甘露咖啡力娇酒混匀。再加香草精一起以中速彻底的把液体混入奶油霜里。

With the mixer on low, add 1/2 portion of the sifted flour and whipping cream. till combined. Add remaining flour to incorporate. Do not overmix to develop the gluten or the cake will turn out dense and heavy.
将搅拌器的速度调低,先把1/2过沥蛋糕粉和淡奶油混入奶油霜里,混匀后再把剩余的半份蛋糕粉混入。切记不要过度搅拌以免面糊起筋而导致蛋糕体过度密实。


In another clean and grease free mixing bowl, beat egg whites (B) until frothy. Add castor sugar and cream of tartar in 2 additions. Continue to beat until firm peaks.
蛋白B先用打蛋器打出一些泡沫,然后分两次加入细砂糖和塔塔粉打成尾端挺立的蛋白霜。

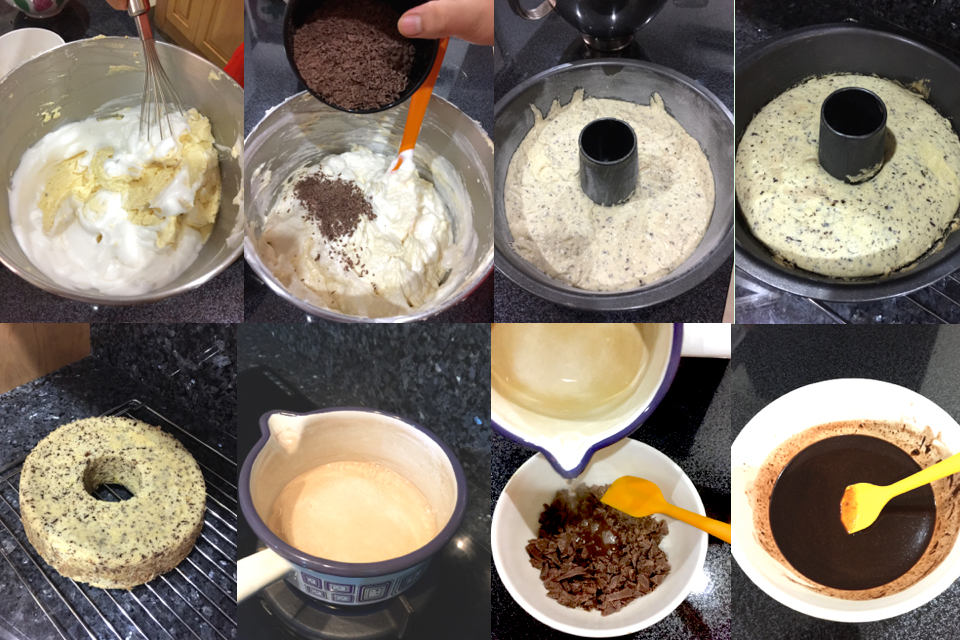
Transfer 1/3 of the beaten egg whites into the cake batter, use a hand whisk and mix to combine.  Lightly fold in the remaining egg whites  and grated chocolate into the batter while try to avoid deflating the batter.
取出1/3份量的蛋白霜混入蛋糕糊中,用打蛋器把蛋白霜混入蛋糕糊,搅拌均匀后才把剩余的蛋白霜和巧克力碎混入蛋糕糊。再用橡皮刮刀轻轻及快速的把蛋白霜混匀,尽量避免过度搅拌以免打散蛋糕的气体。

Pour batter into the tube pan and tilt pan to level the batter. Drop the pan on the kitchen top to dispel
any air bubbles.
将蛋糕糊倒入模具,稍微倾斜模具来平放面糊。蛋糕模未进入烤箱前先在桌面上大力的摔敲一下去散任何气泡。


Bake cake at the second lowest level of a preheated oven for 50 mins or until a skewer inserted comes out clean.
把蛋糕转入已预热的烤箱中下底层烘烤50分钟至蛋糕熟透即可。

Allow the cake to cool slightly on the cooling rack for 20 mins before unmoulding and placing onto the rack to cool completely.
烤熟的蛋糕和模一起放置凉架20分钟后才脱模继续摆置铁架待凉。

Store cake in an air tight container or seal in cling wrap to retain the moisture until consumption.
冷却好的蛋糕建议放入密封的容器或是采用保鲜膜包上保湿。


(C) Glaze 巧克力淋酱 (Optional 自选)
80g Grated Milk Chocolate  巧克力碎
50g Water 清水


Bring water to boil. Pour over grated chocolate and stir until combined. Pour glaze over the cooled cake. Serve.
把水煮滚离火,立刻倒入巧克力碎不停搅拌至完全融化混合均匀即可淋在蛋糕上品尝。


Do link back to Coco Sweet Tooth if you have used any information as published in this blog

Printfriendly

Related Posts Plugin for WordPress, Blogger...