Saturday, August 12, 2017

椰丝糯米糕 Kuih Lopis


Kuih Lopis is a traditional dessert commonly found in Singapore, Malaysia and Indonesia. It is made from steamed glutinous rice served with grated coconut and brown sugar syrup. It is relatively simple to make and you put as much sugar syrup as you like to suit your liking.
椰丝糯米糕是一道普及于新加坡,马来西亚及印尼的传统糕点。制做方法也相当容易,主要的材料是蒸糯米配上椰丝然后再淋上红糖浆就这样子吃了。您可以随自己的喜好尽可添加糖浆来增加口味。


椰丝糯米糕
Kuih Lopis


Ingredients 材料

(A)
525g Glutinous Rice 糯米 (soak for 2-3 hours 泡浸2至3小时)
30 pcs Pandan Leaves 班兰叶
700ml Water 清水
6 pcs Fresh Banana Leaves 新鲜香蕉叶
Raffia String 绳子

(B)
1 cup Gula Melaka 椰糖 (chopped 切碎)
1/4 cup Water 清水

(C)
1 cup Fresh Grated Coconut 嫩椰丝
1/2 Tsp Salt 盐


Directions 做法


Cut (A) pandan leaves into 2cm strips and blend together with 700ml water until pulverized. Strain out 600ml of juice and discard the pulp.
把A的班兰叶剪成二公分小段,配合700毫升清水一起倒入食物加工器把班兰叶搅碎。沥掉叶渣挤出600毫升的班兰汁。

Combine the extracted pandan juice and glutinous rice together into a pot and cook over low heat. Stir continuously until the pandan juice is fully absorbed into the semi-cooked glutinous rice. Remove from heat and set aside.
然后便把班兰汁和糯米A一起倒入锅里一边搅拌一边用小火煮到班兰汁完全被糯米吸收后即可离火搁置。


Clean and wipe dry banana leaves. Cut leaves into 25x25cm squares. Place sufficient amount of the pandan glutinous rice onto the prepared banana leaves and roll up tightly into a bolster. Tie both ends securely with raffia strings.
香蕉叶洗净,抹干后剪成25x25cm的方型状。接着取出半熟的糯米铺在香蕉叶上,卷成个抱枕状用绳子牢固两边尾端。

Boil glutinous rice rolls in a pot filled with sufficient boiling water to completely cover over the rice. Cook over medium high heat for an hour before draining out the water and allow the rice rolls to cool before serving.
最后把卷好的糯米饭卷置入已装满沸水的锅里,锅里的水必须足够完全覆盖米卷。用中火煮一小时后即可取出米饭待凉。


Combine (B) together in a saucepan and bring to boil. Reduce heat to low and continue to simmer the syrup for another 10-13 mins until thickens. Set aside to cool.
将材料B倒入小锅煮滚,转小火继续煮十至十三分钟把糖浆煮至浓稠即可离火搁置。

Combine and mix (C) thoroughly into a steaming tray and steam over medium heat for 8-10 mins. Set aside.
把C一起混匀,转入蒸盘用中火蒸八至十分钟即可离火搁置。


Unwrap and remove the banana leaves. Slice the cooled glutinous into 1-2cm thick disc and roll it over the grated coconut (C) to coat evenly.
取掉香蕉叶,把冷却的糯米卷切成1至2公分的厚块,放入椰丝里平均的塗覆即可。

Pour gula melaka syrup (B) over the coated glutinous rice and serve.
将椰糖浆B淋在糯米饭卷后即可品尝。


Do link back to Coco Sweet Tooth if you have used any information as published in this blog.

Thursday, August 10, 2017

九层糕 Kueh Lapis Sagu


When it comes this layered kueh, I could never resist peeling off layer by layer to savor it.
每逢遇上这项多层的椰香蒸糕时,就会不禁地一层一层的撕开来吃。


This is my 4th attempt in making this type of kueh and by far the most satisfying version derived from this wonderful blog among the previous few I have tried. The kueh came out soft and melts in the mouth.
这已经是我第四次制做九层糕,也是当中最满意的版本取自于此。蒸出来的糕点不仅Q软香甜而且还即刻融入口里超好吃!


九层糕

Kueh Lapis Sagu


Ingredients 材料
( 8x8 inch square mould 8 寸四方模具)

(A)
280g Sugar 砂糖
850ml Water 清水
4 Pandan Leaves 班兰叶

(B)
408g Tapioca Flour 木薯粉
128g Sago Flour 沙谷粉
30g Mung Bean Flour 绿豆淀粉
43g Rice Flour 粘米粉
610ml Thick Coconut Milk 浓椰浆
1/4 Tsp Salt 盐

(C)
Red Food Coloring 食用红色色素
Green Pandan Paste 班兰精


Directions 做法


Combine sugar, pandan leaves and 850ml of water (A) into a pot and boil till sugar dissolves. Strain away  and discard the pandan leaves. Add additional water into this syrup mixture to achieve a total of 1300ml. Set aside.
把A里的砂糖,班兰叶及清水倒入锅烧热,一旦砂糖溶化后即可离火取掉班兰叶又把糖浆过沥。然后再加足够的清水混入糖浆总液体至1300ml即可搁置备用。

In a mixing bowl, mix all flour (B) ingredients (tapioca, sago, mung bean and rice flour) together with salt until mixed. Add in coconut milk gradually and stir until smooth.
另一个盆里将B所有粉料和盐一起混入,混匀后再慢慢的加入椰浆,搅匀。

Pour sugar syrup (A) into (B) mixture and stir to incorporate.
接着把之前的A糖浆混入B里,搅拌混匀。


Divide the mixture into 3 equal portions. Leave the first portion in original color while the other two portions to mix with sufficient red and green food coloring respectively.
把面糊分成三等份。第一份保持原味而其余的两份面糊各自加入红色色素及绿色的班兰精。

Place a non stick square baking pan into the steamer and steam for 5 mins until hot. Pour 80-85g of the original colored mixture into the pan and steam under medium high heat for 6-8 mins. Repeat another layer of original colored mixture.
把一个免粘方型模具送入蒸锅里蒸热5分钟,先取出80-85克的原味面糊倒入模具用中火蒸6至8分钟,又在重复采用同样的面糊及做法蒸出第二层。


Repeat the same for the subsequent 2 colored mixtures and end the last layer with red color mixture. Allow the steamed kueh to cool completely for several hours before cutting it with a well greased knife.
接着便可采用相同的做法把其余的两种颜色面糊一层层的蒸熟一直到最后一层以红色为主。蒸好的糕点搁置待凉数小时后,可用涂上食油的利刀切块来吃。


Do link back to Coco Sweet Tooth if you have used any information as published in this blog.


Wednesday, August 9, 2017

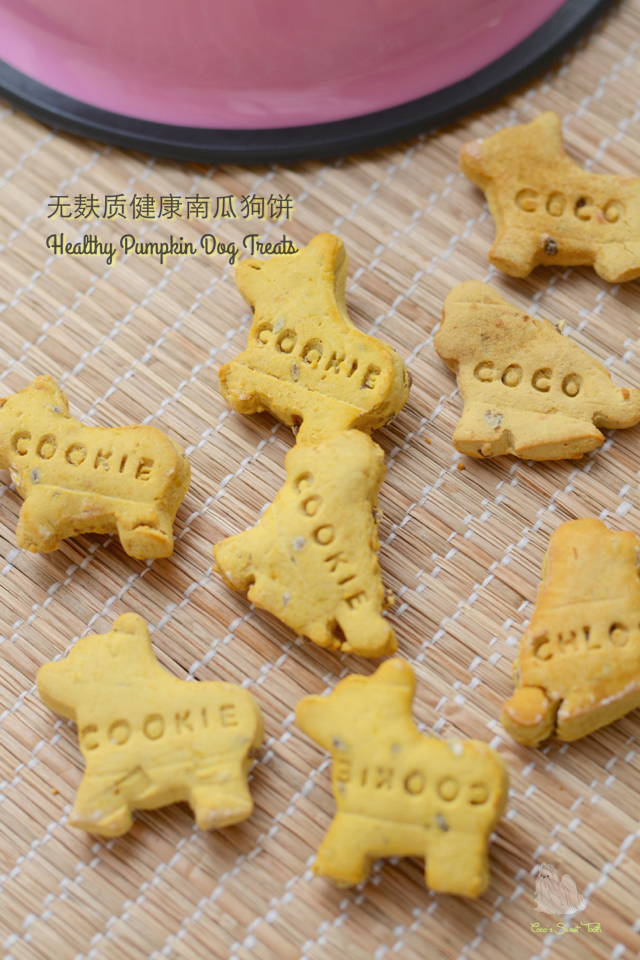
无麸质健康南瓜狗饼 Healthy Pumpkin Dog Treats


I love my furkids very much and treat them like my own offsprings. They are like children who are forever in childlike state, constantly looking up to us for attention and emotional support.
我非常爱护家里的三只爱犬,对待它们有如自己亲生骨肉一般的爱着。在我的眼里它们就像永远长不大的小孩,时时刻刻都在依赖着我们,需要我们不停给予照顾及精神上的安慰。

Among my 3 lovely fur babies, the eldest one is born with severe chronic allergies to most food and preparing custom home cooked food for her is a daily routine. We tried out best to keep them in good shape by giving food which corresponds to their health and growth stage.
在这三只宝贝爱犬当中,老大自小就患上先天性的食物和环境过敏症一旦接触到不适的食品就会癫痫发作,受尽了多年的痛楚。因此这些年来对于它们的生活饮食我都是依各自的身体健康需求而亲自下厨为它准备一切的饮食,希望能帮助它们的健康成长。

Despite the endless bouts of health issues and challenges all these years, my eldest baby Coco who has gone deaf and blind, managed to sustain till a ripe 15 years of age and still counting. Recently, a mass bout of malignant tumor started to invade her pelvis area and within a short period of 3 months the tumor has grown into 6 times the original size. Given her advanced age, the vet discouraged performing surgery to remove the lump citing that the removal would put our baby into more risk than good.
仅可老大忍受了多年的病痛而后来恶化至双眼变盲,耳朵也完全聋去,它还是努力的活着一直撑到15年。很不幸的,它的身上最近长出一块恶性肿瘤而在短短的三个月内扩大六倍极之可怜。由于它年寿太高,兽医不鼓励动手术来切除肿瘤怕爱犬承受不起麻醉药而死去。

We are saddened to learn that her days are numbered and soon she will have to leave us. Hence I set out to make her a batch of home made treats and indulge her when she is still able to enjoy her food.
如今获知它不久后将要离开,我便做了这批南瓜饼给它还能吃的情况下品尝。

Here is a simple yet healthy doggie treat for you love pooch.
这道健康狗饼您也可以尝试试做来给您的爱犬品尝。


无麸质健康南瓜狗饼
Healthy Pumpkin Dog Treats


Ingredients 材料

400g Pumpkin 南瓜 (steamed & mashed 蒸熟搅成泥)
3 Tbsp Organic Flaxseeds 有机亚麻籽
500g Tapioca Flour 木薯粉
250g Potato Flour 马铃薯粉
1 Tsp Baking Soda 小苏打粉
3 Eggs 鸡蛋
150ml Cold Water 冷水


Directions 做法


Preheat oven to 175C degrees.
烤箱预热至175C度。

Combine sifted tapioca flour, potato flour, baking soda and flaxseeds into a mixing bowl. Set aside.
先把过沥好的木薯粉,马铃薯粉,苏打粉和亚麻籽混入,混匀搁置。

In another bowl, combine eggs and pumpkin puree together until incorporated. Then transfer into the flour mixture and stir to combine. Gradually add water (as needed) and use hands to knead the dough together.
将鸡蛋,南瓜泥一起混入另一个小碗,混匀后转入粉料里搅匀。接着倒入适量的冷水,用手搓揉将面糊混合成团。


Place dough between 2 plastic sheets and roll into 3-4mm thick sheet. Remove the top layer of the plastic sheet and flip dough onto the tabletop sprinkled with potato flour then remove the plastic sheet.
再把面团置入两片塑料纸之中,用杆面棒杆成3-4mm厚度即可取出上层塑料纸,然后把面团倒入已撒上少许马铃薯粉的桌面上,再取掉第二片塑料纸。


Use cookie cutter to cut dough to desired shapes. Place cookies on baking pan lined with slightly greased parchment paper. 
使用饼干切割模把面团切成喜欢的形状,排在已涂上少许食油烘焙纸上置入烤盘。

Bake for 22-25 mins until the top has browned and dried out completely. Allow cookies to cool on wire rack completely before storing in air tight container.
把面团烘烤22-25分钟直到表面上色及完全干透即可。将烤熟的饼干摆在凉架待凉后才置入密封的罐子收藏。


Do link back to Coco Sweet Tooth if you have used any information as published in this blog.

Friday, August 4, 2017

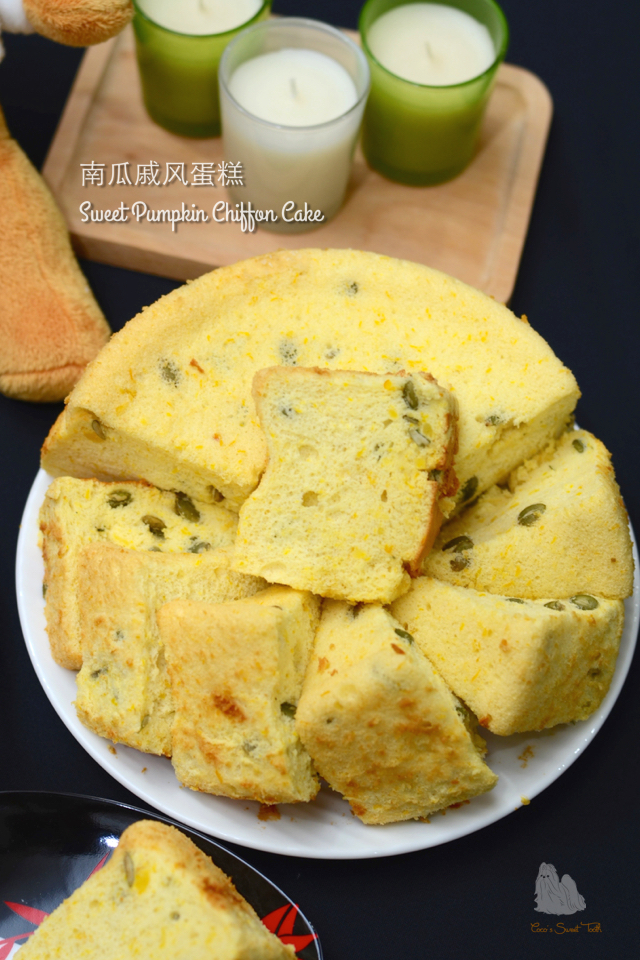
南瓜戚风蛋糕 Sweet Pumpkin Chiffon Cake


Hello everyone, I guess you must be wondering why I haven't been posting any recipes for the past one month.  I even received a message from an avid blog supporter showing her concern over my missing in action.
大家好,我整整一个月没在博客里出现而相信您可能也会注意到。近期我还收到一个热心网友的留言关注着我的状况。

Truth is, I have been extremely occupied traveling to and fro between Malaysia and Indonesia the past few months due to family matters. From the look and progress of the issue, I will be tied up with and left with little time to indulge in my recipes ventures.
我这几个月里因为忙于家里的事务而得每个月分部飞往马来西亚及印尼之间,非常忙碌。看来接下里的月份我还是会继续繁忙着,因该不会有以往般的时间享受烹饪乐。


Meanwhile, thank you for staying with my blog. I will try to share as much recipes whenever my schedule permits.
同时,我很感谢您一直以来的支持,以后只要我的行程充许的话,一定会继续尝试不同美味的食谱与你分享。


南瓜戚风蛋糕
Sweet Pumpkin Chiffon Cake

Ingredients 材料

(A)

105g Pumpkin 南瓜 (steamed and mashed 蒸熟搅成泥)
35g Milk 牛奶
35g Olive Oil 橄榄油
8g Grand Marnier 柑曼怡酒
105g Cake Flour 蛋糕粉
6 Egg Yolks 蛋黄
1/4 Tsp Salt 盐

(B)
6 Egg Whites 蛋清
105g Golden Castor Sugar 金砂糖

(C)
50g Sunflower Seeds 葵花籽


Directions 做法


Preheat oven to 180C degrees.
烤箱预热至180C度。

Combine mashed pumpkin, salt, milk, grand marnier and olive oil (A) into a mixing bowl and whisk until combined.
将南瓜泥,盐,牛奶,柑曼怡酒及橄榄油A混入盆中用打蛋器搅拌均匀。

Sift in cake flour (A) in 2 batches. Add egg yolks to combine. Whisk to mix until smooth with no visible lumps. Set aside.
再把蛋糕粉料A分两次混入南瓜蛋糊里搅拌均匀,成为无粉粒的面糊。搁置待用。


In another dry and grease free mixing bowl, beat the egg whites (B) until frothy. Add in castor sugar in 2 batches and continue beating until stiff peaks.
把蛋白放入一个干燥即干净搅拌盆里,用打蛋器把蛋白B打出一些泡沫,然后分次加入砂糖,打成尾端挺立的蛋白霜即可。

Transfer 1/3 of the egg white meringue into the cake batter and carefully whisk to combine.
取1/3蛋白到蛋糕糊中,用橡皮刮刀轻轻翻拌均匀(从底部往上翻拌,不要划圈搅拌,以免蛋白消泡)。

Transfer the cake batter mixture back into the meringue bowl and fold until evenly mixed.
然后把蛋糕糊转入蛋白霜的盆中,用同样的手法翻拌均匀,直到蛋白和蛋糕糊充分混合。

Fold in sunflower seeds (C) to combine.
最后把葵花籽拌入。


Transfer the final cake batter into an 8 inch chiffon cake pan. Lightly tap the pan on the tabletop twice to release the big bubbles.
将混合好的蛋糕糊倒入8寸戚风蛋糕模具,抹平,用手端住模具在桌上用力震两下,把内部的大气泡震出来。

Bake in the middle rack of a preheat oven at 180C degrees for 10mins then lower temp to 150C degrees and bake for another 30-35 mins.
烤模送入已预热好至160C度的烤箱中层,烘烤约50分钟直到蛋糕熟透即可。

Once the cake is out of the oven, invert the baking mould over a glass bottle to allow to cool completely before unmoulding.
蛋糕出炉后,马上倒扣在玻璃瓶上散热。待完全冷却后即可脱模。


Do link back to Coco Sweet Tooth if you have used any information as published in this blog.

Tuesday, June 20, 2017

柠檬蜂蜜戚风蛋糕 Honey Lemon Chiffon Cake


Apart from coffee flavored desserts and pastries, I am also very fond of lemon flavored ones. Today I am trying it on chiffon cake making and extremely happy with the outcome.
除了咖啡口味的糕点和烘焙甜品之外,我也非常爱好采用柠檬香味制做的食品。今天我特别试用了柠檬来烘烤个戚风蛋糕,结果烘烤出来的蛋糕效果及味道正合我意。


柠檬蜂蜜戚风蛋糕
Honey Lemon Chiffon Cake


Ingredients 材料

(A)

5 Egg Yolks 蛋黄
60g Castor Sugar 细砂糖
1/4 Tsp Salt 盐
40g Olive Oil 橄榄油
40g Honey 蜜糖
60g Cake Flour 蛋糕粉
30g Rice Flour 粘米粉
1 Tsp Vanilla Extract 香草精
50ml Lemon Juice 柠檬汁
1-2 Tbsp Grated Lemon Zest 柠檬皮屑

(B)
5 Egg Whites 蛋清
1 Tsp Lemon Juice 柠檬汁
50g Castor Sugar 细砂糖


Directions 做法


Preheat oven to 160C degrees.
烤箱预热至160C度。

Combine egg yolks, sugar, salt and olive oil (A) into a mixing bowl and whisk until combined.
将蛋黄和细砂糖,盐与橄榄油A混入盆中用打蛋器搅拌均匀。

Add honey and whisk to incorporate.
再加蜜糖搅拌均匀。


Add sifted in flour mixtures (A) and lemon juice in 2 batches. Whisk to mix until smooth with no visible lumps. Set aside.
再把过沥好的粉料A及柠檬汁,分两次交错混入搅拌均匀,成为无粉粒的面糊。搁置待用。

In another dry and grease free mixing bowl, beat the egg whites until frothy. Add in castor sugar in 2 batches and continue beating until stiff peaks.
把蛋白放入一个干燥即干净搅拌盆里,用打蛋器把蛋白打出一些泡沫,然后分次加入柠檬汁及砂糖,打成尾端挺立的蛋白霜即可。

Transfer 1/3 of the egg white meringue into the cake batter and carefully whisk to combine.
取1/3蛋白到蛋糕糊中,用橡皮刮刀轻轻翻拌均匀(从底部往上翻拌,不要划圈搅拌,以免蛋白消泡)。

Transfer the cake batter mixture back into the meringue bowl and fold until evenly mixed.
然后把蛋糕糊转入蛋白霜的盆中,用同样的手法翻拌均匀,直到蛋白和蛋糕糊充分混合。


Transfer the final cake batter into an 8 inch chiffon cake pan. Lightly tap the pan on the tabletop twice to release the big bubbles.
将混合好的蛋糕糊倒入8寸戚风蛋糕模具,抹平,用手端住模具在桌上用力震两下,把内部的大气泡震出来。

Bake in the middle rack of a preheat oven at 160C degrees for 50mins.
烤模送入已预热好至160C度的烤箱中层,烘烤约50分钟直到蛋糕熟透即可。

Once the cake is out of the oven, invert the baking mould over a glass bottle to allow to cool before unmoulding.
蛋糕出炉后,马上倒扣在玻璃瓶上散热。待完全冷却后即可脱模。


Do link back to Coco Sweet Tooth if you have used any information as published in this blog.

Sunday, June 18, 2017

黑芝麻绿茶挞 Black Sesame Green Tea Tart


This recipe is inspired by Anncoo's blog and adapted with a black sesame flavored tart shells to create some variations.

As you can see, I still have a long way to go on improving my skills on shaping the tarts base. I am happy with the outcome as the sesame give out a more aromatic smell than regular tarts base. And coupled with this soft egg fillings, its a perfect balance of sweet and savory.


黑芝麻绿茶挞
Black Sesame Green Tea Tart

Ingredients 材料

Black Sesame Shortcrust Pastry 黑芝麻挞皮 (A)
140g Plain Flour 中筋面粉
60g Rice Flour 粘米粉
140g Unsalted Butter 无盐奶油 (room temp 温室回温)
70g Castor Sugar 细砂糖
1/4 Tsp Salt 盐
40g Beaten Eggs 鸡蛋(打散)
40g Black Sesame Powder 黑芝麻粉

Green Tea Filling 绿茶布丁内陷 (B)
300g Fresh Milk 牛奶
65g Castor Sugar 细砂糖
3 Tsp Green Tea Powder 绿茶粉
2 Egg Yolks 蛋黄
2 Eggs 鸡蛋


Method 做法


Combine and sift plain and rice flour (A) together into a bowl. Set aside.
材料A的面粉及粘米粉一起混合,过沥入碗搁置待用。

To prepare sweet shortcrust pastry, beat butter (A) until soft and creamy. Add (A)  sugar, salt, egg and black sesame powder to incorporate. Sift in sifted flour (A) and fold with spatula to combine to form dough. Wrap dough in cling wrap and refrigerate for 3 hours.
事先准备甜派挞皮,把材料A里的奶油置入搅拌盆用搅拌器打至乳霜状,然后把A里的糖,盐,鸡蛋及黑芝麻粉混入,混匀。接着就将过沥的面粉粘米粉粉料拌入,用橡皮刮板拌匀成团后用保鲜纸包起来置入冰箱冷藏三个小时后即可用。


Unwrap dough onto a non stick baking mat, place the cling wrap on the top and roll out to 3-5mm thickness. Gently place the sheet dough into a 2 nos of 20-22cm tart pan with removable base. Gently press dough into the mould without stretching it.
把冷藏好的面团移出,去掉保鲜纸置于不粘硅胶垫上再把保鲜纸铺在面团上。将面团擀成约3至5mm厚度的圆形,轻轻的把杆开的面皮铺在2个20-22cm挞盘上。用手仔细地把挞皮贴入挞盘内。

Remove excess dough over the top edges. Use a fork to prick holes over the base and freeze the dough for 5 mins before baking.
把多余的挞皮撕去,再用叉子在挞皮上穿孔后又转置入冰箱冷冻5分钟后才送入烤箱烘烤。

Preheat oven to 180C degrees.
烤箱预热至180C度。


Place a sheet of aluminum foil over the chilled dough. Press it well into the bottom edges but avoid covering the top edges of the dough. Add baking weights into the tart mould and bake in the center rack of the preheated oven for 18-20 mins.
在冷冻的挞面团铺上一层锡纸,用手指把锡纸压入低部及边缘但不要覆盖面团上部的边缘。锡纸上放上一些小石头转送入已预热的烤箱的中层烘烤18-20分钟。

Remove aluminum foil and baking weights when edges starts to brown. Continue baking the tarts for another 8-10 mins.
把锡纸和小石头取出,再放入烤箱烘烤8至10分钟即可。

Boil (B) sugar and milk until sugar dissolved. Add green tea powder to combine then remove from heat.
将B里的砂糖及牛奶一起混入锅煮热至融化,再加绿茶粉均匀即可离火。

Whisk in egg and yolks in batches until evenly mixed. Sieve.
马上分次把鸡蛋,蛋黄混入绿茶牛奶,一边搅拌一边加入一直搅拌混匀后过沥。


Transfer mixture into the prepared tart shells and bake in the middle rack of a preheated oven for 20 mins. Allow the tarts to cool on wire rack for the egg to set. Serve.
把过沥好的面糊盛入已冷却的挞皮A里,置入预热至180C度的烤箱的中层烘烤20分钟即可取出,摆在凉架上待凉定型。

The leftover egg mixture can be transferred into pudding moulds and bake according to the same baking mode. Allow the baked puddings to cool before refrigerating. Best serve cold. 
剩余的鸡蛋液可以装入各自的布丁模以同样的烘烤方法烤熟成绿茶布丁。烤熟的布丁待凉后便可冷藏后即品尝。


Do link back to Coco Sweet Tooth if you have used any information as published in this blog.

Printfriendly

Related Posts Plugin for WordPress, Blogger...