Friday, April 29, 2016

绿茶布里欧土司 Green Tea Brioche Loaf


This is my second attempt making brioche bread after the one I made for my friend last year. The bread texture is so soft and fluffy with the aroma of green tea. Yummy!
自从去年尝试制做布里欧面包送给好友后都一直没再试做。今次我便采用了绿茶粉来尝试制做布里欧面包,制做出来的效果松软富有茶香味好好吃!


If you have limited mixer or bread maker capacity, I suggest you to adjust the ingredients from my recipe accordingly.
您若是搅拌机或面包机的容量有限,我建议您从我的材料分量上作适量的调整。


绿茶布里欧土司
Green Tea Brioche Loaf 
Recipe Adapted from here


Ingredients 材料

(A)
204g Milk 鲜奶

8g Instant Yeast 速发干酵母
700-730g Bread Flour 面包粉
10g Green Tea Powder 绿茶粉
204g Whipped Cream 动物性鲜奶油
2 Grade A Eggs 大号鸡蛋
80g Egg Whites 蛋白
72g Castor Sugar 细糖
8g Salt 盐


(B)
72g Unsalted Butter 无盐牛油


(C)
35g Milk Chocolate 牛奶巧克力 (chopped切碎)


Method 做法

Combine all ingredients from (A) & (C) into the bowl of a stand mixer with dough hook and mix with lower speed until all ingredients are well combined. 

将所有材料(A)和 (C)倒入搅拌器的钢盆中以慢速度搅拌搓揉成为一个不粘手的面团.


Add (B) butter and slowly increase the speed to medium for approx. 20-22 mins, until a smooth window pane effect is formed. 
把切成小块的奶油B加入然后依照片揉面标准程序继续以中速把面团搅拌(大约20-22分钟)成为撑得起薄膜的面团.


Transfer the dough to a slightly greased bowl, cover bowl with either cling wrap or cloth. Allow the dough to proof for an hour or until the dough doubled in size.

将揉好的面团滚圆, 收口朝下捏紧放入涂抹少许油的盆中, 罩上拧干的湿布或保鲜膜, 放置到温暖很密闭的空间进行第一次发酵约60分钟或至少两倍大.

Test the readiness of the dough with a finger lightly dusted with low gluten or cake flour. The dough is ready when it remain indented after the finger pokes into it. If not, continue to proof for another 5-10 mins before using the finger to poke and perform the test.
第一次发酵完成后, 用手指沾上低筋面粉, 然后直接戳入面团中心. 如果戳出的洞陵没有弹回的迹象, 便完成第一次发酵. 如果戳出的洞渐渐回缩, 则再继续发酵5-10分钟, 然后再用同样的方方式测试.


Punch down the dough. Remove the dough from the bowl and place it on a floured worktop. Divide the dough into 8 equal portions and mould it round. Let it rest for another 15 mins.

工作桌上洒上一些高筋面粉. 将发酵好的面团从盆子中移出. 面团表面也洒上一些高筋面粉, 然后将面团用手压下去将气体挤出来. 把面团平均分割成八等份, 然后滚成圆形, 盖上拧干的湿布或保鲜膜再让面团休息15分钟.

Sprinkle the worktop with bread flour, use a rolling pin to roll each dough into long rectangle shape with width to fit the baking pan. Start rolling out from the shorter end of the dough into a roulade. Repeat the process for the balance 7 ps of dough. 
台座上撒些高筋面粉,将休息好的面团用擀面棍把面团擀成长方形,宽度同烤模短向宽,然后由短卷起。再重复同样的做法把其余的七份面团完成。

Place the 4 cylindrical bread dough (seams down) into a greased close lid loaf pan 19.5cmx10cmx11cmD. 
将卷好的面团收口朝下朝内排入已涂抹不可融化奶油的有盖面包烤模中19.5x10x11cmD以免沾粘。

Tuck the ends down and place the balance 4 pcs of dough (seams down) into another greased bread pan (open lid) of similar size.
再把其余的四份卷好的面团收口朝下朝内排入已涂抹不可融化奶油的相等容量的(无盖)面包烤模中。

Spray some water over the surface with a fine mist nozzle. Final proof the bread in a unheated oven for another 1-2 hours or until the dough reaches 90% of the bread pan rim. 
将烤模放入未开火的烤箱中, 面团表面喷些水然后盖上烤箱门, 再侍发酵1至2小时至面团膨胀至面包模具的轮圆即可。


8-10 Mins prior to baking time, remove baking pan from oven and turn on the oven heat to 170C degrees.
发酵好前8-10分钟, 将烤盘从烤箱中取出, 烤箱打开预热刊至210C度.

Bake the close lid pan at the lowest level of a preheated oven at 210C degrees for 32-35 mins. For the open lid bread, adjust the temperature to 170C degrees and bake for 35-38 mins until cook.
然后将有盖的面包模具送入已经预热至210C度的烤箱最下层烘烤32-35分钟. 至于那份无盖的面包模具,采用同样的做法用170C度把面包摆在烤箱最下层烘烤35-38分钟至面包熟透即可。

Remove bread from oven and turn it out onto cooling rack to cool.
烤好后马上倒扣出来放在铁网架上放凉。


Do link back to Coco Sweet Tooth if you have used any information as published in this blog. 

Friday, April 15, 2016

椰丝煎饼 Coconut Pancakes


Looking for an easy cum yummy snack, here is one fail proof recipe you might want to try.
您是否也想尝试些即简易又可口的小吃呢?这是一道零失败及又超简单的食谱,不妨试试。


椰丝煎饼
Coconut Pancakes

Ingredients 材料

(A)
250g Fresh Shredded Coconut 新鲜椰丝
125g Cream Style Sweet Corn 甜玉米罐头
76g Glutinous Rice Flour 糯米粉
175g Water 清水
1/2 Tsp Vanilla Extract 香草精
1/2 Tsp Salt 盐

(B)
Cooking oil 食油


Directions 做法

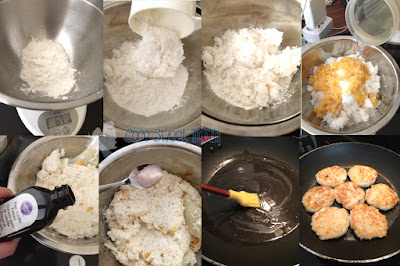
Combine all ingredients (A) together into a bowl until mixed.
将材料A的全部混入盆中,混匀。

Brush some cooking oil (B) onto a pan and heat up oil.
准备好煎锅,煎锅涂抹上少许食油后以中火烧热。


Spoon batter into pan and cook under medium heat until golden brown.
用汤匙勺入面糊在已烧热的煎锅上,以中小火把面糊煎至表面香脆及金黄色。

Flip and cook the other side until golden brown.
然后再把煎饼翻转继续煎熟另一面至金黄色即可。


Do link back to Coco Sweet Tooth if you have used any information as published in this blog. 

Tuesday, April 5, 2016

蛋塔 Egg Tarts


This is my last bake for this week. I will be away in Japan for holiday to take a break away from the kitchen.
这将会是我这星期的最后一道作品。今晚我将会飞往日本度假,暂时远离任何厨房份内的事务。


This is another recipe taken from Carol Hu's "First Book of Baking for Beginners". Hope you enjoy it as much as I did.
今天跟您分享的是取自于湖涓涓的‘烘焙新手必备的第一本书’里的食谱,希望你也和我一样享受蛋挞的美味。


蛋塔
Egg Tarts

(A)
160g Unsalted Butter 无盐牛油
60g Icing Sugar 糖粉
20g Milk Powder 奶粉
60g Eggs 全蛋液 (beaten 打散)
230g Low Protein Flour 低筋面粉
30g High Protein Flour 高筋面粉
1/4 Tsp Salt 盐

(B)
5 Large Eggs 鸡蛋(大)
313g Milk 牛奶
100g Castor Sugar 细砂糖
2 Tsp Vanilla Extract 香草精


Directions 做法


Combine high and low protein flour together. Sift and set aside.
把低筋面粉和高筋面粉一起混合后用滤网过筛。搁置待用。

Cut butter into cubes and allow to soften at room temperature. When slightly press the butter with finger and leaves an indent, whisk the butter until creamy.
无盐牛油切丁放置温室回软,用手指压按有痕迹的程度后便可用打蛋器打散成乳霜状态。

Add icing sugar and continue beating the butter until pale and creamy before adding milk powder. Mix to incorporate.
将糖分及盐加入搅打至泛白呈现乳霜状态,再把奶粉加入搅拌均匀。

Add beaten eggs in few additions. Each addition must be thoroughly mixed in before adding next addition.
全蛋液分数次加入奶油霜内,每一次等混合均匀后才继续加。


Add in sifted flour in 2 batches, use the back of a rubber spatula, press and slice to combine. Fold to evenly incorporate until a dough is formed.
把过滤的面粉分两次加入,用橡皮刮刀按压的方式混合成团 (千万不可过度搅拌,以免影响口感)。

Divide dough into 2 portions and wrap with cling wrap. Refrigerate for at least 30 mins until the dough has sufficiently hardened.
混合完成的面团分成两份然后用保鲜纸包起来, 放入冰箱冷藏至30分钟定型。

Remove tart dough from fridge and cut into 18 equal pieces approx 31g each.
将冰硬的塔皮取出,平均分成18等份(每份约31g).


Place each dough onto the palm and roll into balls. Light flatten each dough into a disc. Dust both sides of the dough with flour and place the dough into the prepared tart moulds.
将小面团放在手心中滚圆,然后稍微压扁, 两面都沾上一层低筋面粉。再把面皮放入塔模中。

Use a thumb to press the skin into the tart mould. Use a fork to press out the edges to form patterns. Place the completed tart moulds onto a baking tray. Transfer the prepared tart shells into the fridge until ready for use.
用大拇指慢慢按压,填满整个塔模,面皮周围一圈用叉子压出花纹,做好的蛋挞皮摆上烤盘上,再放入冰箱里搁置待用。


Combine milk and castor sugar into a saucepan and heat up until sugar dissolved. Remove from heat and allow to cool slightly before adding in vanilla extract. Mix well.
将牛奶和细砂糖一起放入锅加热,煮至砂糖融化就熄火,搁置待温后才把香草精加入混合均匀。

Gradually add the warm milk into the beaten eggs and whisking continuously while pouring until combine. Sieve.
鸡蛋用搅拌器打散,把回温的牛奶慢慢的加入,一边加入一边搅拌至混匀。用滤网过筛。

Place a piece of kitchen paper towel into a measuring cup, transfer the sieved egg mixture into the cup. The paper towel helps to absorb the bubbles from the egg mixture.
把蛋液装入量杯中,量杯里铺上一张餐巾纸让蛋液通过餐巾纸吸取气泡。


Equally divide the egg mixture into the prepared tarts mould about 90% full.
将蛋液平均倒入塔模中约九分满即可。

Transfer the baking pan into a preheated oven and bake at 180C degrees for 20-22 mins until the egg custard is cooked and settled.
送入已预热至180C度的烤箱的中层烘烤20-22分钟,至内陷凝固即可。

Allow the tarts to cool in the mould for 15 mins before unmoulding. Place tarts on a cooling rack to cool completely.
烤好后取出待稍凉就可脱模放凉。


Do link back to Coco Sweet Tooth if you have used any information as published in this blog. 


Sunday, April 3, 2016

贝奈特饼 Beignet


Beignet is actually the french version of doughnut usually made in the form of rectangular puffy pillows after fried. The texture is soft and chewy resembling our local version of fritters.
贝奈特饼是一种法式无孔甜甜圈。一般的造型都是一长方形为主,油炸出来就像浮肿的枕头而富有弹性的口感类似于油条。

The preparation is similar to doughnuts, once the dough is being fried it will be sprinkled with powdered sugar and best eaten fresh while hot.
贝奈特饼的制做方式和甜甜圈一样,都是使用油炸煮熟。一旦油炸离火后便会在饼的表面上撒上糖粉,最好是趁热及新鲜时候品尝。


贝奈特饼
Beignet

Recipe source from Bonbini

Ingredients 材料
(A)
170g Mashed Potato 马铃薯泥 (warm 温)

(B)
330g Plain Flour 中筋面粉
1g Nutmeg Powder 肉豆蔻粉
2 Tsp Vanilla Powder 香草粉

(C)
75g Milk 鲜奶
50g Sugar 糖
3g Instant Dried Yeast 速发干酵母
1 Large Egg 大号鸡蛋

(D)
55g Salted Butter 咸牛油, soften to room temp 温室回温

(E)
Cinammon powder 桂皮粉
Icing Sugar 糖粉

(F)
Oil for frying 食油(用于煎炸)


Directions 做法

Cut potatoes into cubes and steam until tender. Mashed it while its hot. Cover and set aside.
马铃薯切丁后用大火蒸熟透至软化,趁热捣碎成糊状。立刻盖起来搁置。

Heat up milk with sugar in (C) a saucepan until dissolved. Allow to cool.
把材料C的鲜奶和糖一起混入煮锅,开火加热至糖融化即可。搁置待凉。


Sift ingredients (B) together into a mixing bowl until incorporated. Set aside.
将材料B一起沥入碗中,混匀后搁置待用。

When the milk turn lukewarm, transfer it into the mixing bowl of a stand mixer attached with dough hook. Add yeast and set the mixer to low. Add mashed potato and egg and continue mixing.
牛奶稍凉变温后,倒入已安装面团勾的搅拌机的钢盆。再加入速发干酵母,马铃薯泥和鸡蛋以慢速捣匀。


With mixer at low speed, add flour ingredients (B) and continue mixing until smooth and slightly elastic about 15mins.
接下来加入过沥混合的粉料B,继续以慢速搅拌大概15分钟至面团光滑有弹性即可。

Transfer dough into a greased bowl and cover with cling wrap or slightly damp cloth. Allow the dough to proof till doubled in size.
把面团转送入一个已涂抹少许食油的盆,用保鲜纸或拧干的湿布盖上。让面团进行第一次发酵至两倍大以上.

Remove dough from bowl and release the air. Fold the dough once and refrigerate it overnight.
将发酵好的面团从盆子中移出, 将面团用手压下去将气体挤出。折叠面团一次,冷藏隔夜。


On the next day, remove dough from fridge and roll out on slightly floured worktop about 1/2" thick. Use a pizza cutter, cut the dough into 2x2inch squares or rectangles. Place each cut dough on top of baking tray lined with siplat or parchment paper. Final proof the bread in a unheated oven for another 50-60 mins.
第二天,从冰箱取出面团,工作枱上撒些面粉把面团擀成大约1/2 “厚度。再用比萨刀把面团切割成2x2inch正方形或长方形,排在已铺上烘培纸的烤盘上。将烤盤放入未开火的烤箱中, 再侍发酵50-60分钟至两倍大.

Combine (E) together and set aside.
把材料E一起混匀, 搁置待用。


In a deep heavy saucepan or a fryer, heat the oil until it reaches 175C°. Deep fry the beignets in batches for 1-2 minutes on each side, until puffed and golden brown on both sides.
把足够的炸油倒入炸锅,以中火把油烧热至175C度。调低火力以中小火分批的把贝奈特饼油的两侧各炸1-2分钟,至面团膨化和金黄色即可。

Remove and sprinkle (E) mixture as toppings.
离火后马上在表面撒上桂皮糖粉混合料。


Do link back to Coco Sweet Tooth if you have used any information as published in this blog. 


Saturday, April 2, 2016

蛋白班兰蛋糕卷 Egg Whites Pandan Swiss Roll


I was left with a tub of egg whites from the recent making of Indonesia lapis layered cakes 2 weeks ago. Hence I searched from the net for recipes to ease up the leftover egg whites and I came across a white cake recipe from Ann Low's blog which seemed easy and yummy.
前两个星期我因制做了两道印尼千层蛋糕而剩下一大罐的蛋清。为了用掉那些蛋清,我便在网络上寻找能帮助运用蛋清的烘培食谱,最后便于Ann Low's 的博客里看上了一道即简易而又美味的蛋白蛋糕卷的食谱。


To enhance the taste and outlook of the roll cake, I have made some adaptations to arrive at my duo flavor version.
我在原著的食谱里做了少许修改来制做这道双味蛋糕卷的版本。

Thank you Ann Low for this inspiring cake recipe. 
非常感谢Ann Low食谱给予的灵感。


蛋白班兰蛋糕卷
Egg Whites Pandan Swiss Roll


Ingredients 材料

(A)
3 Tbsp Corn Oil 玉米油
60g UHT Fresh Milk 鲜奶

20g Caster Sugar 细糖
1/4 Tsp Salt 盐
40g Plain Flour 中筋面粉
10g Rice Flour 粘米粉
1/2 Tsp Vanilla Powder 香草粉

(B)
2 Tbsp Corn Oil 玉米油
40g UHT Fresh Milk 鲜奶

15g Caster Sugar 细糖
29g Plain Flour 中筋面粉
7g Rice Flour 粘米粉
1 Tbsp Pandan Extract 班兰精

(C)
282g Egg Whites 蛋白
60g Caster Sugar 细糖

(D)
130g Pandan Kaya Jam 班兰加央

Directions 做法


Combine plain flour, rice flour and vanilla powder of (A) evenly. Sift and set aside. 
材料A里的中筋面粉,粘米和香草粉一起加入碗用沥网过筛。搁置待用。


Repeat the same process for the flour ingredients from (B). Set aside.
也把材料B的粉料如上的做法然后搁置待用。


Line and grease a 38x17cm baking tray with parchment paper. 
在38x17cm的烤盘铺上烘焙纸,纸上涂抹少许油脂。


Preheat oven at 160C degrees
烤箱预热160度。


In a mixing bowl, add corn oil, milk, salt and sugar (of A) together and mix evenly. Sift in sifted flour mixture (A) and use a hand whisk to combine. Set aside.
把材料A的玉米油,鲜奶,盐 和糖一起倒入碗,搅匀。再把之前过沥好的粉料A沥入,用打蛋器捣匀。搁置待用。


In another mixing bowl, combine corn oil, pandan extract, milk and sugar (of B) together until mixed. Sift in sifted flour mixture (B) and use a hand whisk to combine. Set aside.
在另一个搅拌碗中,把材料B的玉米油,鲜奶,班兰精和糖一起倒入碗,搅匀。再把之前过沥好的粉料B沥入,用打蛋器捣匀。搁置待用。


In a dry and grease free mixing bowl, whisk the cold egg whites (C) until frothy. Add 1/2 of the castor sugar and continue whisking until the meringue thicken and increase in volume before sifting in the balance castor sugar. Increase the mixer to higher speed and continue whisking until firm peaks and when the meringue does not drop out when the bowl is flipped upside down. This is crucial step to prevent the cake from breaking during rolling.
把材料C的冷藏蛋白倒入另一个搅拌盆里,用搅拌机将蛋白(C)打至粗泡状。将一半的幼糖倒入继续搅打至体积变大后再把剩余的幼糖沥入,以快速把蛋白打至发泡而蛋白会固定于容器内,倒扣时也不会流动即可,否则在卷蛋糕的时候容易破裂。 


Divide the meringue into 2 portions of 136g and 205g respectively.
将打发的蛋白霜分成两份量。一份为136克而另一份为205克。


From the 1st portion of 136g , add 1/3 of the beaten egg whites into the pandan cake batter (B) and fold to incorporate. Continue to fold in the balance beaten egg whites with rubber spatula until evenly combined. Set aside. 
从136克的第一份蛋白霜里,取出1/3份量的蛋白霜拌入班兰面糊B中用橡皮刮刀拌合。接着才加入其余的蛋白霜,轻轻的从容器底部刮起拌匀。搁置待用。


From the 2nd portion of 205g , add 1/3 of the beaten egg whites into the vanilla cake batter (A) and fold to incorporate. Continue to fold in the balance beaten egg whites with rubber spatula until evenly combined. 
从205克的第二份蛋白霜里,取出1/3份量的蛋白霜拌入香草面糊A中用橡皮刮刀拌合。接着才加入其余的蛋白霜,轻轻的从容器底部刮起拌匀。


Pour the 2 cake batters alternately into the prepared baking tray. Level the surface, tap the baking tray on the countertop to release trapped air pockets. Transfer the baking tray into the middle rack of a preheated oven and bake at 160C degrees for 15-16 mins until the surface has browned and cake springs back when press. 
把两种蛋糕糊交替地倒入烤盘。 用小刮板将表面抹平。烤盘在桌面上轻敲几下震出气泡后送入预热的烤箱中层以160度烘烤15-16分钟左右或至到表面呈金黄色,触感有弹性即可。


Invert the cake onto a damp kitchen towel and remove the baking tray and parchment paper. Immediately roll up the cake with the kitchen towel before placing it to cool on a cooling rack. 
蛋糕出炉后,马上倒扣摆上一块湿台布,把烘培纸撕开趁热用台布把蛋糕卷起来摆在铁架上散热。 


Heat up pandan kaya jam in microwave for 30 seconds to soften. 
把班兰加央放入微波炉30秒加热软化。


Unroll the cooled cake, spread a layer of the pandan kaya jam over the cake top. 
将已冷却的蛋糕卷打开,把班兰加央涂抹上蛋糕表面。 


Roll up the cake
再次把蛋糕卷起来。 


Once the cake is rolled up, twist the two sides of the kitchen towel / parchment paper and refrigerate the wrapped cake for 1 hour to set. 
卷完后用蛋糕纸包住蛋糕体,两端稍微扭紧,冷藏1小时待蛋糕卷定型。 


Remove parchment paper, trim both ends and slice to serve. 
去掉蛋糕纸,切去两头就可享用。 


Do link back to Coco Sweet Tooth if you have used any information as published in this blog. 


Friday, April 1, 2016

紫地瓜超软面包 Very Soft Sweet Potato Toast


I love making bread more than pastries. Breads are very easy to make once you understand and have successfully gone through the actual process of baking. That shall be the foundation to base on to move on to making many other types of bread.
在烘焙上,我比较爱制做面包。其实,制做面包并不难,您只要明白面包制做的过程和掌握了基础,而且已顺利烘烤出第一道面包,那就能尝试以面包制做原理来做出更多不同的面包。


This is a straight forward method to achieve a soft and fluffy bread without the hassle of preparing tangzhong or starter dough. Do give it a try and I am sure you would be proud of the outcome.
这是一道直接而又不须采用汤种或中种面团制做出来既松软,富有地瓜香的面包食谱。你不妨试试做看,我相信您一定会很满意制做出来的面包结果而感到自豪。

Happy Baking! 
祝您烘焙愉快!


紫地瓜超软面包
Very Soft Sweet Potato Toast


Ingredients 材料

(A)

200g Mashed Purple Sweet Potato 紫地瓜泥

(B)
465g Bread Flour 高筋面粉
15g Milk Powder 奶粉
8g Instant Dried Yeast 速发干酵母
85g Castor Sugar 细糖
1 Large Egg 鸡蛋(大)
20g Egg White 蛋白
195g Milk 牛奶
3g Sea Salt 海盐

(C)
65g Unsalted Butter 无盐牛油


Directions 做法


Combine all ingredients (A) and (B) into the bowl of a stand mixer with dough hook and mix with lower speed until all ingredients are well combined.
将所有材料(A)和 (B)倒入搅拌器的钢盆中以慢速度搅拌搓揉成为一个不粘手的面团.

Add in butter (C) and slowly increase the speed to medium and continue kneading for approx 15-18 mins, until the dough becomes smooth and pass the window pane test.

把切成小块的奶油C加入然后依照片揉面标准程序继续以中速把面团搅拌(大约15-18分钟)成为撑得起薄膜的面团.


Transfer the dough to a slightly greased bowl, cover bowl with either cling wrap or cloth. Allow the dough to proof for an hour or until the dough doubled in size.
将揉好的面团滚圆, 收口朝下捏紧放入涂抹少许油的盆中, 罩上拧干的湿布或保鲜膜, 放置到温暖很密闭的空间进行第一次发酵约60分钟或至少两倍大.

Test the readiness of the dough with a finger lightly dusted with low gluten or cake flour. The dough is ready when it remain indented after the finger pokes into it. If not, continue to proof for another 5-10 mins before using the finger to poke and perform the test.
第一次发酵完成后, 用手指沾上低筋面粉, 然后直接戳入面团中心. 如果戳出的洞陵没有弹回的迹象, 便完成第一次发酵. 如果戳出的洞渐渐回缩, 则再继续发酵5-10分钟, 然后再用同样的方方式测试.


Punch down the dough. Remove the dough from the bowl and place it on a floured worktop. Divide the dough into 6 equal portions and mould it round. Let it rest for another 15 mins.
工作桌上洒上一些高筋面粉. 将发酵好的面团从盆子中移出. 面团表面也洒上一些高筋面粉, 然后将面团用手压下去将气体挤出来. 把面团平均分割成6等份, 然后滚成圆形, 盖上拧干的湿布或保鲜膜再让面团休息15分钟.

Sprinkle the worktop with bread flour, use a rolling pin to roll each dough into long rectangle shape with width to fit the baking pan. Start rolling out from the shorter end of the dough into a roulade. Repeat the process for the balance 5 ps of dough. 
台座上撒些高筋面粉,将休息好的面团用擀面棍把面团擀成长方形,宽度同烤模短向宽,然后由短卷起。再重复同样的做法把其余的五份面团完成。

Place the 3 cylindrical bread dough (seams down) into a greased loaf pan 21cmx11.5cmx6.5cmD. Repeat the same process for the balance 3 bread dough into another greased loaf pan of equivalent size.
将卷好的三份面团收口朝下朝内排入已涂抹不可融化奶油的面包烤模中21x11.5x6.5cmD以免沾粘。再把其余的三份面团排入另一个同等及已涂抹不可融化奶油的面包烤模中。


Spray some water over the surface with a fine mist nozzle. Final proof the bread in a unheated oven for another 50-60 mins.
将烤模放入未开火的烤箱中, 面团表面喷些水然后盖上烤箱门, 再侍发酵50-60分钟至两倍大.

8-10 Mins prior to baking time, remove baking pan from oven and turn on the oven heat to 170C degrees.
发酵好前8-10分钟, 将烤盘从烤箱中取出, 烤箱打开预热刊至170C度.

Apply egg wash over the bread surface.
在面团表面涂上全蛋液。

Bake in the lowest level of a preheated oven at 170C degrees for 38-40 mins.
然后送入已经预热至170C度的烤箱中层烘烤38-40分钟.

Remove bread from oven and turn it out onto cooling rack to cool.
烤好后马上倒扣出来放在铁网架上放凉。


Do link back to Coco Sweet Tooth if you have used any information as published in this blog. 


Printfriendly

Related Posts Plugin for WordPress, Blogger...