Wednesday, April 1, 2015

Light Strawberry Cheddar Cheesecake


Baked this batch of cheese cake for my buddy as my hubby went there for business trip two weeks ago. Unlike the normal cheesecake which is dense and creamy rich, this recipe only use small dosage of cream cheese. I have adapted this recipe from the original as I was trying to use up the leftover cream cheese in the fridge. 


I was hoping for the cake  to turn out like the souffle cheesecake, however, after baking the cake ended up like a hybrid between the chiffon and sponge. In my opinion, this cake will serve well for those who are less keen on cheese as there is only a mild tinge of cheesy flavor to it.  


Light Strawberry Cheddar Cheesecake

Ingredients (A)
140g Evaporated Milk
30g Cheddar Cheese
30g Cream Cheese
50g Butter

(B)
110g Superfine Flour

(C)
5 Egg Yolks, 
1 Whole Egg
1 Tbsp Strawberry Extract (I use blended fresh strawberries)
(D)
5 Egg Whites
110g Castor Sugar
1/2 tsp Cream of Tartar

(E) 
Fresh Strawberries for Decoration (optional)


Method
  • Preheat oven at 150C degrees (Upper and Lower Rack).
  • Line and grease bottom and sides of an 9" x 9" square cake mould with parchment paper. 
  • Using a hand whisk, combine and boil (A) in a heat proof saucepan / mixing bowl over low heat. Keep stirring until butter and cheese is fully melted. Remove from heat.
  • Sift in (B) to (A) mixture while it is still warm. Mix well. 
  • Set the above mixture over hot water to keep warm. Add (C) and combine well.
  • In another clean and oil free mixing bowl, whisk egg whites and cream of tartar in (D) until frothy. Add sugar in 2 batches and continue beating until soft peak is formed.
  • Fold 1/3 of the egg whites mixture to egg yolk batter. Mix until just incorporated. 
  • Pour the batter to the remaining egg white mixture. Mix well.
  • Transfer the batter into the prepared pan and bake at under the lower rack 150C degrees for 20 minutes. Reduce heat to 130C degrees and continue to bake for another 35-40 minutes till skewer inserted comes out clean. 
  • Remove cake from oven and immediately drop the cake pan at a height of 30cm onto the kitchen counter top to release the hot air inside the cake.  This process helps to reduce sinkage / shrinkage of the cake upon cooling. Unmould the cake immediately. 
  • To unmold, place a large plate or baking sheet on top of the cake pan, invert the cake pan onto the plate / baking sheet. Remove the cake pan and the parchment paper on the base and sides of the cake. Place a cooling rack on the base of the cake, invert the cake right side up onto the cooling rack and leave to cool immediately. 
  • Chill the cake in the fridge for 2-3 hours or overnight before serving.


Tuesday, March 31, 2015

Chicken Pie 鸡肉派

Being raised from a traditional Chinese home,  my exposure to savory desserts were mainly steam buns, hand made kuihs, dumplings, fried carrot cakes etc. Pies and tarts only came into the picture after I started working in Singapore in the early 90s.  During then, I only buy egg tarts and would choose egg tart over chicken pie. I guess I was probably more inclined towards eggs than meat in general. So when I turned full vegan 2 years ago,  it took me a while to disengage myself from my eggs attachment. 

I remembered how I loved munching on the crust of egg tarts,  the buttery cum firm bite of the fruit tarts from delifrance. Being new to vegan baking and the difficulty of getting vegan ingredients from Indonesia, I have no choice but to bake non vegan versions for my household members, who has been my supporter and many thanks to them I get to continue my baking and cooking quest without having to worry about wastage or leftovers.


Chicken Pie 鸡肉派

Ingredients A (Filling - 馅料)

300g Chicken Breast Meat  鸡胸肉
2 Cooked Eggs 煮熟鸡蛋
3 Slices Ham 火腿 (Optional)
1/4 Onion 洋葱
150g Cooked Potatoes 煮熟马铃薯
1/2 Capsicum 甜椒
2/3 Cup Evaporated Milk 奶水
20g Corn Flour 玉米粉
1/2 Tsp Salt 盐
1/4 Tsp Pepper 胡椒粉

Dice All Ingredients. 
Heat up 2 - 3 Tbsp cooking oil and fry onions till softened. 
Add in chicken meat and stir fry till 80% cooked. 
Stir in eggs, ham, potatoes and capsicum. Season with salt and pepper.
Add in corn flour and evaporated milk to thicken the mixture. 
Remove and set aside to cool for later use.

将所有配料切丁. 在锅里烧热 2-3 汤匙油, 加入洋葱炒香至软, 加入鸡肉炒至8分熟, 加入蛋, 火腿, 马铃薯和甜椒, 拌炒均匀后加入盐和胡椒粉调味. 最后加入拌匀的玊米粉奶水一勾芡至浓稠状.


Ingredients B (Crust 派皮)
150g Cake Flour  低筋面粉
100g Frozen Butter 冰硬牛油(diced)
1 Egg Yolk 蛋黄
1/4 Tsp Salt 盐
1/4 Cup Ice Water 冰水

Sift Cake flour onto table top. Add frozen butter to the flour. Using a dough cutter. cut the butter into coarse bits. Using chopsticks, mix well flour and butter mixture, egg yolk, ice water and salt to form a dough. 
Place the dough in a plastic bag and press with palms to even out the dough. Refrigerate the dough for 1 hour.

将面粉过筛在面板上, 放在上冰硬牛油, 以切面刀切碎, 加入蛋黄, 冰水和噔盐, 以筷子搅拌成团. 装入塑胶袋. 再以手轻轻压成厚度均匀的面团, 放入冰箱冷藏1 小时.


Method
  • Remove dough from fridge. Take 2/3 of the dough and divide into smaller portions. Roll / Flatten out each portion and cut into round disc with cookie / pie cutter. Place the dough into pie mould, add filling. Repeat until all the portions are used up. 
  • Roll the balance 1/3 of the dough (crust) and cut into round disc, use it to cover the pies.
  • Remove excess crust. Use fork to press the edges of the pie to form patterns. Use tooth picks to punch a few holes onto the upper crust.
  • Brush with beaten egg yolk.

  • Bake in preheated oven at 170C degrees for 40 minutes. 

  • 取出面团, 将 2/3 的面团分成小份, 擀成圆形薄片, 放入塔模中整形, 填入适量馅料, 将剩余的派皮擀薄, 刷上蛋黄.
  • 将派放入预热至170C 的烤箱, 烤约40 分钟即可.


Monday, March 30, 2015

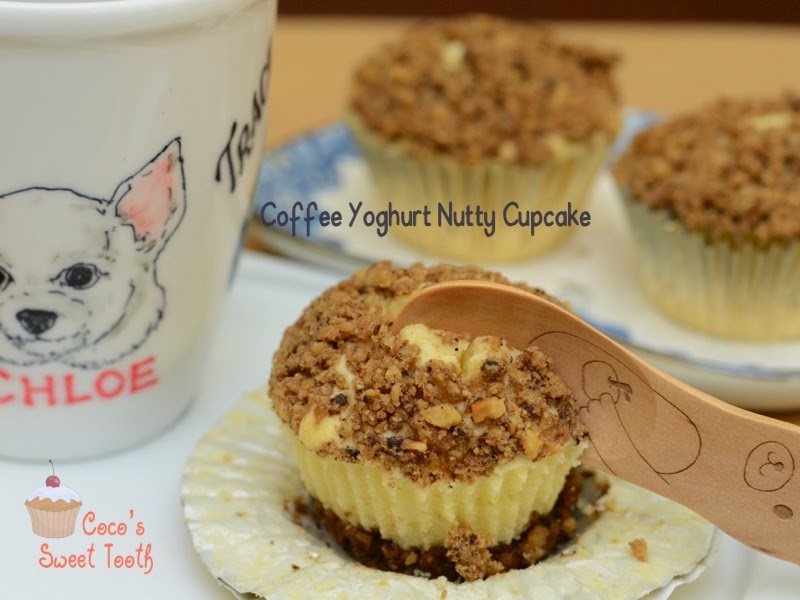
Coffee Yoghurt Nutty Cake


Here is another " easy to make" cupcake recipe. Most people who ate this cupcake mistakenly thought it was cheesecake due to the creamy texture of the cake.


Coffee Yoghurt Nutty Cake

Ingredients :
(For the base and the crumbs)

120g digestive biscuits (crushed)
40g Walnuts (lightly roasted and chopped coarsely)
40g Hazel nuts (lightly roasted and chopped coarsely)
80g Light brown sugar
8g Instant Coffee powder
80g butter (cold, cubed)


Ingredients :
(For the cake layer)
 
225g Butter (softened at room temperature)
130g Castor sugar
3 Eggs (lightly beaten , Grade A)
1 tsp Vanilla extract
A pinch of salt
300g Cake Flour
1-1/2 tsp Baking powder
225g Plain Yoghurt


Method

  • Preheat oven to  170C degrees.  
  • Mix crushed digestive biscuits, light brown sugar, chopped walnuts, hazelnuts, instant coffee powder in a mixing bowl. With finger tips, rub in the cold butter until mixture becomes crumbly. Set aside.
  • Sift cake flour and baking powder, set side.
  • Prepare and line the bottom of the cupcakes mould, baking cups with 1/2 of the crumbles.  Spread evenly and press firmly with the back of a spoon. Set aside.
  • Using a stand mixer with paddle attachment, beat butter with sugar until batter turns pale, creamy and fluffy.
  • Mix in vanilla extract, salt and mix well.
  • Add in eggs, one at a time while continue mixing until fully incorporated.
  • Fold in the cake flour and baking powder with swift and light folding strokes until flour mixture is evenly combined. The batter at this stage will be thick and firm.
  • Stir in the yoghurt until the batter is of 'spreadable' consistency.
  • Transfer the batter into prepared baking cups. Sprinkle the balance of the crumbles on top of the cupcake batter.
  • Bake for 20-25 minutes, or until a skewer inserted into the centre comes out clean.
  • Remove cupcakes from oven, let cool slightly before serving.
  • The cupcakes can be left at room temperature or left to chill in the fridge. 
  • When chilled, allow the cupcakes to return to room temperature before serving.


Saturday, March 28, 2015

Strawberry Souffle Cheesecake......sweet and tender

Last week I was suddenly drawn by the urge  to fiddle with the camera, and as usual, the subject of my photography would evolve around my fur babies or baking. As I have already taken truckloads of photographs for my three furry babies, the thought of taking pastries appeal to me more. Then I started rummaging through my collection of recipes against whatever available ingredients I have on hand.

Okay, I still have leftover strawberry puree kept in the fridge and a block of cream cheese beckoning for attention. Hence I settled for making cheese cake which would be a safer choice and general crowd pleaser since it would be hard for my hubby to finish the same cake alone by himself and I could distribute the excess away.


Strawberry Souffle Cheesecake
(Makes one 9' x  9" Cake)

175g Cream Cheese (cut into cubes)
84g Unsalted Butter (cut into cubes)
7 Egg Yolks (Grade A Eggs with net weight of 55g or more)
120g Milk
50g Strawberry Puree / Paste ( I use 50g fresh strawberries and blend into paste) 
1 Tsp Lemon Juice
105g Cake Flour
49g Corn Flour

7 Egg Whites (Grade A Eggs)
160g Castor Sugar
1 tsp Lemon Juice

1.5 Tsp Instant Coffee (Dissolve with 1 Tbsp Boiling Water & 1 tsp vanilla extract)


Method
  • Preheat oven at 150C degrees. Sieve together cake flour and corn flour and set aside.
  • Line the base and sides of a 9" square cake pan (fixed base) with parchment paper. For the sides, make sure the paper extends higher than the cake pan by 2-3cm to allow the cake to rise properly rather than spilling out from the side. 
  • Place cream cheese and butter in a heat proof large mixing bowl. Set the mixing bowl over a saucepan of simmering water while making sure the base of the mixing bowl does not reach or touch the simmering water. 
  • Keep stirring while allowing the cheese butter mixture to melt smoothly. Remove from heat and set aside to cool.
  • When the cream cheese butter mixture has cool, add in egg yolks one at a time while using a hand whisk to whisk until combine.
  • Add milk, strawberry paste and continue to whisk until evenly combined. Stir in lemon juice and whisk well.
  • Sieve over the flour mixture and using quick light strokes whisk to incorporate the flour into the cheese butter mixture. Apply gentle strokes while whisking the mixture until there are no visible lumps in the batter, avoid over mixing the batter.
  • In another separate, dry and clean mixing bowl, beat egg whites and lemon juice with an electric hand mixer on low speed until mixture turns frothy. Add in 1/2 of the sugar and continue beating the egg whites with high medium speed for a minute. Add in the balance of the sugar and continue beating the egg whites until soft peaks are formed. Turn to low speed an beat for another 1-2 mins to help stabilize the air bubbles.
  • With a spatula, fold in the egg whites meringue to the cream cheese batter in 3 separate additions until combined.
  • Spoon 3 Tbsp of the strawberry cheese batter into the coffee mixture. Mix till smooth.
  • Pour batter into the prepared cake pan. Tap the pan lightly on a table top to get rid of any trapped air bubbles in the batter. Drop dots of coffee batter onto the cheese cake batter. Draw the marbling with a knife.
  • Place cake pan in a baking tray. Fill the tray with hot water to reach about 1cm of the cake pan.
  • Place cake pan on lower rack of the oven and bake at 150C degrees for 60 mins or when the  cake tester inserted comes out clean.
  • Remove cake from oven and immediately drop the cake pan at a height of 30cm onto table top. This helps to prevent the cake from shrinking upon cooling. Unmould the cake immediately and quickly remove the cake pan and parchment paper. Place a cooling rack on the base of the cake, invert the cake right side up onto the cooling rack and allow to cool completely. 
  • Leave the cake to chill in the fridge overnight before serving.


Friday, March 27, 2015

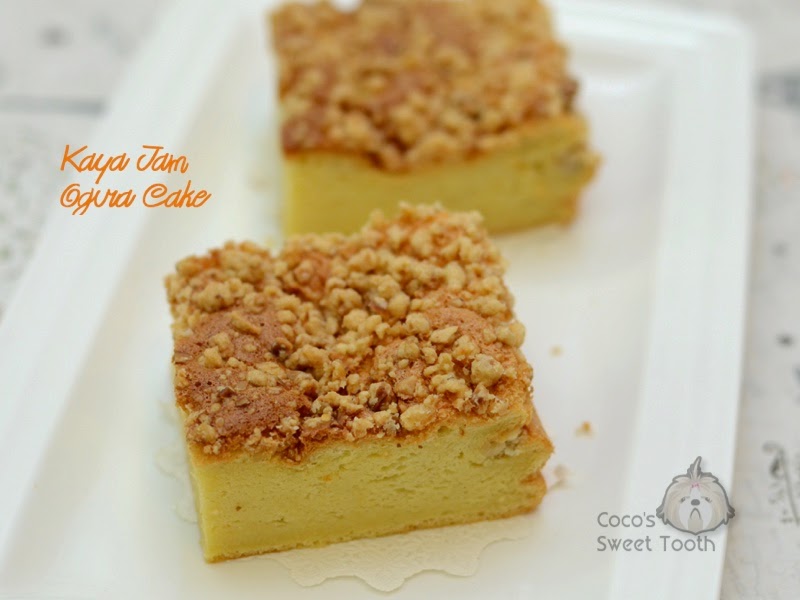
Kaya Jam Ogura Cake ...... a traditional cum western combo

When I came across Kimmy's apple jam cottony cake posting last month I already earmarked to try out the recipe. My last attempt making Ogura cake was more than 2 years ago and during then I was still pretty clueless towards baking but somehow I can't recall now how the cake turned out. Based on the long time gap as to why I haven't revisit making the Ogura cake I reckoned the outcome then must have not been satisfactory.

This time round I was encouraged by the simplicity of the given recipe by Kimmy's blog and have adapted the recipe to our household's preference.

Kaya Jam Ogura Cake

90g Superfine Flour / Cake Flour (sifted)
1/2 tsp Salt
6 Egg Yolks
1 Whole Egg (Grade A Eggs above 60g)
72ml Corn Oil
2-3 Tbsp Kaya Jam (I used store bought Srikaya)
72ml Evaporated Milk

6 Egg Whites
1 tsp Lemon Juice
60g Castor Sugar

Toppings :
Walnut Crumble Toppings (optional) as I have still leftovers stored in the freezer from the making of the cheese cake last month.


Directions :

  • Line and grease the bottom of a 9" x 9" square baking pan with parchment paper. 
  • In a mixing bowl, combine flour and salt together to form a well opening in the centre. Add in egg, corn oil, kaya jam and milk. 
  • Using a stand mixer or electrical hand mixer, beat ingredients until creamy and well combined. Set aside.
  • Preheat the oven at 160C degrees, remove the oven's baking tray and pour in 2 cups of water into the tray and place the baking tray back to the middle lower rack.
  • In another separate clean bowl, whisk the egg whites until frothy, add in sugar in 3 batches followed by lemon juice. Continue whisking at high speed until soft stiff peaks formed.
  • Using a spatula with light swift folding strokes, fold in 1/2 of the meringue into the egg yolk mixture until well combined. Add in the rest of the meringue (egg white batter) to the mixture and continue folding until thoroughly mix.  
  • Transfer batter into the cake mould and lightly shake the baking pan to even out the batter.
  • Sprinkle crumble toppings over the top of batter. 
  • Steam bake in oven at 160C degrees for 10 minutes. Then lower the heat to 150C degrees and bake for another 55-60 minutes.
  • Remove cake from oven after baking. Drop the cake pan at the height of 30cm onto the table top to release the trapped hot air in the cake to reduce shrinking and sinking. Invert the cake on a wire rack and allow to cool slightly before removing the baking paper.
  • Cool cake completely or refrigerate before slicing. 


The cake turns out airy and cottony with the texture of chiffon cake. 

Tuesday, March 24, 2015

Flossy Chicken Bun 鸡肉松奶酥面包


Last week I came across several packets of chicken floss which we brought back from Malaysia during the recent Chinese New Year holiday. Prior to turning vegan, I used quite a fair bit chicken floss in baking and occasionally as toppings to congee or certain dishes. 

The last time I made chicken flossy buns was at least 2 years ago and ever since then I have been buying from Bread Talk whenever my hubby got sick of eating home made breads. For this bread, I fully utilized our supply of chicken floss to the fullest as bread fillings and decorations.

Here is the taiwanese soft bread recipe which I use extensively in most of my bread recipe. With this recipe, I could cut down the '汤种' scalded dough method and go straight into making the bread while still expecting soft airy outcome.  


Flossy Chicken Bun

Soft Bun Dough 基本面團 (软式餐包)
Adapted from 周老师的美食教室 '天然手作面包101 道

320g Water 水
5g Apple Cider Vinegar 萍果醋 
5g Instant Yeast 快发乾酵母
520g High Protein Flour 高筋面粉
100g Low Protein Flour 低筋面粉
80g Castor Sugar 细白砂糖
7.5g Salt 盐
1 Grade A Egg 鸡蛋 (50g nett weight)
80g Unsalted Butter 无盐奶油


Fillings (Optional)
200g Salted Butter 奶油
180g Icing Sugar 糖粉
100g Eggs 鸡蛋
200g Milk Powder 奶粉
200g Chicken Floss 鸡肉松  

  • Cream butter and icing sugar until well blended.
  • Add in eggs, cream until smooth. Add in milk powder and chicken floss, mix until well combined.
  • Set Aside or keep in fridge until ready for use

Directions 
  • In a mixing bowl of a stand mixer, combine all  ingredients (except butterl) together and using a dough hook, mix all ingredients until the dough gathers to form a ball. 
  • Add butter and continue kneading for 15-20 mins on medium speed until the dough no longer stick onto the wall of the mixing bowl, or, when performing the window pane test, the stretch dough forms a thin pane without breaking.
  • Gather the dough and roll it into a ball and let it proof in a lightly oiled bowl. Cover the bowl with a damp cloth and leave for 2 hours or until doubled in size at room temperature.
  • Remove the dough from bowl and punch down the air. Divide the dough into 20 portions. Roll each portion into a small ball, cover and allow it to rest for 20mins. 
  • Flatten each ball and roll into a round disc or rectangle shape. Place the fillings in the centre, shape and seal the seams accordingly. 
  • Place each buns on a lined / greased baking tray. Apply a coat of egg wash over the buns and let it proof for 55 mins.
  • Bake the buns at 185C degrees (lowest rack of the oven) or 180C degrees (middle rack) for 12 minutes. Set aside to cool.
  • Spread the top with mayonnaise and coat the buns with extra chicken floss. 


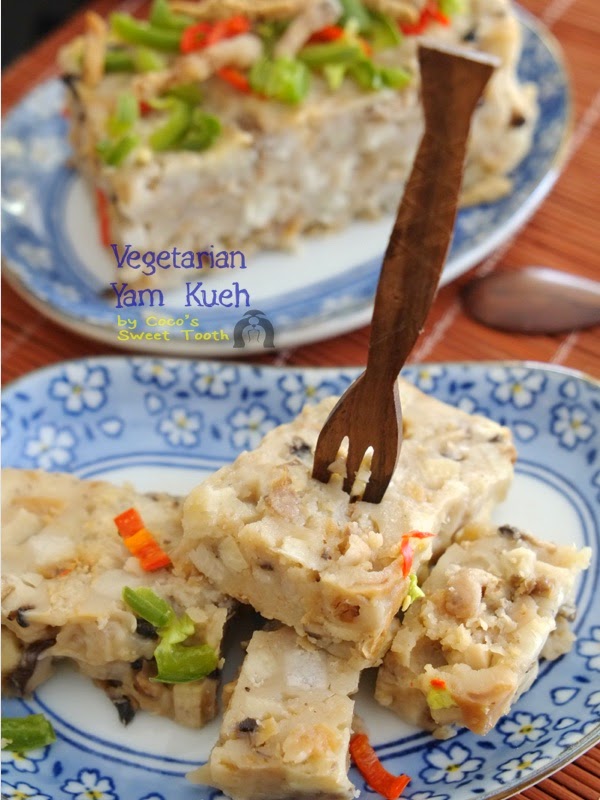
Vegetarian Yam Kueh 素芋头糕

Yesterday my maid brought back 3 huge yam when she came back from Bogor costing only USD3 in total. So we set about putting it to good use and settle for something savory, which is how we arrived at making yam kueh.

Instead of making the traditional ones using dried shrimps, shallots and other non vegan ingredients, I decided to adapt the recipe from baking corner's Steam Yam Cake's recipe to the vegan version.

Ingredients

  • 400g Yam (diced)
  • 300ml Water
  • 40g Preserved Turnips(Chai Poh 菜脯)
  • 30g Vegetarian Ikan Bilis (fried & crushed)
  • 4 Shitake Mushroom (diced)
  • 6 Chinese Mushroom (soaked and diced)
Seasoning
  • 1 Tbsp Mushroom Oyster Sauce (Vegetarian)
  • 1 Tbsp Light Soy Sauce
  • 1 Tbsp Sugar 
  • 1/2 Tbsp Salt
  • Dash of Pepper
Batter (mix together)
  • 200g Rice Flour
  • 3 Tbsp Corn Flour
  • 350ml Water
Toppings (Optional)
  • Some Vegetarian Ikan Bilis (fried)
  • Red Chillis (sliced)
  • Green Peppers (sliced)


Directions :
  • With 5 Tbsp of cooking oil salute turnips (chai poh) until fragrant. Remove and set aside.
  • Using 2 Tbsp sesame oil, stir fry the diced yam under medium heat for 5 minutes. Remove and set aside.
  • Using the same wok laced with leftover oil from frying the yam, stir in the mushrooms, ikan bilis and continue to stir fry until fragrant. Add in turnips, yam and 300ml water and continue stir frying until combined.
  • Stir in seasonings and batter.
  • Continue stirring with low heat until mixture thickens. 
  • Remove from heat. Transfer the batter into a 8x8 inch steaming tray lined with banana leaf at the bottom.
  • Steam under high heat for 30 mins.
  • Remove and apply toppings. Let cool.


Printfriendly

Related Posts Plugin for WordPress, Blogger...