Friday, August 14, 2015

全素金银萝卜糕 Vegetarian Carrot and Radish Cake


Another great recipe adapted from Amy Wong's Aromas of Kuihs to vegetarian version. Firm but yet tenderly chewy. Totally satisfied with this recipe!

这是一道我很满意的糕点食谱。 我把原著的食谱做稍微的修改成全素式的萝卜糕。食谱取自黄春梅的书籍“层层糕粿香”。


全素金银萝卜糕 
Vegetarian Carrot and Radish Cake 


Ingredients 材料 (A)

400g Radish 白萝卜
400g Carrot 红萝卜

(B)
400g Rice Flour 沾米粉
50g Wheat Flour 澄面粉
25g Corn Flour 玉米粉`
1200ml Water 清水

(C)

2-1/2 Tsp Salt 盐
2 Tsp Sugar 糖
1 Tbsp Vegetarian Mushroom Sauce 斋蠔油
1 Tsp Pepper 胡椒粉
1 Tsp Mushroom Stock Powder 香菇精

(D)
15g Ginger 姜 (chopped 切碎) 
40g Vegetarian Ikan Bilis 素江鱼仔 (chopped 切碎)
40g Vegetarian Meat 菇制素肉 (diced切丁)
30g  Chinese Mushroom 花菇 (soaked and chopped泡软后切碎)

(E)
3 Tbsp Sesame Oil 芝麻油


Method 做法

Grate radish and carrot. Scald both (A) together in boiling water and drain.
将A材料里的白萝卜和红萝卜刨丝,以滚水汆烫后沥干。

In a mixing bowl, mix ingredients (B) till combined. Set aside。
把材料B混拌入一个大碗至均匀。搁置备用。

Combine ingredients (C) in a small bowl. Set aside.
再把材料B混拌入另一个小碗,搁置备用。

In a large wok, heat up sesame oil (E) and fry ginger and ikan bilis (D) till fragrant. Stir in the remaining ingredients (D) and stir fry until evenly cooked. 
在一个大炒锅,烧热3汤匙芝麻油E,爆香姜和素江鱼仔D后再办入其余材料D继续翻炒至熟均匀。

Add grated radish and carrot into the wok and continue stir frying until fragrant. Pour in the flour mixture (B) and cook until thickened. 
倒入红白萝卜丝继续炒香,再拌入材料B的面糊浆翻炒至浓稠便可离火。


Transfer batter into a well greased 9"x9"x3"D square mould. 
把面糊倒入已抹上油的9寸方模。

Steam for 50 minutes or till cooked. Remove cake from mould after 3-4 hours when cool. 
蒸50分钟,待3-4小时蒸糕冷却后才脱模切块。


Do link back to Coco Sweet Tooth if you have used any information as published in this blog.

This post is linked to Cook Your Books Event #26 hosted by Joyce of Kitchen Flavours

Thursday, August 13, 2015

木薯打南糕 Tapioca Kuih Talam (Vegan 全素)


I fell in love with Kuih Talam ever since the first I took the first bite as a kid. Whenever I came across this sweet and semi savory kuih I would definitely buy and eat it almost immediately. There are lots of good Kuih Talam recipes out there to choose from should one decides to make their own. However, many of the recipes uses alkaline water (which I am perfectly ok with) to make a firmer kuih texture, but leaving an aftertaste which might be discouraging to some people. Coincidentally, the recipe I was using call for the use eggs for the green pandan layer, which, is a no no for me since I am a vegan.
我从小就很爱吃打南糕/鸳鸯粿,每当遇到有贩卖此糕点时通常都会立刻跑去购买然后马上吃掉。若想自己亲自下手制作都可以在网络免费下载或是从市上售卖的食谱书籍内找到许多有关的食谱。参考了不同版的打南糕/鸳鸯粿后才发现原来大多数的食谱都描述运用枧水。对我来说枧水到是没问题,但对于很多数的人因不喜欢枧水的味道二相当的排斥。我原本想制作原味的打南糕,但因第一本书记载採用鸡蛋而我又是素食主义者所以变制造出另一完全不同的打南糕版本。

The last time I tried making Kuih Talam was more than 2 years ago hence this time round I decided to integrate and adapt today's kuih from 2 of my favorite (and also frequently used) asian kuihs and desserts recipe book to create this delicious vegan version of Talam Kuih to reach out to more people.
Recipe adapted from Delicious Nyonya Kueh & Desserts by Patricia Lee and Aromas of Kuihs by Amy Wong.
记得我上回制做原味打南糕是两年多前,因此今次便结合了两本我最常用的糕点食谱书籍 ‘Patricia Lee 著的娘惹风味糕点‘ 和 黄春梅著的’层层糕粿香‘来制做出自己喜爱即全素的打南糕。希望这个全素版的打南糕给更多的人。

The kuih came out soft but with firm texture that melts in the mouth. Totally satisfied with this combination!  
蒸出来的糕柔软,吃进口里马上融化,很香椰糖但却又不过甜。非常满意!


木薯打南糕(全素)
Tapioca Talam (Vegan)


Ingredients 材料 (A) 
450g Tapioca 木薯 (cubed 切丁)
100g Young Grated Coconut 嫩椰丝
100g Cooked Sago 熟沙谷 (Optional勿必用)

(B) 
200g Palm Sugar 椰糖
100ml Water 清水
4 Pieces Pandan Leaves 班兰叶

(C)
80g Sugar 糖
1/2 Tsp Salt盐
700ml Water 清水

(D)
100g Corn Flour 玉米粉
30g Tepung Hun Kwe / Green Bean Starch 绿豆澄粉
600ml Coconut Milk 椰浆

Method 做法

Blend cut tapioca and grated coconut from ingredients (A) in a food processor until fine. Set aside.
把木薯丁和椰丝混入搅拌机捣碎均匀。搁置待用。

Rinse uncooked sago (A) under cold water for 10 seconds. Transfer the rinsed sago into a pot of boiling water and cook until sago turned translucent. Remove and immediately rinse the cooked sago under cold water to prevent it from clumping.  Add sago into the tapioca mixture and combine.
将生沙谷A泡冷水10秒后马上放入已煮滚水的锅煮至熟透。离火后再把热腾腾的沙谷过冷水以防结块。拌入木薯椰丝面糊搅拌均匀。


Combine ingredients (B) in a pot and cook till sugar dissolves. Discard pandan leaves and filter. Transfer the cooked palm sugar syrup into the blended tapioca coconut sago mixture (A) and mix thoroughly.
把材料B的糖,班兰叶及清水煮至糖融化,过筛糖汁,把班兰叶去掉后倒入木薯椰丝面糊捣匀。

Grease an 8-9 inch square mould or any muffin tart moulds. Pour the tapioca batter into any mould until its half full. Steam over medium heat for 15mins (muffin tart moulds) or 30-35mins (8-9 inch Square mould).
準备好8-9寸的方模或小松饼挞模,模里涂上少许油脂。倒入木薯面糊至半分满,以中火蒸15分钟(松饼挞模)或 30-35分钟( 8-9寸方模)至熟为止 。

While waiting for the base layer to cook, prepare the top layer by boiling sugar, salt and water from ingredients (C) in a saucepan until melted. 
当在等待底层木薯糕蒸熟时,另外把材料C的糖,盐和清水放入锅里煮至糖融化即可。

In a separate mixing bowl, combine coconut milk, corn flour and mung bean flour from (D) together and stir well. Pour this mixture into the sugar syrup (C) mixture. Cook over low heat until batter thickens slightly. Keep stirring non stop while cooking.
将材料D里的椰浆,玉米粉和绿豆澄粉混合入一个盆至均匀,再将它加入之前煮融化的糖汁继续以小火煮(不停得搅拌)直到面糊稍微浓稠便离火。


Pour batter onto the steamed tapioca layer and steam over medium low heat for 15mins (muffin tart moulds) or 35-40mins (8-9 inch Square mould). Open the steam cooker lid every 5 mins during the cooking.
把面糊倒入已蒸熟的木薯表层上,以中火蒸15分钟(松饼挞模)或 35-40分钟( 8-9寸方模)至熟为止 。每5分钟须提起蒸炉蓋一次再蓋回继续蒸至熟透。


Allow to cool for 2-3 hours before cutting.
等蒸糕待凉2-3小时后才切割。


Do link back to Coco Sweet Tooth if you have used any information as published in this blog.

This post is linked to Cook Your Books Event #26 hosted by Joyce of Kitchen Flavours


Wednesday, August 12, 2015

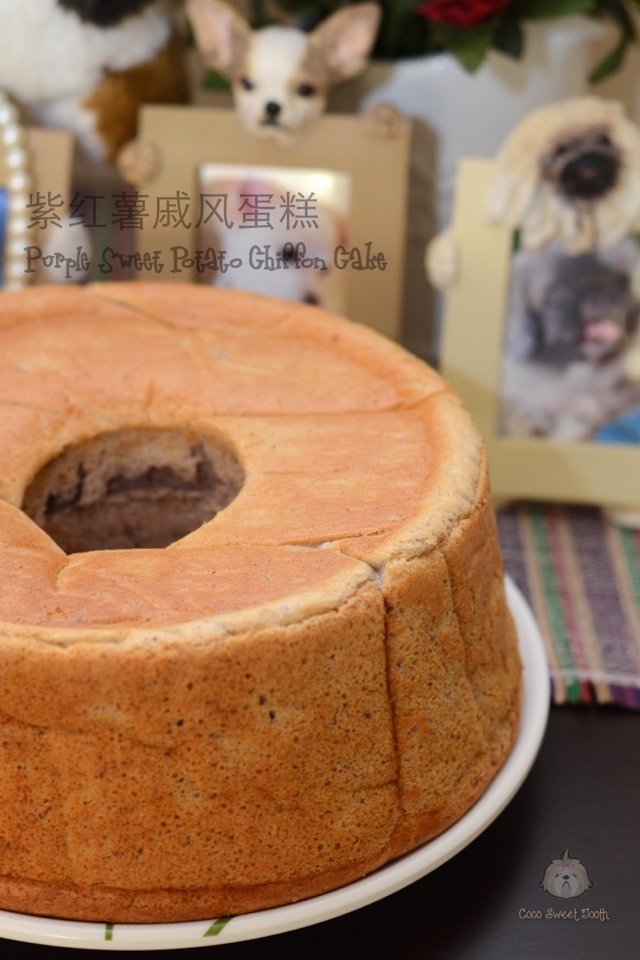
紫红薯戚风蛋糕 Purple Sweet Potato Chiffon Cake


Being a non conformist, I love variety. Be it cooking, baking or even shopping, I would usually ended up ordering lots of food or either buy the same product made from different brands. So when it comes to baking I have also experimented with many alternative or uncalled combinations to satisfy my quest for variety.
我是个不爱受循规蹈矩限制的老妇女,一向来都喜好尝试多种类的事务。因此在烹饪或购物上都会採用不同的品牌。因此,当烘焙时我也尝试用不同的取代材料甚至于非传统方式制作出另种口味的食品。

Therefore I opted for a this purple sweet potato chiffon since it derive the color naturally and also helps to ease my abundant home supply of sweet potatoes.
所以,我选择了这一个以紫红薯为主来制作这个戚风蛋糕 。一来因为想取用紫薯的原色素,二来是为了清里家里所存有的大量紫薯。


Purple Sweet Potato Chiffon Cake
Recipe adapted from Recipe Allrecipe.asia


Ingredients 材料 (A)
250g Purple Sweet Potato 紫红薯 /紫地瓜
8 Tbsp Fresh Milk 鲜奶
Juice from 1 Lemon 一粒柠檬汁

(B)
8 Egg Yolks 蛋黄
50g Brown Sugar 红糖
1/2 Tsp Salt 盐
105g Corn Oil 玉米油
5-6 Tbsp Water 清水 (Optional)

(C)
210g Cake Flour 蛋糕粉

(D)
10 Egg Whites 蛋白 /蛋清
120g Castor Sugar 幼糖


Method 做法

Steam purple sweet potatoes and mash. Add milk to mashed potato while its still warm until combined. Stir in fresh lemon juice to lighten the color to dark pinkish color.
将紫红薯蒸后趁热捣碎成泥后再把鲜奶倒入混合至均匀。拌入鲜柠檬汁淡化紫薯的颜色后转变深粉红色。

Combine beaten egg yolks with brown sugar, salt and corn oil (B)into a mixing bowl until combined. Add mashed sweet potato and stir well. 
将蛋黄稍微搅发再加入红糖,盐与玉米油B进盆中至混合。


Sieve in cake flour (C) and mix until smooth with no visible lumps. Should you find the batter dry, add 1 Tbsp of water and mix again. Continue adding water by the tablespoon until the batter become manageable. Set aside.
筛入蛋糕粉C继续搅拌至没面粉粒的面糊。若是面糊太干可加入一汤匙的清水继续捣拌。可一汤匙一汤匙的加入至面糊易捣搅就可以了。

In another dry and grease free mixing bowl, beat the egg whites until frothy. Add in castor sugar in 2 batches and continue beating until stiff peaks.
把蛋白放入一个干燥即干净搅拌盆里,用打蛋器把蛋白打到呈鱼眼泡状的时候,分两次加入糖再继续搅打至蛋白干性发泡的状态,可以停止搅打了。


Transfer 1/2 of the egg white meringue into the bowl of the cake batter and carefully fold to combine.
盛1/2蛋白到蛋糕糊中。用橡皮刮刀轻轻翻拌均匀(从底部往上翻拌,不要划圈搅拌,以免蛋白消泡)。

Transfer the cake batter mixture back into the meringue bowl and fold until evenly.
翻拌均匀后,把蛋糕糊全部倒入盛蛋白的盆中,用同样的手法翻拌均匀,直到蛋白和蛋糕糊充分混合。

Transfer the final cake batter into a 23cm inch chiffon cake pan. Lightly tap the pan on the tabletop twice to release the big bubbles.
将混合好的蛋糕糊倒入23cm威风蛋糕模具,抹平,用手端住模具在桌上用力震两下,把内部的大气泡震出来。

Bake in a preheat oven at 180C degrees for 30mins and lower to 170 for another 10-15mins.
放进预热好的烤箱,180度烘烤约30分钟,之后在以170度烘烤10-15分钟直到蛋糕熟透即可。


and also to 

Cook your Books #26 @ Kitchen Flavours


Monday, August 10, 2015

芋头甜甜圈 Taro Doughnuts


Among my collections of recipe books, there are several of them which I am still actively using for my baking reference. This bread recipe book 天然手作面包101道 by 周老师的美食教室 is one of my frequently used baking book as it features more on sweet dough breads. My hubby is more into the Taiwanese or Japanese soft breads rather than my preferred hard rye bread.
在我收藏的食谱书籍中,其中仍有我仍在日常使用的烘焙参考书籍。这一本“天然手作面包101道 by 周老师的美食教室 “是其中之一。这本书具有许多甜面团面包的食谱而我先生正和我相反,他比较热爱吃台湾或日本试的软面包,所以就大多以这类食谱为主。


The donuts have a soft and yet crispy texture when it was freshly made and still remained soft and chewy the following day. Gave it a light toast in the toaster oven for several mins and it will go back to its soft and crispy texture again. 
新鲜热腾腾炸出来的甜甜圈非长柔软即富有松脆口感,冷却仍然保持柔软。剩余的放置第二天后只要用小烤箱烤热就会回到它的柔软口感松脆了。

A highly recommended recipe!
是一道强烈推荐的甜品食谱!


芋头甜甜圈
Taro Doughnuts

Ingredients 材料(A) 
600g Yam, cut to cubes 芋头切丁
120g Butter 奶油
8g Instant Dry Yeast 速发干酵母
8-10 Tbsp Water 水
400g Bread Flour 面包粉
100g Cake Flour 蛋糕粉
120g Castor Sugar 幼糖
10g Salt 盐
3 Eggs 鸡蛋

For Dusting / Decoration 表面装饰
Icing Sugar / Dusting Sugar 糖粉 (optional)
Chocolate glazing 巧克力伽纳彻(optional)

Method 做法

Steam the cut yam over high heat for 20 minutes or until cooked.
把芋头切块以大火蒸20分钟至熟透。

Add in the butter while the cooked yam is still hot and mashed. Set aside to cool.
趁芋头蒸熟厚马上加奶油捣成泥,放凉。

In the bowl of a stand mixer, stir in water and instant yeast.
酵母和水放入搅拌盆拌一拌。


Add in the balance ingredients together with the mashed yam into the mixing bowl of a stand mixer with dough hook attachment and knead until the dough becomes soft and pliable. Cover the bowl with cling wrap and proof it for at least 2 hours (I left mine to proof for almost 3 hours as the dough didn't rise much. While the book didn't specify how much bigger the dough to  expect, I waited. The dough did rise but not as much as bread to double size. Luckily it turned out well).
再加入其他材料和奶油芋泥入搅拌盆后便用搅拌器一起打成光滑柔软的面团。 蓋好,基本发酵2小时。由于书上没清楚描述面团发酵后是否会像面包一样双倍大才算完成,所以当我看到面团发酵2小时后还不是很扩长,又再让面团加多1小时的发酵时间。最后面团却是扩长了少许,但没如面包面团发酵后般扩长。虽然我没全部依照书上的做法,幸好制作出来的成品以然可口美味。

Divide the dough into 20 equal portions. Roll each dough into balls and cover. Allow the dough to rest for 20 mins prior to shaping. This step is necessary to sustain the shape of the donuts.
将面团分割20等份,滚圆,放着鬆弛至少20分钟后整形。如果不鬆弛就整形,甜甜圈会变形。

Arrange the shaped donuts on a baking tray dusted with cake flour to prevent sticking. Proof the donuts for 50 mins or until the dough surface is soft to the touch.
把所有甜甜圈都排在烤盘上,最后发酵50分钟,发到用手轻轻按觉得非常虚软即可。


Heat up sufficient cooking oil in a deep bowl frying pot until slightly warm. Drop a small ball of dough into the pot to ascertain the readiness of the oil temperature. When the dough floats up bubbling then the oil is ready to use. Deep fry the donuts under low heat for 3-4 minutes or until cooked. This donut goes well with or without dusting sugar.
油炸烧到温热,试把一点面团放入锅中,会在锅里起起浮浮就是油温合宜。以小火炸甜甜圈3-4分钟即可,沾不沾砂糖都很美味。


Tips 提示:

For this recipe, the longer the proofing time the dough will become crisply soft and chewy after frying.  The texture will still remain crisply soft and chewy when cooled or left overnight. Just heat up with a bread toaster for several mins to get rid of the grease.
最后发酵发的久虽然炸时容意变形,但炸出来的成品非常酥软,即使冷却后也不会变硬。留隔天吃的话,用小烤箱烤热吃可以去掉他的油脂。


Do link back to Coco Sweet Tooth if you have used any information as published in this blog.

This post is linked to Cook Your Books Event #26 hosted by Joyce of Kitchen Flavours

Sunday, August 9, 2015

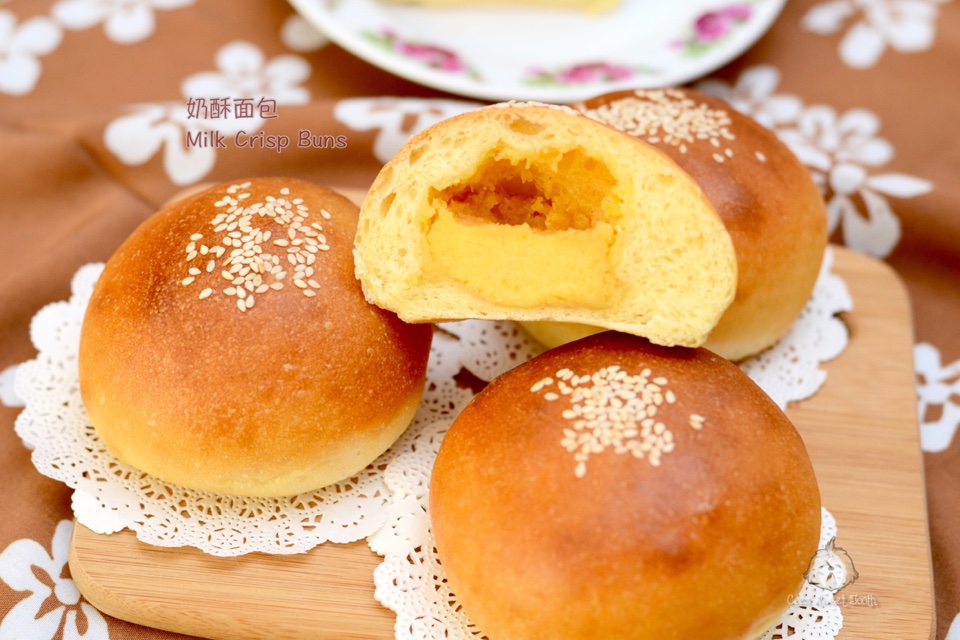
奶酥面包 Milk Crisp Buns


It's been a while since I tried using a water roux method to make bread as I prefer to bake impromptu than to prepare something ahead to use for the next day. When I saw Kitchen Corner's milk crisp bread posting, I braced myself to try it out.
採用汤种制作出来的面包特别柔软即有口感,但因为须提早一天作好汤种面糊,我就很少尝试採用汤种方试制作面包。自从在Kitchen Corner看了她的奶酥面包食谱后,心里便起了痒痒的感觉马上动手做了起来。

The bread turns out soft and chewy with yummy melt in the mouth fillings. Everyone loves it and my patience certainly pays off seeing them wolfing down the buns hungrily. I will definitely make this bread again.
幸好制作出来的面包效果软即富有口感,再加上那吃入口里即溶化的内馅更加讨人喜爱。一下子就把面包吃完了!看来不久后我还会再制做这类面包。

奶酥面包
Milk Crisp Buns

Water Roux 汤种面糊 (A)
50g Bread Flour 面包粉/高筋面粉
250g Water 水

Bread Dough 面包面团材料(B)
420 Bread Flour 面包粉/高筋面粉
112g Plain Flour 中筋面分
40g Milk Powder 奶粉
84g Castor Sugar 幼糖
1 Tsp Salt 盐
12g Instant Yeast 速发干酵母
60g Beaten Eggs 搅拌混合的鸡蛋
170g Water 水
168 Water Roux 汤种面糊(A)

(C)
44g Unsalted Butter 无盐奶油

Fillings 馅料 (D)
210g Salted Butter 咸奶油
90g Icing Sugar 糖粉
90g Beaten Eggs 搅拌混合的鸡蛋
2 Tsp Pure Vanilla Paste 纯香草糊
2 Tsp Corn Flour 玉米粉
1 Tsp Custard Powder 吉士粉
240g Milk Powder 奶粉

Decoration 装饰
Sesame Seeds 芝麻

Method 步骤

Combine ingredients (A) into a heatproof saucepan and cook over medium heat while stirring continuously until the mixture thickens with no visible lumps. According to Kitchen Corner, once the mixture reaches 65C degrees the water roux is ready. I did not measure the temperature (lazy me) of the mixture hence I just cook and stir until it has thickened like baby porridge. 
将材料A里的水和高筋面粉加入耐热锅/盆搅拌均匀成面糊,然后以中小火加热,边煮边搅拌一直煮到面糊开始变浓稠就关火继续搅拌至无粒粒或如婴儿粥般就好了。跟据Kitchen Corner 所描述,面糊一旦达到65度就等于完成。我因懒惰而没跟随这个步奏。

Transfer the water roux paste to a clean bowl and place a piece of cling wrap directly over the top of the mixture to prevent skin from forming on the surface. Allow the mixture to rest overnight before using. Refrigerate the water roux once it has cooled. I kept the leftovers in the fridge for not more than 4 days.
把汤种面糊倒入一个干净的碗内然后表层铺上一层保鲜纸以防面糊表面上生一层皮。汤种糊一旦冷却后冷藏一个晚上后才採用。剩余的汤种面糊可收入冰箱不超过4天。


To prepare the fillings for ingredients (D), cream butter with sugar until light and fluffy. Add beaten eggs and vanilla paste and mix until even. Using a rubber spatula, swiftly mix in corn flour, custard powder, milk powder and combine thoroughly. Scoop 16 portions of fillings with an ice cream scoop and place on a plate. Cover and chill the fillings in the fridge for later use.
将材料D里的奶油和糖粉加入搅拌器的盆里打至鬆发,加入鸡蛋和香草糊继续搅打至均匀。用橡皮刮刀,迅速拌入玉米粉,奶粉和吉士粉至混合。用冰淇淋勺取出16等份的内馅,将内馅摆置於盘,蓋上一层保鲜纸后再放进冰箱以备待用。


Combine all ingredients (B) into the bowl of a stand mixer with dough hook and mix with lower speed until all ingredients are well combined. 
将所有材料(B) 倒入搅拌器的钢盆中以慢速度搅拌搓揉成为一个不粘手的面团.

Add in butter (C) and slowly increase the speed to medium and continue kneading for approx 15-18 mins, until the dough becomes smooth and pass the window pane test.
把奶油加入然后依照片揉面标准程序继续以中速把面团搅拌(大约15-18分钟)成为撑得起薄膜的面团.

Transfer the dough to a slightly greased bowl, cover bowl with either cling wrap or cloth. Allow the dough to proof for an hour or until the dough doubled in size.
将揉好的面团滚圆, 收口朝下捏紧放入涂抹少许油的盆中, 罩上拧干的湿布或保鲜膜, 放置到温暖很密闭的空间进行第一次发酵约60分钟或至少两倍大.


Test the readiness of the dough with a finger lightly dusted with low gluten or cake flour. The dough is ready when it remain indented after the finger pokes into it.
第一次发酵完成后, 用手指沾上低筋面粉, 然后直接戳入面团中心. 如果戳出的洞陵没有弹回的迹象, 便完成第一次发酵. 如果戳出的洞渐渐回缩, 则再继续发酵5-10分钟, 然后再用同样的心方式测试.

Punch down the dough. Divide the dough into 16 equal portions and mould it round. Let it rest for another 15 mins.
工作桌上洒上一些高筋面粉. 将发酵好的面团从盆子中移出.  面团表面也洒上一些高筋面粉, 然后将面团用手压下去将气体挤出来. 把面团平均分割成16等份, 然后滚成圆形, 盖上拧干的湿布或保鲜膜再让面团休息15分钟.

Flatten each dough into a flat disc and place a ball of fillings in the middle of the dough. Gather the edges and pinch to seal. 

将每个面团用手掌压扁成扁圆皮,把馅料放置面团的中间,一边折一边转最后将收口捏紧。


Brush a thin coat of fresh milk on the surface of the buns. Dap the top with sesame seeds and place the buns on the baking tray. Continue the process for the balance buns. 
在面包表面均匀刷上一层鲜奶, 然后沾上少许芝麻. 完成的面团收口朝下间隔整齐排放在烤盘上.

Spray some water over the surface with a fine mist nozzle. Final proof the bread in a unheated oven for another 40-50 mins.
将两个烤模放入未开火的烤箱中, 面团表面喷些水然后盖上烤箱门, 再侍发酵40-50分钟至两倍大.

8-10 Mins prior to baking time, remove baking pan from oven and turn on the oven heat to 190C degrees.
发酵好前8-10分钟, 将烤面团模从烤箱中取出, 烤箱打开预热刊至190C度.


Bake the buns in the middle level of a preheated oven at 180C degrees for 15 mins.
放进已经预热至180C度的烤箱中层烘烤15分钟, 至表面呈现金黄色即可.


Remove bread from oven and turn it out onto cooling rack to cool.
烤好后马上倒扣出来放在铁网架上放凉。


The Versatile Blogger Award


The Versatile Blogger Award 


As a new blogger, being nominated this award by an experienced food blogger whom I have admired since the day I started baking is a huge compliment and acknowledgment for my hours of baking, cooking, shooting and long hours sharing out the entire process in my blog. 


Thank you so so much Veronica for nominating my blog for this award. I am truly happy and honored to be nominated by her whom I have been following her blog  since I started exploring baking in 2012 and her blog Minty's Kitchen are one of the few earlier blogs I frequented and loved until today. Her blog is packed with lots of yummy recipes with simple and easy to follow instructions. If you have not come across her website, do hop on over!


According to VBA rules, I have to disclose seven or more facts about myself...

I am a retired Malaysian housewife living in Jakarta, I love reading, bookmarking recipes  from food blogs, internet shopping, photography and baking. Prior to my retirement, I worked in Singapore, Sabah and Kuala Lumpur in the commercial sector for 22 years. Being a stage 3 breast cancer survivor in 2006, I only started full vegan diet in 2013. Together with a healthy diet , inner peace through meditation and by understanding while following the dharma I am happy to keep the cancer in remission. I am thankful for everything and everyone I met in life  for the precious lessons they bring, either from their personal experience or through my interaction with them. From my friends, family and friendly acquaintances, I am grateful for their love and understanding. As for people whom I aren't agreeable with, I learn to accept them for who they are. It's through the people who aren't in my 'friendly' list that taught me about letting go. Letting go of the attachment to be right, letting go of the attachment to control people or situation to my way. By surpassing this attachment, I started to perceive the goodness of everyone instead of their shortcomings. After all, nobody is perfect and fault free, hence I am in no position to judge as well. Our relationship with others are very much dependent on how we perceive and react towards them. Even if the person do not reciprocate  to our kind and friendly demeanor, in my heart I am glad I have done my part not to create bad affinity with them. So long as we LET GO of any expectations towards our actions or deeds, no disappointment nor mental anguish shall haunt us.  Lastly, I have 3 beautiful 4 legged children and a wonderful husband who happily woofs down my baking creation. Through him, I managed to distribute all my bakes to his supportive work staff while some even used to place orders for cakes until I stopped due to my busy involvement in the buddhist centre.
As part of the rules, I would like to nominate the Versatile Blogger Award to the following blogs, please hop over to visit them:

Aunty Young by 安迪漾
Bernice Kitchen by Bernic Boon
Eileen's Diary by Eilee Lee
Butter, Flour & Me by Joceline Lyn
Gai Shu Shu by Kenneth Goh
Kitchen Corner by Grace

Congratulations to these deserving nominees! 

Lastly, I would also like to thank my blog followers and those who drop by and leaving valuable comments and encouraging words. Thank you!


Printfriendly

Related Posts Plugin for WordPress, Blogger...