Saturday, September 5, 2015

杏仁奶油面包 Almond Cream Buns


Came across this great recipe from Dailydelicious hence I decided to adapt a part of her recipe to combine with Carol Hu's QQ Rice Bread recipe to arrive at this yummy buns.
这是一道全家人都赞好吃的面包。我是从Dailydelicious博客那项面包食谱加以修改再配入胡涓涓的糯米面包食谱制造出这个香浓,脆皮的软面包。


The buns were snapped up shortly after I did the photography.
面包一出炉没多久便给家人扫光了!


杏仁奶油面包 
Almond Cream Buns 

Ingredients 材料(A)
340g Bread Flour 面包粉
67g Glutinous Rice Flour 糯米粉
3/4 Tbsp Instant Yeast 速发干酵母
65g Egg 鸡蛋
30g Castor Sugar 细
1/2 Tsp Salt 盐
200g Fresh Milk 牛奶

(B)
40g Unsalted Butter 无盐奶油

Almond Cream Topping 杏仁奶油表面装饰 (C)
100g Salted Butter 咸奶油, cubed at room temp 切丁温室回温
90g Castor Sugar 细砂糖
40g Soft Brown Sugar 红糖/ Palm Sugar 椰糖
2 Large Eggs 鸡蛋(大)
100g Almond Powder 杏仁粉
50g Plain Flour 普通面粉 (optional自选)


Method 做法

Combine all ingredients (A) into the bowl of a stand mixer with dough hook and mix with lower speed until all ingredients are well combined.
将所有材料(A) 倒入搅拌器的钢盆中以慢速度搅拌搓揉成为一个不粘手的面团.


Add in butter (B) and slowly increase the speed to medium and continue kneading for approx 15-18 mins, until the dough becomes smooth and pass the window pane test.

把切成小块的奶油B加入然后依照片揉面标准程序继续以中速把面团搅拌(大约15-18分钟)成为撑得起薄膜的面团.


Transfer the dough to a slightly greased bowl, cover bowl with either cling wrap or cloth. Allow the dough to proof for an hour or until the dough doubled in size.
将揉好的面团滚圆, 收口朝下捏紧放入涂抹少许油的盆中, 罩上拧干的湿布或保鲜膜, 放置到温暖很密闭的空间进行第一次发酵约60分钟或至少两倍大.

Meanwhile, mix the topping ingredients (C) into a mixing bowl and cream until combine. Transfer the topping into piping bag and store in fridge for later use.

当等待面团发酵时,把杏仁奶油表面装饰 (C)的材料加入一个搅拌盆混合均匀,装入挤花袋后冷藏备用。


Test the readiness of the dough with a finger lightly dusted with low gluten or cake flour. The dough is ready when it remain indented after the finger pokes into it.
第一次发酵完成后, 用手指沾上低筋面粉, 然后直接戳入面团中心. 如果戳出的洞陵没有弹回的迹象, 便完成第一次发酵. 如果戳出的洞渐渐回缩, 则再继续发酵5-10分钟, 然后再用同样的心方式测试.

Punch down the dough. Divide the dough into 12 equal portions and mould it round. Place the dough onto a baking tray lined with parchment paper or non stick silicone baking mat. 工作桌上洒上一些高筋面粉. 将发酵好的面团从盆子中移出.  面团表面也洒上一些高筋面粉, 然后将面团用手压下去将气体挤出来. 把面团平均分割成12等份, 然后滚成圆形. 完成的面团收口朝下间隔整齐放在已铺上烘培纸或不粘用硅胶烘烤垫。


Spray some water over the buns with a fine mist nozzle. Final proof the loaf in a unheated oven for another 50-60 mins.

将烤盘放入烤箱中, 面团表面喷些水然后盖上烤箱门, 再侍发酵50-60分钟至两倍大.

8-10 Mins prior to baking time, remove baking tray from oven and turn on the oven heat to 190C degrees.
发酵好前8-10分钟, 将烤盘从烤箱中取出, 烤箱打开预热刊至190C度.


Cut the top of the dough with a scissor, to make x cross.

在面团顶部用剪刀切割两条交叉割痕。


Pipe the almond cream topping over the top of the dough.
将杏仁奶油馅料以螺旋状挤在面团表面上。

Bake the buns in the middle level of a preheated oven at 190C degrees for 15-18 mins.
放进已经预热至190C度的烤箱中层烘烤15-18分钟, 至表面呈现金黄色即可.


Friday, September 4, 2015

班兰酸牛奶面包 Sweet Pandan Yoghurt Milk Bread


It has been a long week since I started baking again.  There are no more bread supplies at home hence I had no choice but to kickstart my baking engine.
自从一停顿几天没下厨,一旦要开始就觉得全身麻痹不想动。谁知,家里的面包全都给吃光了,没法子唯有硬着头皮再度然烧起烘焙精神。


This is a fragrant sweet bread recipe inspired and adapted from Christine's Hokkaido Milk Bread. I did not follow her recipe completely but more of using it as a guide to creating this soft fluffy bread. The bread smells and taste good enough to eat without having to apply bread jam.
这道香甜的面包食谱启发于这个博客的北海道面包食谱。我只是拿她部分的要点来做参考并没全部依照她的食谱来制做这个柔软即蓬松的面包。烤出来的面包带有浓厚的班兰香,味道甜美可以不须配任何面包酱都很可口。


班兰酸牛奶面包
Pandan Yoghurt Milk Bread


Water Roux 汤种面糊 (A)

30g Bread Flour 面包粉/高筋面粉
150g Water 水

Bread Dough 面包面团材料(B)
180g Water Roux 汤种面糊(A)
60g Plain Yoghurt
550 Bread Flour 面包粉/高筋面粉
20g Wholemeal Flour 全麦面粉
10g Full Cream Milk Powder
12g Instant Yeast 速发干酵母
86g Castor Sugar 幼糖
2 Large Eggs (beaten)
70g Milk
8g Salt 盐

(C)
49g Unsalted Butter

(D)

Few drops of Pandan Paste


Method 步骤
Combine ingredients (A) into a heatproof saucepan and cook over medium heat while stirring continuously until the mixture thickens with no visible lumps. Once the mixture reaches 65C degrees the water roux is ready. I just cook and stir until it has thickened like baby porridge. 
将材料A里的水和高筋面粉加入耐热锅/盆搅拌均匀成面糊,然后以中小火加热,边煮边搅拌一直煮到面糊开始变浓稠就关火继续搅拌至无粒粒或如婴儿粥般就好了。


Transfer the water roux paste to a clean bowl and place a piece of cling wrap directly over the top of the mixture to prevent skin from forming on the surface. Allow the mixture to cool before using. Refrigerate the water roux once it has cooled. I kept the leftovers in the fridge for not more than 4 days.
把汤种面糊倒入一个干净的碗内然后表层铺上一层保鲜纸以防面糊表面上生一层皮。汤种糊一旦冷却后便可加入面包材料里混合。剩余的汤种面糊可收入冰箱不超过4天。


Combine all ingredients (B) into the bowl of a stand mixer with dough hook and mix with lower speed until all ingredients are well combined. 
将所有材料(B) 倒入搅拌器的钢盆中以慢速度搅拌搓揉成为一个不粘手的面团.

Add in butter (C) and slowly increase the speed to medium and continue kneading for approx 15-18 mins, until the dough becomes smooth and pass the window pane test.
把切成小块的奶油C加入然后依照片揉面标准程序继续以中速把面团搅拌(大约15-18分钟)成为撑得起薄膜的面团.

Divide the dough into 2 equal portions. One portion to remain as it is. Add a few drops of pandan paste to the other dough until incorporated. Mould it round.
将面团分成2等份。一份保持原味。另一份倒入几滴班兰精混匀。将两个面团滚圆。


Transfer both dough to two slightly greased bowl, cover bowl with either cling wrap or cloth. Allow the dough to proof for 1 - 2 hours or until the dough doubled in size.
将两份面团收口朝下捏紧,各自放入涂抹少许油的盆中, 罩上拧干的湿布或保鲜膜, 放置到温暖很密闭的空间进行第一次发酵约1-2 小时钟或至少两倍大.

Test the readiness of the dough with a finger lightly dusted with low gluten or cake flour. The dough is ready when it remain indented after the finger pokes into it.
第一次发酵完成后, 用手指沾上低筋面粉, 然后直接戳入面团中心. 如果戳出的洞陵没有弹回的迹象, 便完成第一次发酵. 


Punch down the dough. Divide each color dough into 2 equal portions and mould it round. Let it rest for another 15 mins.
工作桌上洒上一些高筋面粉. 将发酵好的面团从盆子中移出.  面团表面也洒上一些高筋面粉, 然后将面团用手压下去将气体挤出来. 把两份面团平均分割2等份, 然后滚成圆形, 盖上拧干的湿布或保鲜膜再让面团休息15分钟.

Transfer one piece of dough from each portion of the 2 coloured dough onto a clean floured worktop. Roll out each portion of the dough with a rolling pin into a long rectangular shape.  Place the 2 pieces of rectangular dough over one another. Roll in from the shorter length into a cylinder with seal facing downward. Repeat the same process for the balance 2 sets of dough. 

休息好的两份面团里各自取出一份面团。台座上撒些高筋面粉,用擀面棍把两份不同的面团擀成长方形,宽度同烤模短向宽,然后由短卷起。再重复同样的做法把其余的两份面团完成。

Place the 2 pcs of cylindrical bread dough into 2 greased loaf pan 23x13x6.5cm.
将卷好的面团收口朝下朝内排入已涂抹少许不可融化奶油的面包烤模中23x13x6.5cm以免沾粘。


Final proof the bread in a unheated oven for another 40-50 mins.
将烤模放入未开火的烤箱中盖上烤箱门, 再侍发酵40-50分钟至两倍大.

8-10 Mins prior to baking time, remove baking pan from oven and turn on the oven heat to 190C degrees. Apply a light coat of egg wash on the surface.
发酵好前8-10分钟, 将烤面团模从烤箱中取出, 烤箱打开预热刊至190C度. 面包表面涂抹上一层薄薄的蛋液。

Bake the bread in the middle lower level of a preheated oven at 170C degrees for 35-38 mins.
放进已经预热至170C度的烤箱中下层烘烤35-38分钟, 至表面呈现金黄色即可.


Remove bread from oven and turn it out onto cooling rack to cool.
烤好后马上倒扣出来放在铁网架上放凉。


Note : 

For the second portion of the dough, I opted for a more complicated bread shaping method, which, was supposed to create a marbled layer bread. Unfortunately, the marbled effect did not turn out 'obvious' as what I hoped. Maybe I shall try again using stronger variations next time.

在第二份面团中,我采用了另一种面包整形方法,想制造出大理石层次的效果,可是结果失败了。当面出炉后,大理石效果并没明显的呈现出来,我想因该是由于两份面团的颜色都带浅的关系。或许,我下一次再以更强烈的面包口味及色素来做造型,试看可否能成功。


Thursday, September 3, 2015

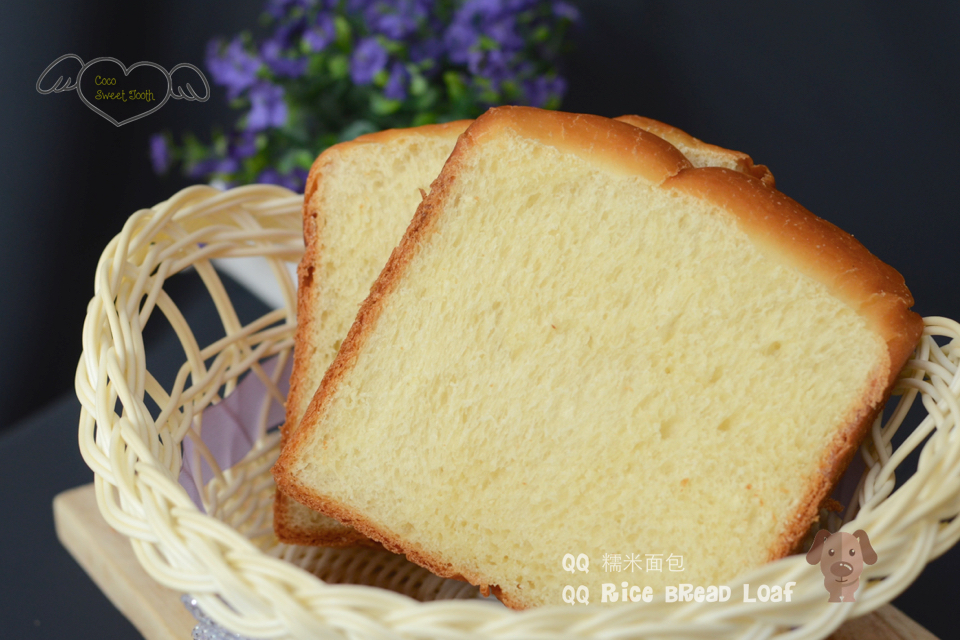
QQ 糯米面包 QQ Rice Bread Loaf


Another great bread recipe I had long bookmarked since I bought this bread recipe book "The Second Book of Baking for Beginners" by Carol Hu since early 2013.
这是一道即软,组织细腻而有口感的糯米面包食谱取自于胡涓涓的“烘焙新手必备的第二本书”。也是我从2013年购买这本书后一直想要尝试的食谱。


After experimenting with lots of fancy bread recipes, I am now back to making of the basic toast bread. What appealed to me was the use of glutinous rice flour in this bread recipe to produce a soft and yet chewy bread. The presence of glutinous rice flour helps to maintain the moisture content and also good in making the bread with fine texture.
进来我又开始制做回传通的面包条,对面包整形似乎有点厌倦。对于这道面包食谱,我最欣赏的是糯米的保湿功能即富有口感。


I am extremely happy with the outcome. Shall try again to create more delicious bread next time.
我非常满意使用这个配料,下次一定会再采用制造出更多美味的面包。


QQ 糯米面包
QQ Rice Bread Loaf

Ingredients 材料(A)
340g Bread Flour 面包粉
67g Glutinous Rice Flour 糯米粉
3/4 Tbsp Instant Yeast 速发干酵母
65g Egg 鸡蛋
30g Castor Sugar 细砂糖
1/2 Tsp Salt 盐
200g Fresh Milk 牛奶

(B)
40g Unsalted Butter 无盐奶油

Method 做法

Combine all ingredients (A) into the bowl of a stand mixer with dough hook and mix with lower speed until all ingredients are well combined.
将所有材料(A) 倒入搅拌器的钢盆中以慢速度搅拌搓揉成为一个不粘手的面团.

Add in butter (B) and slowly increase the speed to medium and continue kneading for approx 15-18 mins, until the dough becomes smooth and pass the window pane test.
把切成小块的奶油B加入然后依照片揉面标准程序继续以中速把面团搅拌(大约15-18分钟)成为撑得起薄膜的面团.


Transfer the dough to a slightly greased bowl, cover bowl with either cling wrap or cloth. Allow the dough to proof for an hour or until the dough doubled in size.
将揉好的面团滚圆, 收口朝下捏紧放入涂抹少许油的盆中, 罩上拧干的湿布或保鲜膜, 放置到温暖很密闭的空间进行第一次发酵约60分钟或至少两倍大.


Test the readiness of the dough with a finger lightly dusted with low gluten or cake flour. The dough is ready when it remain indented after the finger pokes into it.
第一次发酵完成后, 用手指沾上低筋面粉, 然后直接戳入面团中心. 如果戳出的洞陵没有弹回的迹象, 便完成第一次发酵. 如果戳出的洞渐渐回缩, 则再继续发酵5-10分钟, 然后再用同样的心方式测试.

Punch down the dough. Divide the dough into 4 equal portions and mould it round. Let it rest for another 15 mins.
工作桌上洒上一些高筋面粉. 将发酵好的面团从盆子中移出.  面团表面也洒上一些高筋面粉, 然后将面团用手压下去将气体挤出来. 把面团平均分割成4等份, 然后滚成圆形, 盖上拧干的湿布或保鲜膜再让面团休息15分钟.

Using a rolling pin, roll each dough into long rectangle about 35cm and start rolling out from the shorter end into a roulade. Arrange the rolled bread dough (seams down) into a greased loaf pan  23x13x6.5cm,  Repeat the process for the balance 3 ps of dough. 
休息好的面团用擀面棍擀成长条约35cm,宽度同烤模短向宽,然后由短卷起,千万不要卷得太紧,轻轻往前自然卷起就可以。将卷好的面团收口朝下朝内间隔适当排入已涂抹少许不可融化奶油的面包烤模中23x13x6.5cm以免沾粘。再重复同样的做法完成剩余的3份面团。

Spray some water over the loaf with a fine mist nozzle. Final proof the loaf in a unheated oven for another 50-60 mins.
将整盒的面团放入烤箱中, 面团表面喷些水然后盖上烤箱门, 再侍发酵50-60分钟至两倍大.


8-10 Mins prior to baking time, remove baking tray from oven and turn on the oven heat to 170C degrees.
发酵好前8-10分钟, 将面包模具从烤箱中取出, 烤箱打开预热刊至170C度.

Bake the bread loaves in the middle lower level of a preheated oven at 170C degrees for 35-38 mins.
放进已经预热至170C度的烤箱中下层烘烤35-38分钟, 至表面呈现金黄色即可.

Unmould and leave bread to cool on a cooling rack.
烤好后马上倒扣出来放在铁网架上待凉。


Wednesday, August 26, 2015

全素咖喱角 Vegan Curry Puffs


Curry puff, a popular local snack I never get tired of eating since childhood. It can be eaten as breakfast, afternoon tea snack wherever its available.

咖喱角是一道极我从小就爱吃而吃不厌的本地小吃。多年来还是受大众的喜好,可以当早餐,下午茶点心或哪里有贩卖都会有人买。

With my hubby away for several day on business trip, my maid and I would usually make something simple rather than proper meal. For me, I would settle for ready made biscuits to go along with coffee or go instant noodles, like my maid, who is 'Indo Mie' queen. It seems, lots of indonesian thrives on eating instant noodles. This explains why Indonesia is the world's largest producer of instant noodles. Unlike us, they buy instant noodles by the cartons for home consumption. 

随着我的丈夫出差几天,我和侍女通常都选择不下厨煮饭烧菜,越简单越好。对我来说,我只要有现成的饼干配咖啡,在不就煮快熟面。我家侍女,就是典型的“印度即食面'女王,可以天天都吃快熟面。原来这个实习都是许多印尼人的日长 生活习俗,他们每当购买即食面大多是以整箱包装面购买。这证明了为什么印度尼西亚是世界上最大的即熟面生产国。


As in the case of my maid, she prefers eating instant noodles than the wide array of freshly cooked dishes available at home. I suppose their culture is very much into instant noodles. Today when she heard me mentioning about making curry puffs, she returned back the packet of Indomie she originally planned to have for lunch. Hmmm, the curry puff is tempting enough for her to forego the mee.  
在许多时候,就算家里有煮了多样的新鲜菜肴,我的女庸还是选择另煮快熟面吃。我想他们的主要粮食,快熟面和米饭都有平等的地位。今天,当我提起要制做咖喱角之际她马上把手中握着的快熟面受回而选择吃咖喱角。


Lucky that, or else I would ended up 20+ pcs of curry puffs with no one to help clearing.
还好,这道咖喱角还可诱她放弃她爱吃的面。不然,这批20几个咖喱角得如何处理。

全素咖喱角 
Vegan Curry Puffs

Ingredients 材料

Pastry 面皮材料 (A)

250g Plain Flour 面粉
2-1/2 Tsp Corn Oil 玉米油
120-130ml Water 清水
1/3 Tsp Salt 盐


Fillings 内馅(B)

Vegan Curry Potato Fillings 素咖喱马铃薯内馅


Method 做法


Combine ingredients (A) in a mixing bowl and knead for 6-8 mins too form a smooth dough. Cover the bowl with damp cloth or cling wrap and allow the dough to rest for 15 mins.
将面皮材料放入大碗中揉面团6-8分钟至表面光滑,盖上保鲜膜静置松弛15分钟。

Sprinkle some flour onto the worktop. Roll the dough into a long rectangle and start rolling in the dough lengthwise like a roulade.

工作抬面上撒少许面粉,面团擀成一个长的长方形,并开始从长的方向把面团卷起来。

Cut the rolled dough into 24 pcs approx. 16-17g each. Dust the dough with some flour and roll each cut dough into 2 inch disc.

将卷好的面团分成24份,每个大概16-17克左右。面粉上撒些粉然后擀成2寸的薄圆片。


Place 1 Tbsp of fillings (B) onto the center of the dough and fold the dough into half like the shape of a crescent. 

把一大汤匙内陷保入面团的中,两边对折做出一个半月型。


Press and seal the edges with fingers. Use a fork to make imprints onto the seal edges. 

捏紧收口,再用叉在面皮边沿按出花纹。

Repeat the process with the remaining doughs and ingredients.

剩余的生面团和配料重复这一过程,直到完成。

For deep frying, heat sufficient oil in a deep frying pan and slide in the curry puffs in batches.  When the puffs floats up to the surface and turn golden brown, it is ready.

若是油炸,就预先准备 把油煮热, 等油烧热后慢慢的把咖喱角加入锅 内以中火炸至浮上油面即又变金黄色,表示已煮熟,就可离火。


To fry with air fryer, preheat the fryer at 180C degrees for 5 mins. Arrange the curry puffs into the air fryer tray,spray the curry puff surface with a thin coat of cooking oil and set it to frying mode at 180C degrees for 20 mins. Turn the curry puffs in the fryer tray every 5 mins to ensure the puffs are evenly brown.
若是采用空气炸锅,那就依照空气炸锅的操作程序先 预热炸锅180℃度为5分钟。把咖喱角排入空气中炸锅托盘里,面皮表面涂抹少许食油,并将空气炸锅设置为油炸模式以180℃度烘烤20分钟。每隔五分钟便打开炸锅把咖喱角翻面,让咖喱角均匀上色。


Printfriendly

Related Posts Plugin for WordPress, Blogger...