Wednesday, November 23, 2016

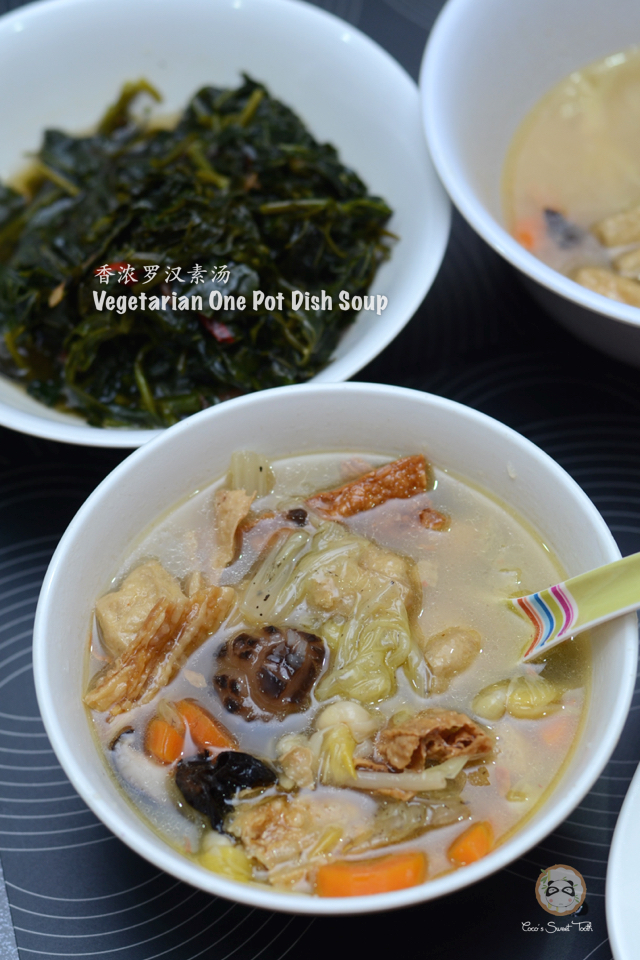
香浓罗汉素汤 Vegetarian Luo Hon Zai Soup


For most people, the impression they have on the vegetarian Luo Hon Zai dish is normally of a stir fry vegetarian dish and not of one with heavy soup base. I am pretty blessed to have tried this dish cooked in various methods.
许多人对于罗汉斋的印象多半是道拌炒或带少许菜汁的菜肴。在我众多的朋友中,都没尝试过家常的罗汉斋汤而我很辛运能有机会尝试不同煮法的罗汉斋。

Among those, this is still the best cooking method passed on down by my parents and I have made repeatedly over the years and never got sick of eating.  Most who have tried this soup version gave very positive feedback while asking for the recipe so that they could introduce it to their family.
从我所尝试的多种煮法中,这项传于我父母亲的煮法还是大家最喜爱也是我最常使用及吃不厌的煮法。有许多尝试了这版本的罗汉斋的爱好者都回头来向我要食谱,想尝试住给家人品尝。

This soup recipe is packed with lots of ingredients and very easy to prepare. With that much of ingredients in the soup, all you need is a bowl of rice to accompany this rich and yummy one pot dish soup.
这是一道填满了多种材料即简易的美味汤食谱。只要配上一碗米饭就足已吃得津津有味了,根本都不虚添加任何菜肴。


香浓罗汉素汤
Vegetarian Luo Hon Zai Soup
(Serves 5-6)

Ingredients 材料
(A)
65g Chinese Mushrooms 花菇
220g Soy Bean Sticks 腐竹
220g Glass Noodles 冬粉
100g Tofu Puffs 油豆腐
400g Chinese Cabbage 白菜
20g Black Fungus 黑木耳
40g Dried Lily Flower 金针菜
2 Carrots 红萝卜
4 Lit Water 清水

(B)
Cooking Oil for frying 食油

(C)
2-3 Tsp Salt 食盐
2-3 Tsp Mushroom Powder 香菇粉
Pepper to taste 胡椒粉


Method 做法


Wash and soak black fungus, chinese mushrooms and dried lily flower for 2 hours. Drain.
花菇,黑木耳及金针菜洗净然后泡浸2小时。沥水。

Cut the chinese mushrooms and black fungus into bite size. Set aside.
把香菇及黑木耳切块,搁置待用。

Tie a knot on the dried lily flower. Set aside.
金针菜打个结,搁置待用。

Cut to puffs into half. Set aside.
油豆腐切半, 搁置。


Peel and slice carrots into thick slices. Set aside.
红萝卜去皮,切片后搁置。

Heat up sufficient cooking oil in a deep fryer. Deep fry glass noodles and soy bean sticks until crispy. Drain and allow to cool on kitchen towel to soak up excess oil. Set aside.
倒入足够的食油入炒锅烧热。把冬粉及腐竹各别送入已烧热油的锅内将冬粉炸脆。沥干油后摆在吸油纸巾上吸取多余的油脂。搁置。


Fill up a deep soup pot with 4 Lit water (A) and allow to boil. Transfer all the ingredients (A) into the pot and cook on medium heat for 20 mins. Reduce the heat to medium low and allow the ingredients to simmer for 20-30 mins until the soy bean stick becomes softened.
把4公升的清水(A)倒入汤锅煮滚后,便把材料A所有配料依序的转入汤锅用中火煮20分钟。再把火调低至中小火继续焖煮20-30分钟,把腐竹煮软及让其他的配料的香味融入汤内。


Add seasonings (C) to taste. Add more if needed.  Continue to simmer another 5 mins before turning off the heat.
加入调味料C,咸度可以根据您的喜好来调。继续焖煮5分钟后才熄火。

Allow the  ingredients to infuse into the soup for 1-2 hours before reheating it for consumption later.
熄火让汤料泡浸多1-2小时给予入味后再烧热片刻即可品尝。


Do link back to Coco Sweet Tooth if you have used any information as published in this blog.

Monday, November 21, 2016

黄河面包 Yellow River Buns


This is another highly recommended recipe from Alex God's Magic Bread with soft and fluffy bread texture. Extremely appetizing!
又是一道取自于吴景发的‘汤出面包香’书籍里的其中食谱之一,制做出来的面包松软及富有口感,强力推荐!


黄河面包
Yellow River Buns


Ingredients 材料

(A) Tangzhong 汤种
100g Bread Flour 高筋面粉
70g Water 水

(B)
300g Bread Flour 高筋面粉
100g Plain Flour 蛋糕粉
9g Instant Yeast 即用酵母粉
75g Castor Sugar 细砂糖
20g Milk Powder奶粉
6g Sea Salt 海盐

(C)
175g Cold Water 冷水
60g Cold Eggs 冷鸡蛋

(D)
75g Butter 无盐牛油

(E)
100g Raisins 葡萄干

(F) Toppings 表面装饰
Salted Butter 咸牛油
Sugar 砂糖


Method 做法


Combine (A) into a saucepan and cook over medium heat while stirring continuously until the mixture thickens to the constancy of baby porridge the tangzhong is deemed ready.
将材料A的鲜奶,水及面粉一起混入锅里搅拌均匀成面糊后,以中小火加热,边煮边搅拌直到面糊开始转浓稠便离火,继续搅拌至无粒粒如婴儿粥般即可。

Transfer tangzhong paste into a clean bowl and place a piece of cling wrap directly onto the paste to prevent a film from forming on the surface. Allow the mixture to cool. Refrigerate for at least 12 hours before using.
把汤种面糊转入一个干净的碗,马上在面糊表层铺上一层保鲜纸以免面糊表面上生一层皮。等面糊冷却后冷藏12小时后才可使用。


In the bowl of the stand mixer fitted with dough attachment, add Tangzhong (A) together with all the of ingredients (B), (C) and mix with lower speed until all ingredients are well combined. 
首先将汤种面糊(A)及材料(B)和(C)混入搅拌器的钢盆中,以慢速度搅拌搓揉成团。


Add in butter (D) and slowly increase the speed to medium and continue kneading for approx. 18-22 mins, until the dough becomes smooth and pass the window pane test before adding in (E) to combine.
把牛油(D)混入面团然后依揉面标准程序继续以中速把面团搅拌大约18-22分钟,直到成撑得起薄膜的面团再加入(E)混匀即可.


Place dough into a slightly greased bowl. Cover bowl with either cling wrap or cloth and allow the dough to proof for 1-2 hours or until it doubled in size.
将揉好的面团滚圆,收口朝下捏紧放入涂抹少许油的盆中,盖上拧干的湿布或保鲜纸放置到温暧密闭的空间进行第一次发酵约1-2小时至面团变两倍大为止。

Punch down the dough. Divide the dough into 12 equal portions and mould it round. Let it rest for another 15 mins.
将面团用手压除气体,然后把面团平均分割成12等份, 滚圆盖上拧干的湿布或保鲜膜再让面团松弛15分钟.


Sprinkle the worktop with bread flour, use a rolling pin flatten the dough and roll up each dough into oval shape. 
台座上撒些高筋面粉,将休息好的面团用擀面棍把面团压扁,然后把每份面团券起来成椭圆形.

Place bread dough (seams down) into 2 greased pan. 
将卷好的面团收口朝下朝内平均的排入两个已涂抹不可融化奶油的面包烤模中以免沾粘。

Spray some water over the surface with a fine mist nozzle. Final proof the bread in a unheated oven for another 50-60 mins.
将烤模放入未开火的烤箱中, 面团表面喷些水然后盖上烤箱门, 再侍发酵50-60分钟至两倍大.

8-10 Mins prior to baking time, remove baking pan from oven and turn on the oven heat to 180C degrees.
发酵好前8-10分钟, 将烤盘从烤箱中取出, 烤箱打开预热刊至180C度.

Egg wash and cut the top portion with scissors or sharp knife. Place some butter (F) into the incision and sprinkle some sugar (F) over the top.

面团表面搽上蛋液,用剪刀或利刀在表层切开然后放入少许咸牛油块(F), 最后撒上少许糖(F).

Bake in the middle level of a preheated oven at 180C degrees for 15-16 mins until the top turns golden brown.
然后送入已经预热至180C度的烤箱中层烘烤15至16分钟至表面呈现金黄色即可。

Remove bread from oven and turn it out onto cooling rack to cool.
烤好后马上倒扣出来放在铁网架上放凉。


Do link back to Coco Sweet Tooth if you have used any information as published in this blog.

Saturday, November 19, 2016

香草桃子乳酪蛋糕 Super Vanilla Peach Cheesecake


Yesterday I was given short notice t to prepare some desserts for my husband's colleagues who would be coming over to the house during the weekend. Hence I came up with this light and creamy baked cheesecake which totally won them over.
昨天,我丈夫临时才给我通知,他说隔天将会有数位同事到访家里开会,要求我给弄出几样甜品来招待。结果我在冒冒然的状态下制做了这道桃子乳酪烤蛋糕而得予大家的赞赏。


Instead of using crushed biscuits for the base, I opted for a simple sponge cake base which I believe further enhances the flavor of cheese cake.  Highly recommended!
一般上的乳酪蛋糕底都会采用饼干碎来铺底,我却选择了松软的海绵蛋糕来做底,因为我认为这个方法可以更增添乳酪的香味,而且也是强力推荐的做法之一,您不妨试试!


香草桃子乳酪蛋糕
Super Vanilla Peach Cheesecake

(A) 海绵蛋糕底 Sponge Base
20g Plain Flour 中筋面粉 (sifted 过沥)
8g Rice Flour 粘米粉
20g Unsalted Butter 无盐牛油 (melted 溶化)
75g Egg Whites 蛋白
10g Castor Sugar 细砂糖
25g Dark Brown Sugar 黑砂糖
45g Egg Yolks 蛋黄

(B) 乳酪蛋糕层 Cheese Layer
330g Cream Cheese 乳酪
75g Castor Sugar 细砂糖
3 Egg Yolks 蛋黄
2 Tbsp Whipping Cream 淡奶油
2 Tsp Vanilla Extract 香草精
85g Canned Peach 罐头桃子

(C) Sour Cream Layer 酸奶层
190g Plain Yoghurt 原味酸奶
1 Tbsp Vinegar 白醋
30g Icing Sugar 糖粉

(D) Toasted Almonds 烤杏仁豆 (optional)


Method 做法


Preheat oven to 180C degrees.
烤箱预热至180C度。

Line and grease the bottom and sides of a 8 inch round loose bottom baking pan with parchment paper. Set aside.
准备一个八寸圆形非固定底蛋糕模具,模具的底部刷点油然后铺上烘焙纸,边缘无需刷任何油脂。搁置备用。

Melt butter over a pot of simmering water. Set aside.
牛油放入耐热碗中,摆入已烧热的热水中隔热水融化。 搁置备用。

Combine plain and rice flour (A) together into a bowl. Sift twice and set aside.
把材料A的粉料一起混入碗里,混匀。过沥两次后搁置待用。


In another clean and grease free mixing bowl, beat egg whites (A) until frothy. Add castor sugar and dark brown sugar in 2 additions. Continue to beat until firm peaks.
蛋白A先用打蛋器打出一些泡沫,然后分两次加入两种砂糖A,继续打成尾端挺立的蛋白霜。

Lightly fold in egg yolks (A) till combined.  Add sifted flour mixture (A) and fold to combine. Lastly fold in melted butter (A) till incorporated.
轻轻地把蛋黄A拌入蛋白霜,又再加过沥好的粉料A,用橡皮刮刀拌入均匀。最后就把溶化的牛油A也拌入至混合成蛋糕糊即可。

Transfer batter into the prepared baking mould and bake at the middle rack of the oven for 15-18 mins till cooked.
把蛋糕糊转入烤馍送入烤箱的中层烘烤15-18分钟至熟透为止。


Unmould the cake pan and parchment paper. Allow the cake to cool on the wire rack.
蛋糕烤熟后马上脱模,去掉烘焙纸后摆于铁架上待凉。

When the cake has cooled, place and line it into the bottom of a loose base 18-20cm cake pan. Set aside.
等蛋糕冷却后,铺入一个18-20cm的圆形蛋糕模。搁置备用。

Drain and pat dry the canned peach (B) with kitchen towels to remove excess moisture. Slice and set aside.
将罐头桃子B用纸巾吸取水份,切片后搁置备用。

Adjust oven temperature to 170C degrees.
烤箱温度调整至170C度。


Heat up cream cheese (B) in the microwave oven for 15-20 seconds till softened. Transfer into food processor together with castor sugar, egg yolks, vanilla extract and whipping cream (B) and blend till thick and creamy.
把乳酪B送入微波炉热一热15-20秒钟弄软后,转移入食物加工器,一起加入细砂糖,蛋黄,香草精和淡奶油B搅打至浓稠即可。

Pour cream cheese batter into the prepared cake pan over the sponge cake layer (A). Arrange the sliced peaches (B) on top.  Bake the cheesecake in the preheated oven at 170C degrees for 25-30 mins until set.
再把乳酪面糊倒入已铺上了海绵蛋糕A层上。接着便把切片的桃子排在乳酪面糊上,才送入已预热的烤箱以170C烘烤25-30分钟至面糊定形后即可取出。

Increase oven temperature to 200C degrees.
烤箱温度再次调整至200C度。


Now to prepare the top layer. Combine all ingredients (C) together into a bowl and whisk till combined. Heat up the mixture in a microwave for 30 second until the mixture becomes fluid. Pour over the baked cheesecake layer. Send the cake back into the oven again and bake for another 5-6 mins for the cream layer to set.
现在准备最后的表层。把全部材料C一起混入耐热碗,搅匀后送入微波炉烧热30秒。接着便把这酸奶混合糊倒入烤熟的乳酪蛋糕层上,又再次送入烤箱烧烤5-6分钟至定型为止。

Leave the cake to cool on a wire rack. Cover with cling wrap and refrigerate overnight before serving.
把烤好的蛋糕摆在凉架上,待凉后用保鲜膜盖上,冷藏隔夜后才品尝。

Decorate the top with whipping cream and toasted almonds (optional) prior to serving.
隔天可以在蛋糕表层上挤出打发的淡奶油霜及烤杏仁豆后才切来品尝。


Do link back to Coco Sweet Tooth if you have used any information as published in this blog.


Monday, November 7, 2016

法式咖啡柑曼怡千层蛋糕 French Style Coffee Grand Marnier Mille Crepes


This is a super easy and yet sure to impress cake recipe which is extremely yummy and more economical to make your own.
我超爱这道即简易又非常讨好的蛋糕食谱,自己亲手做总是胜于外头贩卖的法式千层蛋糕,即经济又好吃。


The listed ingredients here is sufficient to make between 22-25 of 22cm round crepe layers. If you are not keen on taller cakes, you might want to cut down on the ingredients。
在这道食谱中所描述的材料足予制成22至25片的22cm圆形蛋糕饼皮,您若是偏向于普通高度的蛋糕体可以在材料的份量上调整。


法式咖啡柑曼怡千层蛋糕
French Style Coffee Grand Marnier Mille Crepes

To Make Crepes 蛋糕皮料 (A)
775g Soya Milk 豆浆
7 Grade A Large Eggs 鸡蛋 (大号)
90g Icing Sugar 糖粉
180g Plain Flour 中筋面粉

(B)
1 Tbsp Instant Coffee Granules 速溶咖啡精
2 Tbsp Hot Water 滚水

(C)
90g Salted Butter (melted by double boiling) 隔水炖溶咸奶油

(D)
3 Cups Whipping Cream 植物性鲜奶油 
1 Tsp Vanilla Extract 香草精
1/2 Cup Icing Sugar 糖粉
3 Tsp Grand Marnier 柑曼怡酒


Method 做法

Get ready a 22-24cm non stick flat frying pan, 1 palette knife, cake turntable and an 8" flat serving plate or cake board.
準备好一个22-24cm不粘平底锅,抹刀1把,蛋糕转盘和一个8“平底盘子或蛋糕板。

Combine ingredients (B) until evenly mix. Set aside to cool for 5 mins.

将材料B一起混合入个碗内,混匀后搁置5分钟待凉备用。


Combine all ingredient (A) & (B) into a large mixing bowl and mix until the batter is smooth. Strain through a sieve. Cover batter with cling wrap and allow to sit / rest for 30 minutes. 
将材料(A)和(B)放入一个大碗里搅拌均匀后过滤, 休面30分钟.

Prepare melted butter from ingredient (C) and set aside to cool for later use.
把无盐奶油C隔水炖溶后,离火,搁置待用。

Add in melted butter to batter (A) and mix well just prior to frying the crepes. 
煎蛋糕层之前加入溶化的无盐奶油拌匀.


Heat a non-stick frying pan over medium heat. Use a ladle to scoop the crepes batter into the pan while tilting to lightly fill the pan with the cake batter. Pour off any excess batter back into the mixing bowl. Cook crepe until the surface starts to bubble and the bottom layer has set.
以中火预热平底锅,用勺子舀入适量的面糊,迅速将锅转一圈至面糊薄薄地沾满锅底直到面皮底面煎熟。尽量不要倒入过多面糊,若有表面上有剩余的面糊尽可倒回面糊碗中。


When the edges turn to pale golden, use a spatula to ease away the layer from the pan. At this point, you may carefully lift up the crepe by hand or any other tools to make sure the crepes does not break. Place the cooked crepes on a baking tray while finishing the remaining batter. Stir well to prevent the batter from thickening before cooking each layer. Repeat the process until the batter is all used up.当饼皮煎至边沿微黄时, 用划刀把饼皮划离锅, 再轻轻的用手把烧好的饼皮取出放在在一个容器或烤盘上, 重复做法把面糊完成. 千万要记得每当倒入面糊入锅时必须先搅匀, 以防止面糊浓稠。

Combine all ingredients (D) into a large mixing bowl and beat with a hand held electric hand beater / mixer until thickened and stiff。Set aside.
将材料(C) 倒入一个大盆中然后用手持电动打蛋器将植物性鲜奶油, 香草精,糖粉及柑曼怡酒精打至硬发。搁置待用。 


To assemble cake, place cake board or plate on the turntable. Place one piece of crepe layer on the board / plate. Spread a thin layer of filling on top. Stack on another piece of crepe. Lightly flatten each layer with palm to sandwich the cream onto the crepe. Repeat the process until the last layer. Decorate the final layer as desired.  
组合蛋糕, 将蛋糕板放在蛋糕转盘上,铺一层饼皮,抹一层薄薄的馅料在表面,然后又再铺上一层饼皮,用手轻按餅皮中间部份使馅料分布均匀。重复同样的步骤至完成。 最后一层可以随意装饰。剩余的馅料可以收藏入冰箱冷藏。

Cover the cake with wrap and chill cake overnight before serving.
把蛋糕盖好, 放入冰箱冷藏隔夜才切出享用。


Do link back to Coco Sweet Tooth if you have used any information as published in this blog.

Friday, November 4, 2016

班兰蛋奶酥海面蛋糕 Pandan Souffle Sponge Cake

Last week I bought a bunch of purple colored pandan leaves from the local wet market hoping to extract out purple colored pandan juice.
签个星期我在湿巴刹购买到一串紫色的班兰叶,以为可以取出紫色班兰汁。

To my disappointment, the extracted pandan juice only gave a darker greenish brown hue instead of the color I hoped for.  Hence I ended up with a 2 tone of green colored cake.
结果搅拌出来得到的是深褐绿色的班兰液汁,大大失望。最终只有拿来做个两种色调的绿色蛋糕。

This is a lovely cake recipe adapted from Jeannie's blog which I highly recommend you to check out her site.
这道蛋糕食谱取自及修改于Jeannie's blog ,她的所有作品我都极力推荐,您不防去参观。


班兰蛋奶酥海面蛋糕
Pandan Souffle Sponge Cake

Ingredients 材料
(A)
70g Unsalted Butter 无盐牛油
35g Salted Butter 咸牛油
180g Cake Flour 低筋面粉 (sifted 过沥)

(B)
75g Coconut Milk 椰浆
45g Pandan Juice 班兰汁
3 Eggs 鸡蛋
9 Egg Yolks 蛋黄
3 Tsp Vanilla Extract 香草精
45g Pandan Juice

(C)
9 Egg Whites 蛋清
170g Castor Sugar 细砂糖


Method 做法


Prepare and measure all ingredients ahead. All eggs have to be in room temperature.
所有材料量秤好,鸡蛋必须是室温的温度。

Prepare an 8 inch and 6 inch round cake pan. Line and grease the bottom and sides of a fixed bottom baking pan with parchment paper. Set aside.
准备一个八寸及六寸圆形固定底蛋糕模具,模具的底部刷点油然后铺上烘焙纸,边缘无需刷任何油脂。搁置备用。

Place the oven's big baking tray at the lower rack of the oven. Fill the tray with hot water and preheat the oven to 160C degrees.
把烤箱里的大烤盘放入烤箱的底层,大烤盘中倒满热水,烤箱预热至160C度。


Cut 8-9 pcs of fresh pandan leaves into 1-2cm short lengths. Blend with 110g Water. Strain and reserve the juice. Set aside.
取八至九片新鲜班兰叶,切成1-2cm小段放入食物搅拌机,倒入110克清水一起搅碎,过沥取汁后搁置备用。


Place butter into metal bowl and boil under low heat melted.  Add in sifted cake flour  and use a wooden spoon or rubber spatula to evenly mix into lumpy mixture. Remove from heat and set aside.

把牛油倒入铁盆以小火煮至融化,立刻加入已过沥的蛋糕粉料用木勺子或者是橡胶刮刀搅拌搅拌混合成粒状即可离火。搁置备用。

Combine eggs, egg yolks, vanilla extract from ingredients (B) together into a mixing bowl. Mix to combine. Set aside.
将材料B的鸡蛋,蛋黄及香草精倒入另一个盆,用打蛋器搅匀。搁置备用。


Add coconut milk and 45g of pandan juice into the cooked butter flour mixture (A) and stir to combine.

把椰浆和45克班兰汁混入牛油蛋糕粉混合料A,混匀。

Gradually stir in the egg yolk mixture and whisk to combine. Strain batter and set aside.

轻轻的把蛋黄香草液倒入,搅拌混匀成糊。接着把蛋糕糊过沥,搁置待用。

In another clean and grease free mixing bowl, beat egg whites (C) until frothy. Add castor sugar in 2 additions. Continue to beat until firm peaks. 
蛋白C先用打蛋器打出一些泡沫,然后分两次加入细砂糖C打成尾端挺立的蛋白霜。


Transfer 1/2 of the beaten egg whites into the cake batter, use a rubber spatula to fold until combine. Continue to mix in the balance egg whites until completed.
取出1/2份量的蛋白霜混入蛋糕糊中,用橡皮刮刀沿着盆边翻拌及画圈圈的方式搅拌均匀。接着采用同样的步骤把剩余的蛋白霜混入蛋糕糊至均匀即可。

Transfer out 1/2 of the cake batter into another bowl. Add another 45g (B) of pandan juice into the batter fold to incorporate. The other 1/2 cake batter to remain as it is. Set aside.
再取出1/2的蛋糕糊转入另一个碗,加入45克的斑兰液,拌匀后搁置备用。其余的半份蛋糕糊保持原味。


Spoon 1 tablespoon of the original batter into the center of the prepared baking pan. Spoon 1 tablespoon of the darker pandan batter over the 1st layer. Repeat the steps until all batter has been used up.  (Alternatively you may just pour all the cake batter over each other and create swirls with toothpick to create the marbled effect). 
挖一大汤匙的原味蛋糕面糊倒入烤模的中心点,再用另一只汤匙挖取深班兰色面糊倒入原味蛋糕糊的中心点上。重复以上的步骤直到完成为止。您也可选择分次加入两份蛋糕糊入烤模,表面抹平后采用木牙签拉出大理石纹线即可。

Place both cake moulds into the big baking tray place inside the mid lower level of the preheat oven. Bake with water bath at 160C degrees for 15 mins, then reduce oven temp to 140-145C degrees  and a continue baking for 60 mins until the cakes are thoroughly baked.
浸入已盛满热水的大烤盘及预热至160C度的烤箱的中下层烘烤15分钟,然后再调低至140-145C度继续烘烤60分钟至烤熟为止。

Unmould and invert the cake to cool on the wire rack for 5 mins before removing parchment paper. Allow to cool completely before storing.
蛋糕出炉后脱模摆倒扣在铁网上待凉5分钟后撕去烤纸,继续待凉。


Do link back to Coco Sweet Tooth if you have used any information as published in this blog.

Printfriendly

Related Posts Plugin for WordPress, Blogger...