Wednesday, April 29, 2015

Black Sesame Seed Cake 黑芝麻蛋糕


Last weekend I decided to try out this recipe which I have bookmarked among my baking books collection. It is a relatively easy to make cake with minimum fuss with the usual preparation procedures as many other cake. 

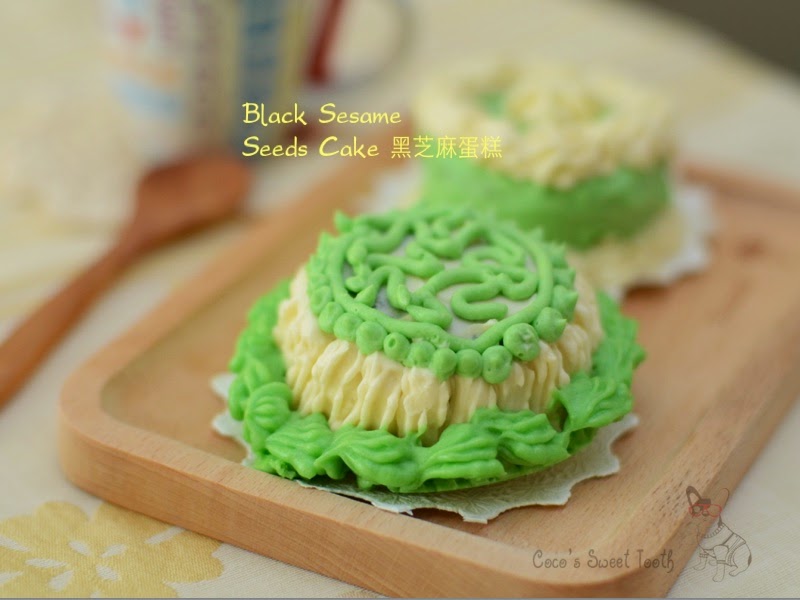
The reason why I chose this recipe  was more towards the sesame part as I am a fan of sesame products and have used lots of sesames in cooking, particularly the oil. A good friend of mine gave me a kg pack of black sesame seeds some time ago and no matter how hard I tried I just could finish consuming it. Through this recipe, I was hoping to clear up the supply and also to find out for myself how it actually taste in baking. 

For the icing cream, you may use any frosting recipe of your preference.  This is the original version of icing proposed by the author of this recipe. Cake frosting is the part I am still shunning away from.  Instead of baking and icing the entire cake as per what the recipe called for, I baked mine in muffin cups and decorate the top with the proposed icing.


Black Sesame Seed Cake

Ingredients (A)
5 Grade A Eggs
140g Castor Sugar
160g Cake Flour
80g Black Sesame Seed Powder
40ml Fresh Milk
1 Tsp Ovalette (Optional)

(B)
200g Butter

Icing Cream (C)
100g Shortening
120g Butter
150g Golden Syrup
1/2 Tsp Vanilla Essence

Pandan Coloring

Method

Preheat oven to 170C degrees. Line bottom of a 13" x 13" x 1" baking pan, Set Aside.

Blend A with blender at high speed for 5 minutes till light and fluffy. Set Aside

Blend B till thick and creamy, gradually fold in batter. Pour batter evenly into prepared  baking pan and bake for 20-25 minutes. If using muffin cups 15-18 mins baking time.

Icing Cream
Blend butter until soften. Fold in shortening and whip till fluffy. Add in vanilla essence and golden syrup and mix till well incorporated. Scoop out a small portion and add pandan coloring. Stir well and set aside.

Cut the cake horizontally into 3 layers. Spread icing cream over the first layer of cake, place second layer onto it, then spread another layer of icing cream over and place the 3rd layer of cake on top (not applicable for cake baked in muffin cups).

Cover the cake with icing cream.

Pipe some green icing onto the cake and decorate as desired.


Monday, April 27, 2015

Vegetarian Yam Puffs 素芋头角........Simply Yummy

I have been itching to eat yam puff for a while but have not been successful in finding vegan versions in any of the eateries I visited in Jakarta. Even if its available as meat free, there would still be onion or garlic to consider. 

Under my desperate circumstances, I ended up adapting from a regular yam puff recipe into a vegetarian version.

The outlook may not seems as appetizing as the restaurant made ones...but the taste do taste like one. Worth the effort making it. Handling and wrapping the dough might be a 'wee bit' messy and challenging.

素芋头角
Vegetarian Yam Puffs

For The Dough
600g Yam

100g Wheat Flour
100g Shortening

Seasoning For Dough
1/4 Tsp Five Spice Powder
3/4 Tsp Salt
1/2 Sugar

Method 
Peel Yam and diced into cubes. Steam until softened. Add wheat flour and shortening to the cooked  yam and mix well. Transfer the mixture onto a slightly floured work top, mash the mixture with the face of the knife. Add in Seasoning and knead until well combined. Set Aside.


For The Fillings
20g ginger (finely cut)
30g Diced Vegetarian Meat ( I substitute with Radish)
30g Diced Carrot
50g Diced Vegetarian BBQ Pork 
50g Diced Chinese Mushrooms
30g Green Peas
100g Mangkuang, shredded
300ml water

Seasoning for Fillings 
2 tbsp vegetarian oyster / mushroom sauce
1 Tbsp Light soy sauce
1 Tbsp Dark soy sauce
1/2 Tsp Salt
1 Tbsp Sugar
3-4 Tbsp Sesame Oil
Oil For Frying
1 Tbsp each (Tapioca Flour, Plain Flour mix with Water)

Method

Soak diced vegetarian meat in water for 1/2 hour, squeeze out excess water.

Heat up sesame oil in a pot, saute ginger until fragrant. Stir fry all the diced ingredients till fragrant.   Add water and the balance of the ingredients and continue stir frying for another 5-10 minutes or until cooked. Add seasoning and cook till it boils. Lastly add in flour and tapioca flour solution. Remove and set aside for later use.

Divide the yam dough into 35g each. Flatten and place a spoonful of filling in the center. Wrap the fillings and seal the edges tightly. 

Heat up a pot of oil. Deep fry the yam balls till golden brown. Serve.


Pumpkin Pau 南瓜蒸包


Following my recent posting on pumpkin bread, I decided to adopt this ingredient into steam buns for its rich golden color and also the nutritional value it carry. Try choosing pumpkins with brighter orange color, the stronger color tends to be riper and sweeter in taste. And also, the concentration level of the pumpkin puree may differ, so do pay extra attention to the amount of water added to the dough. You may need to adjust the amount of water to be added to the dough accordingly.  For pau making, it is not required to knead the dough until it passes the membrane test. Once the kneaded dough becomes manageably soft and shiny, it's ready for proofing. 

I have studied many recipes on Pumpkin steam pau and not all of them propose the same cooking / steaming time. To be on the safe side, I opt to apply the steaming time based on previous pau recipes I had successfully experimented. 

Pumpkin Pau 南瓜蒸包

To Make Pau Skin (A)
1 Tsp Instant Yeast
160ml Water

120g Pumpkin Puree 

330g Pau Flour (sieved)
50g Caster Sugar
1 Tsp / 5g Double Action Baking Powder
25g Rice Bran Oil / Salad Oil

For Fillings (B)
Any store bought lotus fillings

(if you make your own) (C)
150g Fresh Grated Coconut
35ml Water
40g Caster Sugar


Method

To make pumpkin puree, remove skin and cut into small cubes. Steam till softened. Discard water and mash it immediately while it is hot. Leave to cool.

Place enough water in a steamer pot and bring water to boil. Place a steaming rack which has cloth laid on it.

To prepare the fillings, cook ingredients (C) while stirring till it turns to pale yellow color.  Dish up and cool. I use store bought fillings. 

To prepare pau skin, mix yeast with 1/2 portion of the water well and set aside. In another big mixing bowl, combine all ingredients from (A) as well as the yeast water mixture. Add the remaining water to the dough and adjust based on the concentration of the pumpkin puree. You may stop adding water once a rough dough is formed. Transfer the dough to a slightly floured work table and knead for approx 20 mins or more till the dough becomes shiny and soft. I did mine in a stand mixer for the first 15 minutes before kneading by hand.

Place dough in a slightly oiled bowl and wrap with clingfilm and proof for 30 mins.

Lightly dust the work table with flour. Gently punch down the dough to deflate the air and knead for 1-2 minutes.

Divide dough into 16 portions. Roll each portion into a ball and then flatten. Place a spoonful of filling into the centre. gather the edges, seal the opening and lay each dough ball downwards on a parchment paper or muffin liners.

Repeat the process for remaining 15 portions.

Cover the pau with clingfilm and proof for 30 mins until double in size.

Arrange the pau on the steamer rack and steam over medium high heat for aproximately 15-20 mins (depending on size of the pau) or till cooked.  Turn of the heat.

Open the steamer lid slightly to release the heat and let it stand for another 3-5 minutes before removing the lid. This is to prevent the pau from shrinking after cooling.


Printfriendly

Related Posts Plugin for WordPress, Blogger...