Thursday, April 23, 2015

Mocha Layer Cake

Mocha Layer Cake


It's been almost a year since I last played with cake frosting, the part which I just couldn't do well. I have tested many types of frosting but the outcome was not pretty. 

Seeing that there is leftover whip cream lying around in the fridge, I decided to give it a go without much expectations. Leafing through the neglected baking books in the study I found this relatively easy and less time consuming recipe to try out. The original recipe calls for the using of 3 separate 7 inch shallow cake pans but I only have 1 hence I just bake the entire recipe on a standard 7" round cake pan and worry about the layering the cake later.

True enough the layering is tough for novice baker like me as the cake was rather crumbly and instead of making 3 layers, I settled for 2 layer...phew! Cold sweat ! My advice would be to follow the recipe and bake with at least 2 separate cake pans if you don't have many spare baking pan of the same size. 

While layering the cake, lots of crumbs came loos. So, I kept it for use in decorating the sides of the cake while only opting chocolate shaving on the top surface of the cake. The feedback from my maid was the chocolate being too sweet. Luckily I cut down on the castor sugar from 120g to 90g and in the end, the using of the cake crumbs for the side also helps to even out the sweetness. 

Recipe adapted from the book "Simple & Delicious Desserts" published by Love Food.


Mocha Layer Cake
(Servings - 8 pax)

Cake

Butter (for greasing)
250g Self Raising Flour
1/4 Tsp Baking Powder
4 Tbsp Cocoa Powder
95g Castor Sugar
3 Grade A Eggs
2 Tbsp Golden Syrup
150ml Corn Oil
150ml UHT Milk

Filling / Topping

1 Tsp Coffee Powder
1 Tbsp Boiling Water
300ml Double Cream
2 Tbsp Icing Sugar

Decoration

50g Chocolate Shavings
Loose Cake Crumbs (optional)
Icing Sugar (for dusting)


Method

Lightly grease 3 shallow 7" cake pans. I bake mine using one standard 7" cake pan (bottom and side line with parchment paper) instead of what the recipe calls for.

Sift the flour, baking powder and cocoa powder together into a large bowl. Stir in the castor sugar. Then make a well in the center. Add eggs, syrup, oil and milk to the well and gradually beat in with a wooden spoon to form a smooth texture. Divide the batter between the prepared cake pans (if any).

Bake in a preheated oven at 180C degrees for 35-40 mins, or until springy to the touch. Leave to cool slightly in the cake pan before transferring to a wire rack to cool completely.


To make filling, dissolve the coffee in the boiling water. Add coffee mixture into a mixing bowl containing the double cream and icing sugar. Whip at high speed until the cream starts to hold its shape. Apply the cream to sandwich the 3 layers of cake together. I only layered mine  to 2 layers. Spread the remaining cream over the top and side of the cake.

To decorate, lightly press the chocolate shavings into the cream on the top as well as the side of the cake. I did mine with the cake crumbs (for the sides) and chocolate shavings (for the top).

To serve, lightly dust with icing sugar.


Vegetarian Nasi Lemak

Vegetarian Nasi Lemak


I believe many of the seasoned cooking members like me do not actually keep records or measure their cooking ingredients on a frequent basis. Particularly when you and I cook almost everyday and are used to playing around with flavors or food combinations based on personal preferences.


I have never given much thought the necessity to do so until when I started to post some of the home cooked food pictures on Facebook and from the response from people asking for the recipe. This morning I spent several hours cracking my head to recount the steps and going through the kitchen scales to weigh the ingredients used for the requested recipes.

Thank you for the interest and I hope you enjoy the outcome as much as I enjoy the preparation process. Cheers and have a wonderful day! 


Sambal Tumis

300g Dry Chili
Water (for boiling)

3 Red Chilis
2 Bird's Eye Chilis (Chili Padi), Optional
300ml Water (for blending)
100g Tomato, optional (diced, for blending)

75ml Cooking Oil
90g Sugar
15g Tamarind slice / paste (mix thoroughly with 1 cup water)
4 slices Galangal
1 stalk Lemongrass (crushed)
1 tsp Salt
1 tsp Vegetarian mushroom granules
Lime juice (optional)


  • Boil 300g of dry chilis with sufficient water for 10-12 mins or until softened. Remove from heat and discard the water.
  • Using a blender, combine the above dry chili, red chilis, chili padi and 300ml water and blend into fine paste.


  • Heat up oil in a wok, add in the above blended chili paste and stir fry under low heat until fragrant or when oil starts to separate. 


  • Add in tamarind water, galangal, lemon grass, salt, sugar and mushroom granules to taste. You may add further spices or seasoning based on your preference. Stir fry the mixture until slightly thicken but runny. Add lime juice (if using) and bring to boil.


  • Dish out to cool before storing in glass container.


Coconut Fragrant Rice

2 Cups long grain rice
1 tsp salt
1 tsp sugar
6 Pandan leaves (knotted)
3 Stalks Lemon Grass (crushed)
6 Slices of Ginger
1 Fresh Coconut (Grated only the white part & mix with water to get 4 Cups of coconut milk)


  • Wash the rice and strain.
  • Add all ingredients into the rice cooker.
  • Leave aside for 1 hour before cooking.


  • Serve with roasted groundnuts, sliced cucumber and vegetarian ikan bilis (anchovies). For me, I stir fry 30g of vegetarian ikan bills with 2 tsp of the samba paste and 1 tsp of sugar as I am not so much into plain ikan bilis (anchovies).


Wednesday, April 22, 2015

Pulut Inti 蕉叶糯米椰丝糕 .......a memorable dessert from my past

Many of my close friends asked me how did I manage to resist from all eating all those sweet laden, dairy rich cakes and pastries which I frequently bake. Well, I guess I just switch my mind away from the cravings and put all attention to any baking at best I could. The same goes for cooking for the family members who aren't vegan, I just cook based on 'gut feelings' without actually testing the taste.  

Now I can relate to how my late grandmother capabilities in making lots of delicious desserts and chinese kuihs with only her 'agar agak' estimation using basic measuring tools such as cup  and bowl. Unlike our modern ways whereby we are all blessed with kitchen scales, food thermometers, ovens, mixers etc etc.

So... back to the subject of Pulut Ini, yes this is still a comfort food for me. It's meat and dairy free which works well as a substitute to curb my sweet tooth. I posted the photos in Baking Corner's page in Facebook and received lots of request to share the recipe.  Hence, I have to quickly arrange my works and share out the recipe today.


Pulut Inti
蕉叶糯米椰丝糕

(A) 
300g glutinous rice (washed and soaked overnight)
180ml coconut milk (from 1/2 coconut)
3 pandan leaves (knotted)
1/2 tsp salt

(B)
1/2 grated coconut (white part only)
100g gala melaka ( chopped)
4 tbsp water
2 pandan leaves (knotted)
1/4 tsp salt

(C) For thickening
1 tsp cornflour
1 tbsp water

12 pcs banana leaves (18cm x 15cm) , softened and wiped clean

Method


  • For (A) - Place the well drained glutinous rice, coconut milk and salt into a steaming tray and mix well. Coconut milk should just cover the rice. Place the pandan leaves on top of the rice and steam for 30 mins until dry and fully cooked.
  • For (B) - In another heat proof sauce pan, combine water and gula melaka and boil until sugar is dissolved. Add grated coconut, pandan leaves and salt. Cook with medium low heat until the grated coconut is almost dry.
  • For (C) - Combine cornflour and water together. Stir it into (B) cooked grated coconut mixture until well combined. 
  • Remove the grated coconut toppings from heat and set aside to cool. Divide the toppings into 12 portions.
  • Fluff up the cooked glutinous rice and divide into 12 portions.
  • Place 1 portion of glutinous rice on the banana leaf and top it with 1 portion of the coconut toppings. Wrap it up neatly like nasi lemak. 
  • Repeat with the balance portions. 


Pumpkin Bread 南瓜麵包


Pumpkin and sweet potatoes have always the constant staple food for my eldest furkid ever since she was diagnosed with hereditary severe allergies to rice, yeast and wheat products, we had been using pumpkins, potatoes and sweet potatoes as her main source of carbohydrates. All those years of preparing food for her, never had I actually use for my baking or cooking. Usually I would only pumpkin meals for ourselves when we eat outside. I guess we just want to save every bit of our home supplies for our beloved furkid. 


Yesterday I came across a big packet of pre cut pumpkin cubes in the freezer which were in excess of what we have prepared for my forked consumption. Immediately I set about putting it to baking. And, finally... I get to try out the pumpkin bread recipe adapted from Alex Goh's 'Magic Bread 汤出面包香'. 


Pumpkin Bread 南瓜麵包
(Makes 2 x 24x13x7cm Loaves)

Ingredients

A  100g Bread flour
     85g   Boiling water

B  400g Bread flour
     40g   Sugar
     1 tsp Salt
     15g   Milk powder
     1/4 tsp Cinnamon powder
      8 g   Instant yeast

C   200g Pumpkin (cooked and mashed)

D  150g Cold water

E  60g Butter

F  80g Pumpkin seeds


Method:

Combine boiling water from (A) with bread flour until well blended to form a dough. Cover and set aside to cool. Store into refrigerator for at least 12 hours before using.

Combine all ingredients from (B) into the bowl of a stand mixer with dough hook and mix until all ingredients are well combined. Add (C), (D) and continue kneading to form a rough dough. Add in (A) and continue kneading on slow speed until blended. Add more water wherever necessary.

Add in (E) and continue kneading on medium speed until the dough is smooth and elastic. You may also tear a small part of the dough to test its readiness by performing the window pane test.

Add in (F) and mix until well combined.

Transfer the dough to a slightly greased bowl, cover bowl with either cling wrap or cloth and allow the dough to proof for an hour or until the dough doubled in size.

Punch down the dough. Divide the dough into 12 equal pieces and mould it round.  Allow the doughs to rest for another 10-15 mins.

Arrange 6 pieces of dough into a 24x13x7cm bread pan. Repeat the same for the balance.  Sprinkle a mist of water onto the surface of the 2 bread pans and allow the dough to proof for another 45mins or until double in size.

Apply egg wash onto the surface of the bread and sprinkle some pumpkin seeds over the top.

Bake in a preheated oven at 180C degrees for 30 minutes.

Remove bread pan from oven. Drop the pan from a height of 1 feet onto the counter to release the hot air inside the pan. Unmold and transfer bread onto cooling rack.


Tuesday, April 21, 2015

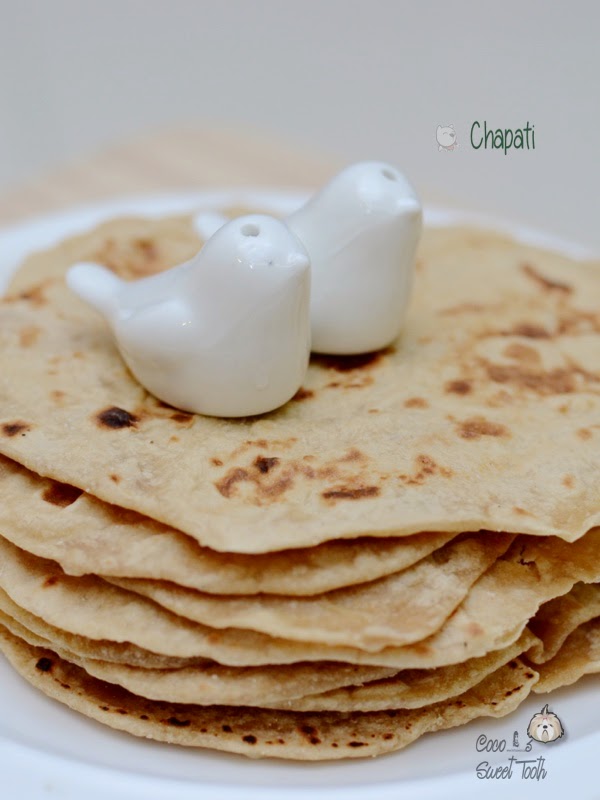
Chapati ........my vegetarian dhal companion


Chapati, also known as Indian flat bread, is our very first Indian pancake attempt prior to the making of  Pita Bread last month. It all started with my cravings for curry lentils (dhal) as well as my maid's sudden urge to eat roti canai. Hence, I googled the net for the easiest recipe to create something equivalent instead of roti canai to go along with the batch of vegetarian curry lentils (Dhal) dhal / lentils sitting around in the fridge.


It's a very simple and straight forward recipe with minimal ingredients.  


Chapati 

2 Cups of Atta Flour
3/4 Cups Water
a Pinch of Salt


Directions 
  • Mix Atta Flour with a pinch of salt. Gently add in the water to the flour mixture, adjusting and adding as needed until the mixture forms a dough. 
  • Continue kneading until the dough is manageably soft and smooth. 
  • Cover the dough and set to rest for 15 mins.
  • Dust work space with flour. Divide the dough into equal portions each equivalent to a lemon size dough.  
  • Take each dough and roll between the palms with gentle pressure in circular motion until the dough is smooth and without cracks.  
  • Repeat the same for the remaining lemon size doughs. 
  • Lightly coat each dough with Atta flour. Using a roll pin, flatten and roll out each dough to form a 4' - 6' flat disc.  The rolled out Chapati must not be less than 1/6" thick regardless of the disc size.
  • Place the dough / disc on a heated pan on medium flame. Using a spatula, flip the chapati when raised bumps appears on the surface. Repeat the same for the other side until chapati is thoroughly cooked.
  • Serve with Curry Dhal or any gravy of your preference.


Chocolate Marble Swirl Bread 大理石面包


Being an avid baker, I landed up with lots of leftover ingredients in the freezer and sometimes I often forgotten about it until I started clearing stuffs to make way for newer leftovers such as cake frosting, cake toppings, bread fillings and many more I couldn't recall.

Anyway, last month I deliberately increase the quantity of the required cream cheese toppings ingredients while making a batch of strawberry cream cheese bread hoping to keep the leftovers as toppings to enhance a 2 tone / flavor bread recipe I have in mind. 


This recipe is an adaptation of several bread recipes whereby I took bits and pieces of certain information from various bread books hoping to create a different outlook cum tasty bread. The bread turns out soft and tasty as I hoped.  Do feel free to try making on your own and email me the outcome. Happy baking!


Chocolate Marble Swirl Bread

Sweet Bread Dough 基本麵团甜麵包
200g Milk
4g Instant Yeast
330g High Protein Bread Flour
70g Low Protein Flour
80g Castor Sugar
4g Salt
1/2 Tbsp Apple Cider Vinegar
1 Grade A Egg
40g Unsalted Butter
2 Tbsp Unsweetened Dark Cocoa Powder


Cream Cheese Toppings (A)
125g Cream Cheese
40g Sugar
50g Whipping Cream
10g Instant Custard Powder

Chocolate Rice for decoration (B)

Method (A) 
Cream the cream cheese until light. Add sugar and continue creaming until smooth. Add in whipping cream and mix until well blended. Add in custard powder and mix until well combined. Transfer batter into a piping bag and set aside. 


Directions
  • In a stand mixer fitted with a dough hook attachment, add all the ingredients except butter. However, leave around 30g of milk left to be added slowly later. 
  • Mix at low speed (speed 1) until all the ingredients are well mixed to form a coarse ball dough ( appro. 2-3 min). Add the remaining liquids if necessary.
  • Add butter and slowly increase the speed to medium for approx. 15-18 min until a smooth, window pane effect is formed. 
  • Divide the dough into two equal portions. One portion to remain as it is and the other portion to mix with 2 Tbsp of unsweetened dark cocoa powder and knead until fully combined to form a chocolate color dough. 
  • Shape the 2 doughs into a ball and allow it to proof in individual (lightly greased) bowls. Cover the bowls with cling film and allow to proof for 1 hour or until it doubles in size.
  • Test the readiness of the dough with a finger lightly dusted with low-gluten or cake flour.  The dough is ready when the dough remain indented after the finger pokes into it.
  • Punch down the doughs. Roll into balls and leave to rest for another 15 mins.
  • Lightly dust the work top with low protein flour, using a rolling pin, roll out the light color dough into a 10x14cm rectangle and set aside. 
  • Repeat the same for the chocolate dough and roll out the dough into the same rectangular dimension as per the light color dough of 10x14cm. 
  • Stack the chocolate colored rectangular roll dough on top of the light color dough.  Flatten the joint dough sheet with the rolling pin. 
  • Roll up the rectangular sheet dough like a roulade and place in a well greased bread loaf pan. Tuck the ends down. 
  • Spray some water over the dough with a fine-mist nozzle. Proof the final bread dough in the tin for 50 min until it almost reaches the brim of the tin. 
  • Pipe cream cheese batter over the top of the bread dough. Sprinkle and decorate with some chocolate rice.
  • Preheat oven to 200 degC but bake at 180 degC for about 35 - 40 minutes. Remove from oven and unmould immediately. Let the loaf cool off before slicing.

Sunday, April 19, 2015

Pandan Chiffon Cake....... simple yet unresistable


It's been almost 3 years since I embarked on this wonderful and fulfilling journey of baking and photography. Looking back I still find it hard to believe how did I stay onto this hobby until today without wavering. 

For all that has been achieved, I must give all credits to my husband who has been my ever supportive food sampler. Not only did he not complain having to eat the same batch of bakes for several days in order to finish the entire lot since the entire household only consist of 3 persons, hubby, me and the maid. So the most badly ones are my hubby and maid since I hardly touch (eat) my bakes, as I would normally be worn out by the end of the day baking with bread kneading, cake baking and photography.

This recipe and photograph was one of my earlier batch of baking works. I don't quite remember where did I get the recipe from but somehow it was posted on my Facebook among the thousands of photos I stored there. 

This is a relatively simple and straight forward chiffon cake recipe yielding good outcome. Feel free to try out.

   
Pandan Chiffon Cake
Ingredients:

5 Grade A Eggs (Separated)
100g Castor 
60g Corn oil
1/2 Tsp vanilla extract
90g Cake flour
20g Corn flour
1/4 Tsp baking powder
1/2 Tsp salt
2 Tbsp Pandan leave juice
1 Tsp green food colouring (Optional)
60ml Thick coconut milk


Method
  • Separate Egg Yolks and Whites. Sift Cake flour, cornflour and baking powder together. Mix Pandan leave juice, thick coconut milk and green food colouring together.
  • Add 1/2 of the sugar to the egg yolks and beat till creamy and fluffy. Add in 1/3 of the coconut milk mixture and mix well. Add in 1/3 of flour mixture.
  • Continue with another 1/3 of the coconut milk and 1/3 of the flour mixture. Repeat until coconut and flour are used up. Add in salt, vanilla extract and corn oil and gently mix well.
  • In a separate (Clean, dry and oil free) bowl, beat egg whites till foamy. Add in remaining sugar and continue to beat till firm peaks are formed.
  • Take 1/3 of the egg white and add to the batter. Gently fold in to mix well. Add remaining egg whites to the batter and continue to fold in to mix well.
  • Pour batter into chiffon cake mould. Gently knock the sides of the mould to release air bubbles.
  • Bake in preheated oven at 160degrees C for about 60mins. Remove from oven, invert the mould and set aside to cool for 30 mins.

Printfriendly

Related Posts Plugin for WordPress, Blogger...