Saturday, January 2, 2016

黑森林樱桃蛋糕 Black Forest Gateau


Black Forest Gateau is a popular German cake consisting of few layers of chocolate sponge cake sandwiched with whipped cream and cherries. In addition, the high alcohol content from Kirsch, which is technically cherry brandy, gives the cake a deep and rich flavor. If you cannot get hold of this alcohol, you could substitute the required quantity of Kirsch with brandy.


黑森林蛋糕原自来于德国,在80和90年代最受欢迎及时长用于生热庆祝上。黑森林蛋糕其实是以数层海绵蛋糕涂上淡奶油后摆入樱桃而颊起来拼成的。此外,这蛋糕还含有高含量的樱桃酒(一种无色水果的白兰地)把蛋糕的味道变的更加浓厚。你若家里没这类酒,可以跟着食谱里的容量用白兰地酒取代。

Sharing this lovely cake recipe from a great recipe book Step by Step Baking by Carolie Bretherton
今天又再次与你分享这蛋糕食谱取自于 Step by Step by Carole Bretherton.


黑森林樱桃蛋糕 
Black Forest Gateau

Ingredients 材料
(A)
100g Unsalted Butter 无盐牛油, melted 融化
9 Grade A Eggs 鸡蛋(大)
180g Golden Castor Sugar 金幼糖
180g Plain Flour 中筋面粉 / 蛋糕分
75g Cocoa Powder 可可粉
2 Tsp Vanilla Powder 香草粉


Directions 步骤

Preheat oven to 175C degrees. Grease the bottom and sides of a removable base 22cm cake pan with parchment paper. Set aside.
烤箱预热至175度。准备一个22厘米底部旁边两侧已涂油及铺上烘培纸的圆形烤盘。搁置待用。


Combine flour, cocoa powder and vanilla powder into a mixing bowl and sieve to incorporate.
在另一个搅拌碗将粉料(可可粉,面粉及香草粉)沥入混匀。

In a separate heat proof mixing bowl, combine eggs and sugar. Place the bowl over a pan of simmering water.  Make sure the bowl does not touch the simmering water.
把鸡蛋和糖倒入一个耐热搅拌盆混匀,再将盆摆上正在煮热开水的锅。千万不要让搅拌盆底接触到沸腾着的热水


Whisk the eggs with a electrical egg beater until the mixture become pale and thick and firm enough to hold a trail when lift up the beaters.
用电动打蛋器一边搅拌一边隔水加温,继续拌打至泡沫光滑均匀大状态,一直打到用打蛋器捞起呈流性状。

Remove the bowl from heat and whisk for another 5 minutes or until cool slightly.
把鸡蛋盆离火,再拌打多5分钟让蛋糊冷却下来。

Sift the flour mixture over the beaten egg mixture. Gently fold the dry ingredients into the egg batter with a rubber spatula.
把粉料沥入打发的蛋糊,将橡皮刮刀以由下捞取而上的手势快速把面粉与鸡蛋糊拌匀。


Fold in the melted butter. Transfer batter into the prepared cake pan and bake in the middle rack for 40 minutes. Or, when the cake has risen and started to shrink away from the sides.
拌入融化牛油。把拌好的面糊倒入烤模中。送入已预热好的烤箱中层烘烤40分钟,一直到烘烤接近完毕时而蛋糕体积稍微缩小即可。

Turn out the cake onto a wire rack and allow to cool before removing baking mould.
蛋糕出炉后必须立刻倒扣放凉后才脱模。


Ingredients
(B)
1 can 425g Pitted Black Cherries 罐头去核黑樱桃
4 Tbsp Kirsch 樱桃酒
600ml Whipping Cream 动物性鲜奶油
150g Chocolate Shreds 巧克力碎片

Directions 步骤

Drain the canned cherries. Reserve the juice. Add Kirsch into the reserved cherry juice and set aside.
沥干罐头樱桃,保留樱桃汁。混入樱桃酒后搁置备用。

Chop 1/2 of the cherries while the balance 1/2 to remain whole. Set aside.
把一半的樱桃切块,其余的另一半份保持原状。搁置待用。

Carefully cut the cooled cake into 3 layers.
平均地把放凉的蛋糕切成三份。


Equally drizzle the cherry kirsch juice over each cake layer.
把每一层蛋糕层刷上樱桃酒汁。

In a separate chilled mixing bowl, beat the whipped cream until it just holds shape and not too stiff.
将动物性鲜奶油装入个冷藏的搅拌碗,用搅拌器用中速打至尾端挺立的程度。

Place a layer of cake on a cake base. Spread the layer with cream and 1/2 of the chopped cherries. 
蛋糕盘上铺上第一片蛋糕片,蛋糕表层抹上鲜奶油后再均匀铺上樱桃块。

Repeat with the second cake layer. Top with the final cake layer, Press down. 
再盖上另一片蛋糕,使用同样方式完成其余的两片蛋糕夹层,用手在蛋糕上压一压使蛋糕层紧密。


Coat the sides and top with whipped cream pressed chocolate shreds.
用抹刀把鲜奶油涂抹整个蛋糕上后再以巧克力碎轻轻沾上蛋糕表面及四周做装饰。

Pipe a ring of whip cream around the cake and decorate with whole cherries.
剩下的鲜奶油装入挤花袋中在蛋糕表层挤出花边再放上樱桃为最后的装饰。


Do link back to Coco Sweet Tooth if you have used any information as published in this blog.

Friday, January 1, 2016

素莲藕花生汤 Vegetarian Lotus Root Soup

I grew up from a family whereby clear soups were a big part of our menu. Even so, I was not exactly a fan of having soup for any rice meal and being a teochew I am more keen on rich gravy dishes. Unlike my cantonese husband who finish up the soup, I will the one who ate the accompanying ingredients in the soup.
我虽然生长于一个吃饭必有汤喝的家庭中,但是我却不是很好喝汤。我想自己比较偏向潮州人的喜好而偏爱吃含有浓厚液汁的菜肴,一般上都是丈夫喝汤我吃汤料。

According to traditional medicine, Lotus root soup is attributed to have nourishing health benefits  as it is claimed to boost ones immune system. I got hooked to this soup dish since early childhood, and now, after being a vegetarian, I managed to get hold of good lotus soup recipes from the dharma centre. This is a tasty vegetarian tasty lotus root soup recipe even without the need for meat or dried cuttlefish.
根据传统医学的研究,莲藕汤含有滋阴养颜及提高免疫系统的功能。是一道我从小就喜爱的菜肴,后来转吃素后幸好能在佛教会的师姐哪儿得到许多美味可口的莲藕汤食谱。通过这道食谱,您也可以享有个可口又不须加入任何肉类或鱿鱼干的莲藕汤。


素莲藕花生汤
Vegan Lotus Root Soup

Ingredients 材料
750g Lotus Root 莲藕
60g Peanuts 花生
150g Chickpeas 鹰嘴豆
130g Chinese Water Chestnut 马蹄
135g Vegetarian Burdock Vegetarian Meat Balls 素牛膀素肉丸
8 pcs Red Dates 红枣
6 pcs Dried Chinese Yam 淮山
5g Fragrant Solomon's Seal 玉竹
2pcs Dried Honey Dates 蜜枣干
1-2 Sweet Corn 甜玉米
3.5-4Lit Water 清水


1/2 Tbsp Mushroom Powder 香菇粉
1/2 Tbsp Salt 盐


Directions 步骤

Soak peanuts and chickpeas overnight. Drain.
花生和鹰嘴豆泡沉隔夜。洗净沥干。

Peel lotus roots and chestnuts. Cut to bite size if needed.
莲藕和马蹄去皮。莲藕切块。

Wash and drain lotus roots, red dates, chinese yam, solomon's seal, dried honey dates and water chestnuts.
将莲藕块,红枣,淮山片,玉竹,蜜枣干与马蹄洗净后沥干。

Transfer all of the above stated ingredients into the high pressure cooker fill with 2.5-3 liters of water and boil under medium heat for 40 mins until tender. Allow the cooker to sit for 30 mins to release the trapped steam before opening the lid.
然后把以上沥干的材料包括花生及鹰嘴豆一起放入高压力锅,再加入2.5至3升的清水以中火煲40分钟至花生和鹰嘴豆熟透软化即可。之后让锅里的困住的蒸汽慢慢散发,千万不要把锅盖打开。一直等到30分钟后才可把锅盖打开。


Transfer the soup and ingredients into a deep pot.
再把汤及料转入另个汤锅。

Wash sweet corn and cut into 1/3 length. Add sweet corn into pot together with the soup.
甜玉米洗净切成3段后混入汤内。

Thoroughly wash and squeeze out excess oil from the vegetarian mock meat. Add to the pot of soup to combine.
把素牛膀素肉丸洗净, 尽可洗去油脂再加入进汤锅里。


Transfer the balance 1 Liter of water to the soup and cook under medium low heat for 1 hour or more.
将其余的1升清水加入汤内,继续再以中小火煲煮1小时或以上都可。

Season with mushroom powder and salt. Serve.
熄火前加入香菇粉和盐巴调味。


Do link back to Coco Sweet Tooth if you have used any information as published in this blog.


Thursday, December 31, 2015

香草奶油挞 Vanilla Custard Tart

Another great recipe from the book Step By Step Baking by Caroline Bretherton given by my dear buddy in Singapore. This is one of the few baking books I own which is packed with detailed step by step pictorial and written illustrations from the preparation right up to the finish product.
这是一道可口的奶油他食谱取致于Caroline Bretherton 的烘培食谱书籍。在我所收集的烘培书籍里略充实及内容完整的食谱书籍,书中还给予许多详细的图像和文字清楚地说明各种食谱的制做步骤及过程。


Usually its hard to come across english language recipe books with such comprehensive pictorial detailed instructions. The majority of the ones I owned contain more written words than photos. However, if you have the advantage of understanding written chinese then you will have more choices of good recipe books with lots of detailed illustrations to guide you better.
一般上,英文食谱比较难遇到如此全面的详细图案说明。我所收集的英文食谱书籍大多数注重于文字上的说明,就算含有照片都仅有数张而没中文食谱书籍来得多。 您若看得懂中文的话,市场上有许多全面详细的食谱让你选择。

Of course, there are also many other good blogs out there who put lots of effort in uploading the photos of the baking process for us to choose from. I am also one of the lucky bloggers who benefit from learning from those great blogs.
除此之外,网络上也能找到许多好心博客的热心分享, 有些不单还放上详细的图片讲解让人人都能自修。我当初也是从博客网站受益不少,慢慢地学习起来。


香草奶油挞

Vanilla Custard Tart

Ingredients 材料
(A)
170g Plain Flour 普通面粉
100g Unsalted Butter 无盐牛油 (chilled & diced 冷冻切块)
50g Castor Sugar 细糖
1/2 Tsp Salt 盐
2 Egg Yolks 蛋黄
1 Tsp Vanilla Extract 香草精


Directions 步骤

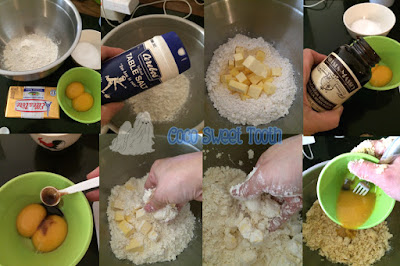
Combine flour and butter together into a mixing bowl until they form fine crumbs.
将面粉和牛油一起倒入碗里,然后用手充分揉合成雪花状。

With a fork, beat the egg yolks with the vanilla extract and add them to the flour butter mixture.
用叉子把蛋黄打发后加入香草精,混匀后再揉入牛油面粉块里。


Bring the mixture together with the palm to form a soft dough. Flatten the dough into a round disc and wrap in cling film. Chill the dough for 1 hour.
用手把面粉块慢慢捏合在一起,以擀面杖将面团擀扁成一个圆盘形。盖上保鲜膜,放入冰箱冷却1小时。

Preheat oven to 180C degrees. Roll out the dough onto a floured surface into 3mm thick.
烤箱预热至180度。桌上和擀面杖撒些面粉,把面团擀成一张大大的饼皮大约3毫米厚。


Use a muffin ring cutter to cut out as many pastry skin as possible. When the pastry skin crumbles or breaks, bring it together with your hands by kneading gently.
使用松饼环刀尽量切出越多的挞皮越好。挞皮若难处理或断裂时可轻轻用手揉捏把挞皮接回。

Line and press firmly the cut out pastry skin into the prepared muffin / tartlets mould.
然后采用圈形的模具直接用手指按压在皮面上。

Prick the pastry all over with a fork to prevent air bubbles from forming during baking.
用叉在表面戳出气孔。

Line the pastry skin with parchment paper and weigh it down baking beans.
挞皮上铺一层烘培纸,再倒入烤豆。


Bake for 18-20 minutes. Remove beans and parchment paper. Transfer baking tray back into the oven and bake a further 5 minutes.
放入预热好的烤箱中层烤18-20 分钟。取出烘培纸和烤豆后再送入烤箱另烘烤5分钟。

Set aside to cool for later use.
待凉备用。

(B)
225ml UHT Fresh Milk 鲜奶 
150ml Double Cream 淡奶油
2 Eggs 鸡蛋
30g Castor Sugar 细砂糖
1/2 Tsp Vanilla Extract 香草精
1/4 Tsp Nutmeg Powder肉豆蔻粉

Directions 步骤

Lower the oven temperature to 160C degrees.
烤箱温度调低至160度。

Heat up milk and double cream in a saucepan.
把鲜奶和淡奶油一起混合入锅内以小火加热。

While waiting for the milk to boil, combine the balance ingredients (B) e.g. eggs, castor sugar, vanilla extract and nutmeg powder into a mixing bowl and whisk to incorporate.
正当等待奶液煮热时,另把其余材料B里的鸡蛋,糖,香草精和肉豆蔻粉混入一个碗中混匀。

Once the milk and double cream starts to boil, pour it over the egg mixture while whisking non stop.
一旦奶液开始沸腾时,立刻把奶油倒入鸡蛋香草液不停地搅拌以免鸡蛋煮熟,至混匀即可。


Pour the milk egg mixture into the baked tart mould.
再把混合的奶油鸡蛋液倒入预考好的挞模。

Bake the tarts at the top 3rd level of the oven for 20-25 mins or until just set with slight wobble in the centre.
把奶油挞送入烤箱的顶部第三层烘烤20至25分钟,或奶油馅稍微定型即可。

Any leftover custard fillings can be baked into puddings.
若有剩余的奶油液可以放入烤箱烤熟成布丁。


Do link back to Coco Sweet Tooth if you have used any information as published in this blog.


Tuesday, December 29, 2015

黑白天使蛋糕 Black and White Angel Food Cake


This is an extremely good and simple cake recipe to put those leftover egg whites to good use. With only egg whites, the cake is airy and light. In the absence of egg yolks and oil in this recipe, I should think that the consumption of this cake would be less fatty than the conventional butter cakes.
您若存有剩余的蛋清而却不知如何处理的话,这类蛋糕将是其中的答案之一。天使蛋糕跟威风蛋糕一样只是采用蛋清而不须蛋黄制造出蓬松,湿软及不含油质的蛋糕。所以我认为这类蛋糕因该会比一般牛油或乳酪蛋糕来得少脂可以多吃。


In order to make this cake interesting, I decided to follow this  recipe from food network with slight adaptations. Ultimately, with the chocolate with double cream glazing there goes the 'lean' factor. If you are watching after your waistline, you may opt not to dress the cake with the glazing but will still get a delicious cake to munch on.
为了想把这蛋糕食谱给予些变化,我采用了这博客里的食谱稍微修改了一下而制做出来的。最后我又在蛋糕外层铺上一层巧克力奶油,就因如此把蛋糕的‘轻瘦’素质破解掉了!你若是顾着自己的腰围的话,可以不须加入巧克力奶油,原味无加巧克力奶油层的天使蛋糕还是一样好吃。


黑白天使蛋糕
Black and White Angel Food Cake

Ingredients 材料
(A)
250g  Sifted Icing Sugar 过滤糖粉
250g Sifted Cake Flour 过沥蛋糕粉
675g Egg Whites 蛋清 / 蛋白
1-1/2 Tsp Salt 盐
3 Tsp Cream of Tartar 塔塔粉
2 Tsp Vanilla Extract 香草精
80g Coarsely Grated Semi Sweet Chocolates 切碎牛奶巧克力

(B) Glaze 巧克力淋酱
225g Semi Sweet Chocolate Chips 巧克力块
190g Heavy Cream 动物性鲜奶油

Directions 步骤

Preheat oven to 170C Degrees。
烤箱预热至170度。

Sift 1/2 portion of icing sugar together with the cake flour four times. Set aside.
把一半已过沥好的糖粉混入过沥好的蛋糕粉,混匀再过沥四次。搁置待用。


In a bowl of a stand mixer fitted with whisk attachment, combine and whisk egg whites, salt and cream of tartar on high speed until medium firm peaks. Reduce the speed to medium, sprinkle in the balance 1/2 portion of the icing sugar over the meringue. Set the mixer back to high and continue whisking until thick and shiny.
将蛋白,盐和塔塔粉混入搅拌机,用打蛋配件把蛋白打至湿性发泡。再把搅拌器转至中速,把剩余的另半份糖粉撒入蛋白霜内,捣匀后再继续以快速把蛋白打致光泽。

Add vanilla extract then continue to whisk the egg whites for a minute more until firm peaks.
加入香草精后继续搅拌至硬性发泡即可。


Remove the bowl and whisk attachment from the mixer. Carefully fold the flour / cake mixture in 3 portions into the meringue with a rubber spatula until incorporated.
轻轻分三次地把糖粉蛋糕粉混合粉用橡皮刮刀拌入蛋白霜至混合即可。

Fold in grated chocolate.
最后拌入巧克力碎。

Transfer batter into 2 ungreased 8-9 inch tube pan and bake the cake for 35-40 mins or when the cake springs back to the touch.
将蛋糕糊倒入两个无涂抹油脂的蛋糕模具把蛋糕放入已预热的烤箱烘烤35-40分钟即可。

Invert the cake pan on a cooling rack to cool. Run a thin knife along the sides of the pan to unmould the cake when cool。
把烤好的蛋糕一起和模倒扣在铁架上待凉。等蛋糕冷却后再用扁平小刀沿着边缘刮一个圈脱模。


For the glazing, double boil the chocolate chips and the heavy cream in a heat proof bowl while stirring till the chocolate melted. Pour the chocolate glaze over the top of cooled cake.
巧克力淋酱的准备,将巧克力块和动物性鲜奶油倒入炖盅或双底锅一边加热一边不停搅拌至完全融化混合均匀即可。放凉后就可淋上蛋糕上。


Note :

The recipe for the glazing is only sufficient for a 10 inch cake. You need to double the quantity if you wish to glaze both cakes as well.
巧克力淋酱在此的分量仅足予铺满一个10寸的蛋糕。若要在两个蛋糕上都淋上巧克力淋酱就得在食谱分量上调整。


Do link back to Coco Sweet Tooth if you have used any information as published in this blog.

Printfriendly

Related Posts Plugin for WordPress, Blogger...