Showing posts with label Puddings. Show all posts

Sunday, June 18, 2017

黑芝麻绿茶挞 Black Sesame Green Tea Tart


This recipe is inspired by Anncoo's blog and adapted with a black sesame flavored tart shells to create some variations.

As you can see, I still have a long way to go on improving my skills on shaping the tarts base. I am happy with the outcome as the sesame give out a more aromatic smell than regular tarts base. And coupled with this soft egg fillings, its a perfect balance of sweet and savory.


黑芝麻绿茶挞
Black Sesame Green Tea Tart

Ingredients 材料

Black Sesame Shortcrust Pastry 黑芝麻挞皮 (A)
140g Plain Flour 中筋面粉
60g Rice Flour 粘米粉
140g Unsalted Butter 无盐奶油 (room temp 温室回温)
70g Castor Sugar 细砂糖
1/4 Tsp Salt 盐
40g Beaten Eggs 鸡蛋(打散)
40g Black Sesame Powder 黑芝麻粉

Green Tea Filling 绿茶布丁内陷 (B)
300g Fresh Milk 牛奶
65g Castor Sugar 细砂糖
3 Tsp Green Tea Powder 绿茶粉
2 Egg Yolks 蛋黄
2 Eggs 鸡蛋


Method 做法


Combine and sift plain and rice flour (A) together into a bowl. Set aside.
材料A的面粉及粘米粉一起混合,过沥入碗搁置待用。

To prepare sweet shortcrust pastry, beat butter (A) until soft and creamy. Add (A)  sugar, salt, egg and black sesame powder to incorporate. Sift in sifted flour (A) and fold with spatula to combine to form dough. Wrap dough in cling wrap and refrigerate for 3 hours.
事先准备甜派挞皮,把材料A里的奶油置入搅拌盆用搅拌器打至乳霜状,然后把A里的糖,盐,鸡蛋及黑芝麻粉混入,混匀。接着就将过沥的面粉粘米粉粉料拌入,用橡皮刮板拌匀成团后用保鲜纸包起来置入冰箱冷藏三个小时后即可用。


Unwrap dough onto a non stick baking mat, place the cling wrap on the top and roll out to 3-5mm thickness. Gently place the sheet dough into a 2 nos of 20-22cm tart pan with removable base. Gently press dough into the mould without stretching it.
把冷藏好的面团移出,去掉保鲜纸置于不粘硅胶垫上再把保鲜纸铺在面团上。将面团擀成约3至5mm厚度的圆形,轻轻的把杆开的面皮铺在2个20-22cm挞盘上。用手仔细地把挞皮贴入挞盘内。

Remove excess dough over the top edges. Use a fork to prick holes over the base and freeze the dough for 5 mins before baking.
把多余的挞皮撕去,再用叉子在挞皮上穿孔后又转置入冰箱冷冻5分钟后才送入烤箱烘烤。

Preheat oven to 180C degrees.
烤箱预热至180C度。


Place a sheet of aluminum foil over the chilled dough. Press it well into the bottom edges but avoid covering the top edges of the dough. Add baking weights into the tart mould and bake in the center rack of the preheated oven for 18-20 mins.
在冷冻的挞面团铺上一层锡纸,用手指把锡纸压入低部及边缘但不要覆盖面团上部的边缘。锡纸上放上一些小石头转送入已预热的烤箱的中层烘烤18-20分钟。

Remove aluminum foil and baking weights when edges starts to brown. Continue baking the tarts for another 8-10 mins.
把锡纸和小石头取出,再放入烤箱烘烤8至10分钟即可。

Boil (B) sugar and milk until sugar dissolved. Add green tea powder to combine then remove from heat.
将B里的砂糖及牛奶一起混入锅煮热至融化,再加绿茶粉均匀即可离火。

Whisk in egg and yolks in batches until evenly mixed. Sieve.
马上分次把鸡蛋,蛋黄混入绿茶牛奶,一边搅拌一边加入一直搅拌混匀后过沥。


Transfer mixture into the prepared tart shells and bake in the middle rack of a preheated oven for 20 mins. Allow the tarts to cool on wire rack for the egg to set. Serve.
把过沥好的面糊盛入已冷却的挞皮A里,置入预热至180C度的烤箱的中层烘烤20分钟即可取出,摆在凉架上待凉定型。

The leftover egg mixture can be transferred into pudding moulds and bake according to the same baking mode. Allow the baked puddings to cool before refrigerating. Best serve cold. 
剩余的鸡蛋液可以装入各自的布丁模以同样的烘烤方法烤熟成绿茶布丁。烤熟的布丁待凉后便可冷藏后即品尝。


Do link back to Coco Sweet Tooth if you have used any information as published in this blog.

Sunday, January 1, 2017

咖啡燕菜千层糕 Coffee Agar Agar Layer Cake

Happy New Year!
新年快乐!


Beginning a new chapter to more exciting kitchen ventures and a big thank you to all the great bloggers and Facebook supporters who truly inspires me since I started learning baking 3 years ago. There are still so much more to learn and let's motivate experiment and to share out better recipes.
新的一年意味着一个更精彩即充满着更多的下厨考验,在此我要感谢所有这3年里我开始学习烘焙的博客和Facebook网友们的支持,还有他们的烘焙烹饪方面给予的启发。必然学问是无止尽而且还有很多所要学习的,让我们彼此激励对方一起尝试不同的食谱,分享出更好的食谱给予大家。

Here is an adapted recipe from Alan Ooi's "In Love With Cakes".
在此所分享的蛋糕食谱取自于黄思纶的‘我爱蛋糕’食谱书籍。


咖啡燕菜千层糕
Coffee Agar Agar Layer Cake


Ingredients 材料
(A)
175g Salted Butter 咸奶油
125g Castor Sugar 细砂糖
1 Tsp Vanilla Extract 香草精
3 Large Eggs 大号鸡蛋
175g Self Raising Flour 自发面粉

(B)
825ml Water 清水
140g Brown Sugar 红糖
5 Tsp Agar Agar Powder 燕菜粉
3 Tsp Instant Coffee Powder 即溶咖啡粉
2 Tsp Chhocolate Emulco 巧克力香精

(C)
400ml Coconut Milk
400ml Water 椰浆
110g Castor Sugar 细砂糖
100ml Fresh Milk 鲜奶
50g Corn Flour 玉米粉
1/3 Tsp Salt 盐
2 Tbsp Agar Agar Powder 燕菜粉


Method 做法


Preheat oven to 180C degrees. Grease and line a 24x24cm baking pan.
烤箱预热至180C度。准备一个24x24cm方型模具。盘底涂抹食油铺上一层烘焙纸。

In a mixing bowl, cream butter and sugar (A) until light and fluffy.  Add vanilla extract to combine.
把A的奶油及细砂糖倒入搅拌盆内,用打蛋器打至松发。加入香草精搅匀。

Gradually add eggs (A) in 3 additions and mix until even before adding another.
然后分次把3粒鸡蛋A混入,每个鸡蛋均匀的混入后才加入一直到混匀为止。


Sift in flour (A) and lightly fold to combine. Pour into prepared mould.
沥入粉料A,拌匀转入预备好的4x24cm方型模具。

Bake in a preheated oven at 180C degrees for 22-25 mins until baked.
放入预热至180C度的烤箱烤22-25分钟至熟透即可。


Unmould cake and leave to cool on wire rack.
蛋糕烤熟后脱模,置于铁架待凉备用。

Combine (B) into a saucepan and cook while stirring until boil. Transfer cooked mixture into a deep 22-23cm square baking pan and leave until 80% set.
把材料B混入煮锅,一直搅拌煮滚里活。倒入一个22-23cm方型蛋糕模具待放至8分凝固。


Repeat the same process by boiling (C) in a saucepan. Pour over the almost set coffee layer and leave till 80% set.
重复同样的做法把材料C放入煮锅煮滚。倒入在已8分凝固的咖啡燕菜层B上,待放至8分凝固。


Trim the baked cake (A) layer and assemble over the coconut milk agar agar (C) layer. Gently press the sponge cake (A) onto the agar agar layer.
把蛋糕A稍微切割掉边缘足以装入及盖上椰浆燕菜层C上,并轻轻按压。

Allow to cool before chilling the cake in the refrigerator.
待冷却后放入冰箱冷冻。


Do link back to Coco Sweet Tooth if you have used any information as published in this blog

Tuesday, November 29, 2016

冷冻云石粉粿 Marble Green Bean Kuih


Are you a fan of pudding like desserts? Today I am sharing this 'Melt in the Mouth' hun kwee dessert which I personally can't stop eating.
您爱吃布丁般的甜点吗? 今天我所分享的这道冷冻粿糕不但好吃,一旦送入口里就会马上融化,就连我也不能自拔。


冷冻云石粉粿 
Marble Green Bean Kuih

Ingredients 材料
(A)
60g Green Bean Starch 绿豆澄粉
100g Sugar 糖
300ml Coconut Milk 椰浆
1 Tsp Salt 盐
200ml Water 清水
3 Pandan Leaves 班兰叶 (knotted 打结)

(B)
150g Green Bean Starch 绿豆澄粉
300ml Coconut Milk 椰浆
1000ml Water 清水
30g Sugar 糖
200g Gula Melaka 椰糖 / Brown Sugar 黄糖
1 Tsp Alkaline Water 碱水
5 Pandan Leaves 班兰叶 (knotted 打结)


Method 做法


Combine ingredients (A) into a heat proof mixing bowl and mix to incorporate. Heat and continue stirring with a hand whisk until the mixture thickens like thick kaya jam. Discard pandan leaves and remove from heat and set aside.
把材料A一起混入个耐热锅混匀,然后一边煮一边不停地用打蛋器搅拌至面包拌酱般浓稠即可拿走斑兰叶,离火搁置待用。


Repeat the same for ingredients (B) until complete.
准备另一个耐热锅,也把材料B以同样的步骤重复,一直到煮成浓稠状即可。


Transfer mixture B into an 9-10 inch baking tray. Drop spoonfuls of mixture A over the B mixture. Use a small knife to draw lines to create the marble effect. Allow the mixture to cool before refrigerating. 
先将煮好的全部材料B层倒入个9-10寸的蛋糕模,接着用汤匙把煮熟的材料A舀到入B的表层。用小刀在面糊画出云石纹理后待冷却就放入冰箱冷藏。


Serve cold. 
冷却后即可切块享用。


Do link back to Coco Sweet Tooth if you have used any information as published in this blog.


Monday, August 8, 2016

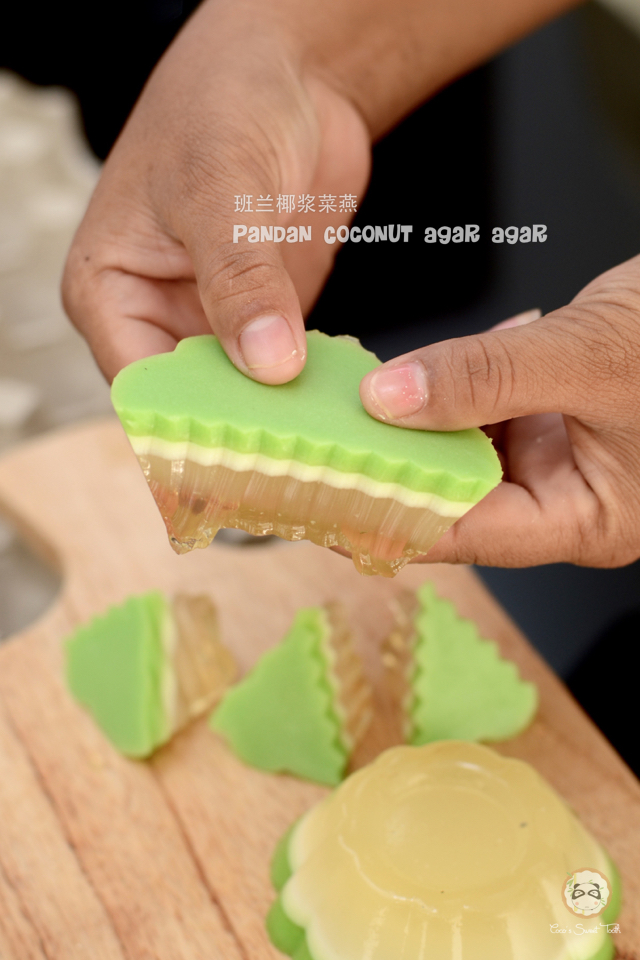
班兰椰浆菜燕 Pandan Coconut Agar Agar


This is actually a simple recipe which can be made with ease by using store bought packet coconut milk and pandan extract. Today I decided to be a little bit adventurous by making this yummy dessert by preparing the main ingredient from scratch while also giving me the opportunity to compare the taste difference.
班兰椰浆菜燕其实是非常容易做的,只要采用市面贩卖现成的包装椰汁及班兰精华然后配上食谱里基本的材料就可以制做了。这次忽然心血来潮想把主要的材料从零做起,比较看看会不会更好吃。

Based on the satisfactory outcome, I concluded that this method using fresh coconut milk taste better  as the agar agar reminded me of the ones i had during my childhood days.
我从这项满意的成果所得到的结论就是,菜燕糕还是采用新鲜椰汁制做出来的能香浓美味,令我回想童年时所吃的一样。


班兰椰浆菜燕
Pandan Coconut Agar Agar

Ingredients 材料

(A) Coconut Milk 椰浆

1 Fresh Coconut 鲜椰子一粒 (dice 切块 / grated 搅丝)
3-4 Cups Water 清水


Blend coconut with 3 cups water in blender on high speed to fully grind the coconut until the water turns milky in color.
椰子与3杯清水混入食物搅拌机以高速打碎直到水变牛奶色即可。

Strain the mixture in a fine sieve to collect the first extract of the coconut milk. Refrigerate until ready to use.
过滤取出第一轮的浓椰浆, 冷藏待用。

Transfer the coconut residue into the blender again and blend with another cup of water to get the 2nd  extract of coconut. This will not be used in this recipe but for other cooking purpose later.
再把椰渣送入食物搅拌机,加一杯清水继续以高速混匀取出第二轮的淡椰汁。这批淡椰汁并不会用于此而将会冷藏收藏予烹饪用途。


(B) Pandan Juice 班兰汁
9 Fresh Pandan Leaves 班兰叶
125ml Water 清水


Wash pandan leaves to remove dirt.
班兰叶洗净。

Cut pandan leaves into 1cm strips and transfer into a blender. Add 125ml of water and process until the leaves are pulverized.
把班兰叶剪成1cm条后放入食物搅拌机。加入125ml清水和班兰叶一起搅拌至粉碎。

Strain and squeeze the pandan extract over a strainer. Refrigerate until ready to use.
过滤取出班兰汁, 冷藏待用。


(C)
40g Agar Agar Powder 菜燕粉
100ml Water 清水
900ml Water 清水
4 pcs Pandan Leaves 班兰叶 (knotted 打结)
180g Sugar 糖
500ml Coconut Milk 浓椰 (A)
1 Tsp Salt 盐
90ml Pandan Juice 班兰汁 (B)


Instructions 做法

In pot filled with 900ml Water and pandan leaves, bring water to boil. Add sugar and stir until dissolved.
把900ml清水和班兰叶一起放入煮锅烧热后加入糖,捣匀。

Dissolve agar agar powder into 100ml water. Transfer it into the boiling water and simmer under medium heat for 15 mins to combine.
在另一个小碗里,把菜燕粉与100ml 清水一起混合后转送入已烧滚水的锅内,焖煮15分钟直到菜燕完全融化为止。

Scoop 1/2 of the agar agar mixture from the pot and pour it into any prepared mould.
从锅里取出一半的菜燕汁倒入任何模具, 待凉。


Add coconut milk into the balance agar agar in the pot and continue to boil for 5 minutes. Add salt to combine. Remove from heat.
将浓椰浆倒入剩余的半锅菜燕汁里继续煮5分钟微滚,加盐捣匀即可离火。

When the 1st agar agar layer has set, transfer 1/2 of the coconut agar agar mixture over the agar agar layer and allow to set.
当手指抹而不粘第一层的透明菜燕时便可将锅里的一半分量的椰浆菜燕倒入模具,待凉。


Add 90ml pandan juice into the remaining coconut agar agar in the pot and stir to combine. Reheat the pandan coconut mixture and bring to a gentle boil. Remove from heat.
最后把90ml的班兰汁倒入锅里与剩余的椰浆菜燕汁一起混合。再把锅子加热煮至微滚即可。

Once the 2nd layer of the coconut agar agar has set, gently pour the pandan coconut mixture over.
等第二层的椰浆菜燕开始要定型时,轻轻的把班兰菜燕汁倒入模具里。

Chilled to set.
完成后,放入冰箱冷却后享用。


Do link back to Coco Sweet Tooth if you have used any information as published in this blog.   


Tuesday, July 14, 2015

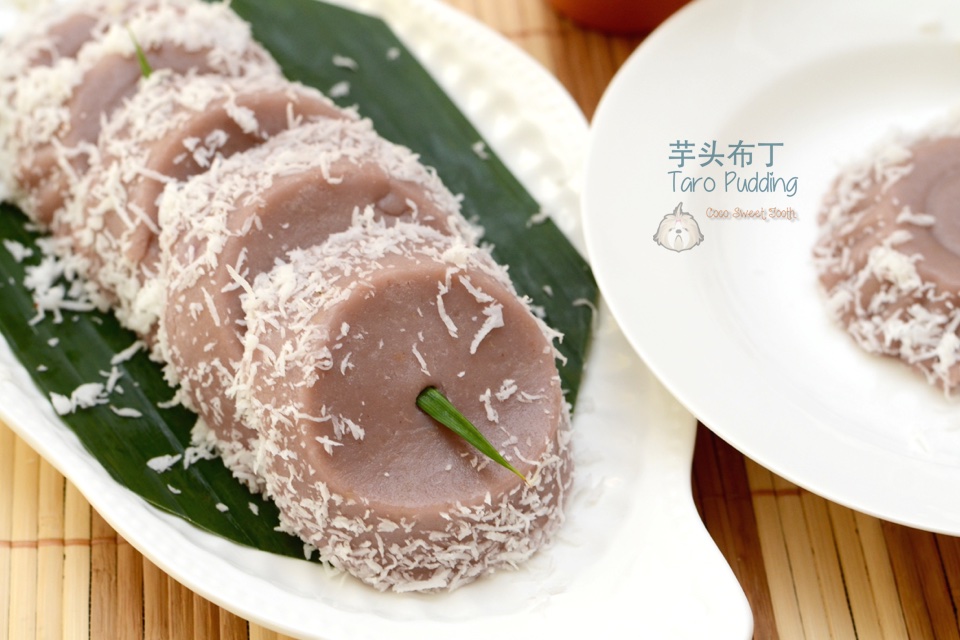
芋头布丁 Taro Pudding

Are you a fan of yam / taro? 

你爱吃芋头吗?


This is a great recipe taken from the book 'Delicious Nyonya Kueh & Desserts' by Patricia Lee. We all love this kueh pudding and its vegan too! To me, this dessert is truly soft with smooth texture like pudding despite its preparation and cooking method more attuned towards steam cakes. Yummy!  


这是一个非常可口的糕点食谱,取自于Patricia Lee的‘娘惹粿风味糕点’食谱书里。虽然煮法跟蒸粿相似,制作出来的糕点却是如其名般, 就如布丁一样柔软与光滑。此外,又是全素无加奶蛋素,对素食主义的我是最好的消息。赞!


芋头布丁
Taro Pudding 

Ingredients 材料

550g Taro / Yam 芋头
350ml Thick Coconut Milk 浓椰浆
100ml Pandan Water 班兰水
110g Sugar 砂糖
85g Rice Flour 粘米粉
85g Tapioca Flour 木薯粉
a pinch of salt 盐少许
200g Grated White Coconut 白椰茸
6 Pandan Leaves 班兰叶
2-3 Drops Purple Food Colouring 紫色食用色素2-3滴


Directions 做法

Combine grated coconut,3 pcs of pandan leaves and salt evenly and steam for 7-10 mins. Leave to cool.
椰茸, 三片班兰叶及盐拌匀, 蒸7至10分钟. 待凉.

Boil 150ml of water with 3 pandan leaves for 10 minutes to get 100ml of pandan water. Set Aside. 
将150ml的开水和3片班兰叶一起烧煮10分钟,取出100ml班兰水。搁置。

Cut taro into small pieces and boil in a pot with sufficient over the taro for 20 mins or until until soft.
芋头切成小块, 泡入乘满足够清水的锅里煮20分钟直到芋头煮软熟透为止。

While waiting for the taro to be cooked, combine coconut milk, pandan water, sugar, rice flour and tapioca flour into a mixing bowl and stir until well combined.
当还在等待芋头正在锅里烹煮时,把浓椰浆,班兰水,砂糖,粘米粉和木薯粉混合到另一个碗中。搅拌直到充分结合即可。

Drain the cooked taro. Transfer taro into a blender, add in half of the coconut milk flour mixture, purple food coloring and blend together with  the taro until blended. If your blender is huge enough, you may add in the balance of the coconut flour mixture into the taro mixture and blend into a smooth paste. Otherwise, you may transfer the blended taro into the balance coconut flour mixture and mix evenly. 
沥干熟芋头。把芋头放入搅拌机,加入一半的椰浆兰水面粉混合浆和紫色食用色素,并与芋头一起搅拌直到均匀混合在一起。若是你的搅拌机容纳量大的话,你可以把剩余的椰浆兰水面粉混合浆加入搅拌机一起搅拌混合成均匀的糊状。若不的话,你也可以把芋头椰浆糊转移出搅拌机放入剩余的椰浆班兰粉糊混合搅拌均匀。

Pour batter into muffin cups and steam the batter for 25-30 mins. Leave to cool.
把芋头糊倒入松饼杯或模具内,蒸25-30分钟。待凉。

Unmould taro pudding onto the grated coconut and coat liberally before serving.
将芋头布丁倒出模,撒上椰茸才享用。


Do link back to Coco Sweet Tooth if you have used any information as published in this blog.

This post is linked to Cook Your Books Event #25hosted by Joyce of Kitchen Flavours

Saturday, June 27, 2015

咖啡花生布丁 Coffee Peanut Layered Pudding


Pudding, agar agar, jelly or anything close to that form I will wallop everything in mere seconds (provided it is free from animal by product, dairy and eggs).

Despite my crazy love for it, I normally prefer to bake than doing the preparing for pudding like desserts. Yesterday, I came across a packet of leftover fresh grated coconut in the freezer so here I am mooring through my collection of books for something with distinct taste and color as the subject for my next photo shoot.

Recipe derived from Sweet Jelly 菜燕甜品 by Khoo See Yew 丘思耀.  Another neglected pudding jelly recipe book bought 2 years ago but yet to try.  As I have not tested any from this book but from the outcome of my first attempt, I think this recipe passed reasonably.

咖啡花生布丁 
Coffee Peanut Layered Pudding

Ingredients 材料
(A) Sugar Syrup 糖水
180g Golden / Castor Sugar 细糖
300ml Water 水
Few Pandan Leaves 少许香兰叶

(B)
70g Green Bean Starch 绿豆澄粉
250g Water 水
1 Tbsp 即溶咖啡粉

(C)
240ml Water 水
240ml Sugar Syrup 糖水

(D)
100ml Thick Coconut Milk 浓椰汁
30g Green Bean Starch 绿豆澄粉

(E)
300ml Peanut Mixture 花生混糊
(100g Peanut 花生 + 500ml Water 水, cooked till tender and blend 煮软, 用混合器𤧷或磨烂)
120ml Sugar Syrup 糖水
1/4 Tsp Salt 盐

Method 做法

Combine ingredients (A) in a pot and boil until sugar dissolves completely and the aroma of pandan is infused into the syrup.
把材料(A)混合在锅中煮沸,直到糖完全溶解和香兰的香气注入糖浆。

In a separate heat proof pot with medium low heat, warm up ingredients (C). Combine ingredients (B) evenly and transfer the mixture the the pot of (C). Keep mixing / stirring until mixture becomes slightly thick and transparent. Remove from heat and set aside.
把材料(B)混合搅拌成糊. 煮滚材料(C), 把(B)咖啡糊慢慢加入, 继续搅拌成糊状. 离火待用。 

Cook ingredients (E) under medium low heat  until combined. Stir in ingredient (D) and continue mixing until slightly thickens. Remove from heat. 
把材料(D)混合搅拌好, 慢慢加入正煮滚的材料(E),  继续搅拌成糊状. 离火.

Spoon both mixtures alternately into then jelly mould. 
用汤勺将2种面糊分次倒入模型内.

Leave to cool before cutting. Best eaten after refrigerated.
待凉切块, 冷食更佳.


Do link back to Coco Sweet Tooth if you have used any information as published in this blog.

This post is linked to Cook Your Books Event #24hosted by Joyce of Kitchen Flavours

Printfriendly

Related Posts Plugin for WordPress, Blogger...