Showing posts with label Sponge Cake. Show all posts

Wednesday, May 23, 2018

波士顿奶油馅饼 Boston Cream Pie


Time flies and now it's already one week into the holy month of Ramadan fasting. My Indonesian helpers usually break fast with water, some date palms or sweet desserts follow dinner after prayer . A scene different from what we experienced in our home country where normally a huge feast awaits on the table.
时光流逝一转眼已经要进入回教徒斋月禁食圣周的第二周。每当旁晚六点钟的开斋时候,印度尼西亚的员工们一般都会用饮水和吃些甜点,待祈祷后才进餐。跟我所熟悉的母国回教徒实习不同,一旦到开斋时候,回教徒们都已坐待已摆满大盛宴的桌面等开餐

As a gesture of appreciation, I made this sweet and aromatic cake for their break fasting last night. Do not be intimidated by the extra process for making this wonderful recipe. Once you tried making it, you will get a yummy pie /cake which justify the work done. This recipe is certainly a crowd pleaser and keeper.
昨晚特别为员工们制做了这项香甜可口的巧克力馅饼。您千万不要被这项食谱制做的额外过程而阻止去尝试。我可保证您一旦完成制做及尝试成果后便会觉得一切功夫和时间都是值得的。这是一道能讨好大众口味和收集的好食谱。


波士顿奶油馅饼
Boston Cream Pie
(Recipe adapted from Joy of Baking)


Pastry Cream Filling 奶油酱 (A)
50g Castor Sugar 细砂糖
3 Large Egg Yolks 大号蛋黄
20g Plain Flour 面粉
20g Corn Flour 玉米粉
300ml Milk 牛奶
1 Tsp Vanilla Extract 香草精
2 Tsp Lemon Juice 柠檬汁


Directions 做法

Combine sugar and egg yolks into a mixing bowl.
把细砂糖,蛋黄一起混入碗拌匀至细砂糖完全溶化没有颗粒。

Whisk flour mixture together and sift into egg mixture and mix into paste form. Set aside.
将粉料一起过筛,再沥入以上蛋黄液料中搅拌融合成糊状。搁置备用。

Heat up milk in a saucepan over medium heat. Gradually pour heated milk into the egg mixture while whisking the mixture continuously to combine the mixture without cooking the eggs.
炖锅用中火煮沸牛奶。逐渐将加热的牛奶倒入鸡蛋糊中,同时连续不停地搅拌混合以免把蛋液烫熟。

Transfer the egg milk mixture back into the saucepan. Cook while whisking constantly over medium heat until the mixture thickens into custard form before turning off the heat. Whisk in vanilla and lemon juice to combine.
又再把混匀好的鸡蛋牛奶液转入炖锅,一边用中火煮一边不停地搅拌,煮至浓稠糊状即可离火,最后混入香草精和柠檬汁混匀匀即可。


Transfer pastry cream into a bowl and immediately cover the pastry surface with a cling wrap to prevent crust from forming. Allow to cool before refrigerating for several hours before using.
将奶油酱转移到一个碗中,并立即用保鲜膜直接铺在奶油酱上以免表层形膜。冷却后再冷藏数小时备用。


Sponge Cake 海面蛋糕层 (B)

3 Large Egg Yolks 大号蛋黄 (room temp 室温)
2 Large Eggs 大号鸡蛋 (room temp 室温)
110g Castor Sugar 细砂糖
1 Tsp Vanilla Extract 香草精

60g Cake Flour 低筋面粉
35g Plain Flour 面粉
1 Tsp Baking Powder 发酵粉
1/4 Tsp Salt 盐

3 Tbsp Milk 牛奶
28g Unsalted Butter 无盐牛油

3 Egg Whites 蛋清
50g Castor Sugar 细砂糖


Directions 做法

Grease and line two 8 inch round cake pans with parchment paper for easy removal.
准备两个八寸圆形模具。模具低部铺烤盘纸及涂上黄油以利蛋糕脱模。

Combine and sift together flour, baking powder and salt into a bowl. Set aside.
将面粉,发酵粉和盐混合在一起筛入碗中。搁置。

In a small saucepan, bring butter and milk to a simmer over low heat. When the butter is melted, remove from heat.  Cover and set aside.
炖锅用小火煮沸牛奶至牛油融化即可离火。盖起搁置待用。


In a mixing bowl, beat egg yolks, whole eggs and sugar with electric mixer on high speed until thick and pale (4-5 mins) reaching ribbon stage. Beat in vanilla extract to combine.
将蛋黄+全蛋+细砂糖用打蛋器快速搅拌均匀(4-5分钟)至略微泛白浓稠且不太流动的状态。然后打入香草精均匀。

In a separate clean and grease free mixing bowl, beat egg whites until foamy, gradually add castor sugar while beating the meringue to soft moist peaks.
把蛋白放入一个干燥即干净搅拌盆里,用打蛋器把蛋白打出一些泡沫即可分次加入砂糖,打成湿性发泡的蛋白霜即可。

Scoop 1/3 of the beaten egg whites into the egg yolks batter and fold to combine.
挖1/3蛋白霜混入蛋黄面糊中用橡皮括刀延著盆边翻转及划圈圈的方式搅拌均匀。

Transfer the egg yolk batter back into the meringue bowl and gently use a spatula to fold through to combine. Sift of the flour mixture into the batter in 2 additions. Gently fold until incorporated. 
然后再将拌匀的面糊倒入剩下的蛋白霜中用橡皮刮刀搅匀。接着将过筛好的粉料分两次混入搅拌均匀成为无粉粒的面糊。


Lastly pour the melted milk butter mixture into the batter and fold until combined.
最后把融化的牛奶奶油液混入面糊,用橡皮刮刀轻轻拌匀。

Divide the cake batter equally into the prepared 2 cake pans. Bake in the center rack of a preheated oven at 175C degrees for 19-20 mins until a toothpick inserted into the center comes out clean.
将搅拌好的面糊平均的倒入已备的两个8吋模具中送入已预热至175C度烤箱的中层,烘烤约19至20分钟至用竹签插入中心没有沾粘就可以出炉。

Invert the cakes onto wire rack. Remove parchment papers and allow to cool completely.
出炉后马上倒扣在铁架,取掉烤盘纸待凉。

Remove custard cream (A) from fridge and slap a chunk of the pastry cream (A) into the center of a serving plate and place one cake layer (B) over it. Spoon a thick layer of pastry cream filling onto the cake evenly. Place the second cake layer (B) onto the filling. Set aside.
从冰箱中取出奶油酱A,取一大匙奶油酱A置入盘子的中央,然后把一片蛋糕层铺在盘上,在蛋糕层上均匀的涂抹一层厚厚的奶油酱A。接着把第二个蛋糕层夹在奶油酱上。搁置备用。


Chocolate Glaze 巧克力酱(C)
120g Semi Sweet Chocolate 半甜巧克力 (chopped 切碎)
130ml Whipping Cream 鲜奶油
13g Unsalted Butter 无盐牛油


Directions 作法


In a saucepan over medium-low, heat the cream and butter until the butter melted.  Immediately pour the hot cream over the chocolate and stir until the chocolate melted and thickened to pouring consistency.
将鲜奶油,牛油加入炖锅煮沸至融化后关火。即刻倒入巧克力碎粒,搅匀搅拌至融化至稠化浇注状即可用。


Pour the chocolate glaze onto the center of the cake and allow it to flow and fall through the rims of the cake. Refrigerate until ready to serve.
立刻将稠化浇注状的巧克力酱从蛋糕的中心倒入,让巧克力酱流动并落蛋糕边缘。冷藏备用。


Do link back to Coco Sweet Tooth if you have used any information as published in this blog


Sunday, June 11, 2017

香浓咖啡海绵蛋糕 Rich Coffee Sponge Cake


A lovely sponge cake adapted from Allie's blog. The cake is so moist and spongy that melts instantly in the mouth. 
这道超好吃即蓬松湿润的海绵蛋糕食谱取自于Allie's博客。一旦进入口里即融化填满了香甜满足的口感。


香浓咖啡海绵蛋糕
Rich Coffee Sponge Cake

Ingredients 材料

(A)

70g Olive Oil 橄榄油
100g Low Protein Flour 低筋面粉
6 Egg Yolks 蛋黄
2 Eggs 鸡蛋
80g Milk 牛奶
60g Castor Sugar 细砂糖
1 sachet Old Town Kopi O 怡宝旧街场咖啡乌
1-2 Tsp Cappuccino Coffee Emulco 卡布奇诺咖啡精

(B)
6 Egg Whites 蛋清
70g Castor Sugar 细砂糖
1-2 Tsp Lemon Juice 柠檬汁


Direction 做法


Heat oil (A) in a saucepan until lines starts to appear on the side of the pan. Whisk in flour to blend.
把橄榄油A置入锅烧热后立刻倒入面粉,用打蛋器搅拌均匀。

In another bowl, beat egg yolks and eggs (A) until combine. Whisk into the flour mixture in 5 batches until mixed.
将蛋黄和鸡蛋A一起混入碗里,搅匀。接着分五次不停的搅拌地混入面糊至混匀。

Combine (A) milk, sugar  and Kopi O sachet into a heat proof mug. Immerse mug into a saucepan of boiling water and boil over low heat until sugar dissolved.  Add cappuccino emulco (A) to combine. Transfer into the egg batter and to combine. Cover and set aside.
将A的牛奶,砂糖及怡宝旧街场咖啡乌袋混入耐热杯里。再把杯子放入煮滚热水的锅里用小火煮至糖融化后便加A卡布奇诺咖啡精混匀。接着混入鸡蛋面糊,搅匀后把盆盖上搁置。


In another clean and grease free mixing bowl, beat egg whites (B) until frothy. Add lemon juice then continue beating while gradually add in (B) castor sugar in 2 additions. Continue to beat until firm peaks.
蛋白B先用打蛋器打出一些泡沫,倒入柠檬汁继续搅打间中慢慢地分次加入细砂糖B打成尾端挺立的蛋白霜。

Transfer 1/3 of the beaten egg whites into the cake batter, lightly whisk to combine. Then transfer the batter into the beaten egg whites mixture. Use a rubber spatula to fold until combine.
取出1/3份量的蛋白霜混入蛋糕糊中,用打蛋器轻轻的混匀后, 再把面糊倒入蛋白霜里用橡皮刮刀沿着盆边翻拌搅拌均匀。

Transfer cake batter into 2 x 7 inch baking pan. Drop the pan on the kitchen top several times to release air bubbles.
把蛋糕面糊置入两个7寸圆形蛋糕模具。入烤箱前先把模具从一尺高处摔几下解放气泡。


Transfer cake pan into the oven's baking tray at the mid lower level of the preheat oven. Bake with water bath at 170C degrees for 15 mins, then reduce oven temp to 150C degrees and continue baking for 40 mins until baked.
浸入已盛满热水的大烤盘及预热至170C度的烤箱的中下层烘烤15分钟,然后再调低至150度继续烘烤40分钟至烤熟为止。

Unmould and invert the cake to remove parchment paper. Invert cake back onto wire rack to cool. If the sides are still moist, place the cake back into the oven for 15 mins to allow the remaining oven's heat to dry it. Allow to cool completely before storing.
蛋糕出炉后脱模倒扣撕去烤纸, 马上又倒扣置于凉架上待凉。若是蛋糕的边缘或低部还带湿,可以把整个凉架及蛋糕一起置入烤箱15分钟让烤箱的余温把蛋糕烘干。蛋糕出炉后需冷却后才收藏。


Do link back to Coco Sweet Tooth if you have used any information as published in this blog.


Thursday, May 18, 2017

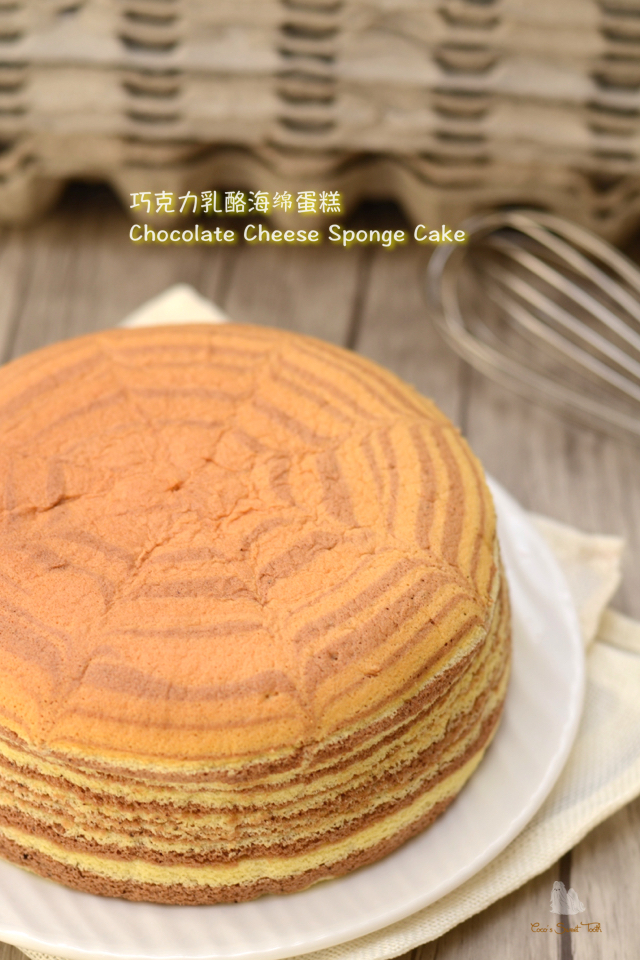
巧克力乳酪海绵蛋糕 Chocolate Cheese Sponge Cake


I am always in awe of jeannie's cake as its almost fail proof and usually yields great results.  This cake recipe is also taken from her blog and I almost cried with joy when the cake came out beautifully as what was also shown from her blog.
我向来都很敬佩Jeannie制做的蛋糕,个个都是如此完美无瑕。这道蛋糕食谱也是从她的博客中得到的,烤出来的蛋糕就如她的蛋糕一样令我开心得不得了。


If you are into fluffy and light textured sponge cake, this is a good recipe to try out.
您若爱吃蓬松既细致的蛋糕的话,我强力推荐您试做来尝尝。


巧克力乳酪海绵蛋糕
Chocolate Cheese Sponge Cake


Ingredients 材料


(A)
50g Salted Butter 咸奶油
50g Castor Sugar 细砂糖
60g Cream Cheese 奶油乳酪
100g Milk 牛奶
6 Egg Yolks 蛋黄
75g Cake Flour 蛋糕粉
20g Corn Flour 玉米粉

(B)
6 Egg Whites 蛋白
65g Castor Sugar 细砂糖
1/2 Tsp Cream of Tartar 塔塔粉

(C)
1 Tbsp Cocoa Powder 可可粉 (sifted 过沥)

(D)
1 Tsp Vanilla Extract 香草精


Method 做法


Preheat oven to 155C degrees.  Fill oven's baking tray with water.
烤箱预热至155C度,烤箱里的大盆盛满水。

Line bottom and side of an 8" round cake mould. Set aside.
准备一个8寸模具,低部及边缘铺上烤纸,搁置。

Cook (A) butter, castor sugar and cream cheese over low heat in a saucepan until melted. Whisk milk (A) into the mixture until smooth. Remove from heat.
把A里的奶油,细砂糖及奶油乳酪放入锅里用小火煮至融化。又加牛奶A用打蛋器搅匀至顺滑即可离火。


Sift (A) both flours into the cheese mixture and whisk to combine.
离火后,沥入粉料A继续采用打蛋器搅匀。

Gradually stir in egg yolk and whisk to combine. Set aside.
轻轻的把蛋黄倒入,用打蛋器搅拌混匀后搁置待用。

In another clean and grease free mixing bowl, beat egg whites (B) until frothy. Add cream of tartar then continue beating while gradually add in (B) castor sugar in 2 additions. Continue to beat until firm peaks. 
蛋白B先用打蛋器打出一些泡沫,倒入塔塔粉继续搅打间中慢慢地分次加入细砂糖B打成尾端挺立的蛋白霜。


Transfer 1/3 of the beaten egg whites into the cake batter, lightly whisk to combine. Repeat the same for the following 1/3 of the beaten egg whites until evenly mixed then transfer back into the balance egg whites mixture. Use a rubber spatula to fold until combine. 
取出1/3份量的蛋白霜混入蛋糕糊中,用打蛋器轻轻的混入后继续又重复同样的做法完成下一部份的1/3蛋白霜混匀。然后将面糊装入剩余的1/3蛋白霜里用橡皮刮刀沿着盆边翻拌搅拌均匀。

Transfer out 1/2 of the cake batter into another bowl. Sift in (C) cocoa powder and fold to combine. Add vanilla extract (D) to the other 1/2 portion cake batter and combine.
再取出1/2的蛋糕糊转入另一个碗,沥入C的可可粉翻拌搅拌均匀搁置备用。其余的半份蛋糕糊加入一小茶匙D香草精拌匀即可。


Spoon 1 tablespoon of the vanilla batter into the center of the prepared baking pan. Spoon 1 tablespoon of the chocolate batter over the 1st layer. Repeat the steps until all batter has been used up.  (Alternatively you may just pour all the cake batter over each other and create swirls with toothpick to create the marbled effect). 
挖一大汤匙的香草蛋糕面糊倒入模具的中心点,再用另一只汤匙挖取可可面糊倒入香草蛋糕糊的中心点上。重复以上的步骤直到完成为止。您也可选择分次加入两份蛋糕糊入烤模,表面抹平后采用木牙签拉出大理石纹线即可。

Transfer cake pan into the oven's baking tray at the mid lower level of the preheat oven. Bake with water bath at 155C degrees for 50 mins, then reduce oven temp to 150C degrees  and  continue baking for 25 mins until baked.
浸入已盛满热水的大烤盘及预热至155C度的烤箱的中下层烘烤50分钟,然后再调低至150度继续烘烤25分钟至烤熟为止。

Unmould and invert the cake to remove parchment paper. Invert cake back onto wire rack to cool. If the sides are still moist, place the cake back into the oven for 15 mins to allow the remaining oven's heat to dry it. Allow to cool completely before storing.
蛋糕出炉后脱模倒扣撕去烤纸, 马上又倒扣置于凉架上待凉。若是蛋糕的边缘或低部还带湿,可以把整个凉架及蛋糕一起置入烤箱15分钟让烤箱的余温把蛋糕烘干。蛋糕出炉后需冷却后才收藏。


Do link back to Coco Sweet Tooth if you have used any information as published in this blog.

Friday, March 24, 2017

龙珠果海绵蛋糕 Dragon Fruit Sponge Cake


Hello there. Its been a very long while since my last blog posting. For the upcoming months I will not be doing much posting due to heavy traveling schedules. Thank you for your support.
嗨!相隔一个多月没上网在博客里与你分享任何食谱,接着下来的几个月我将会非常的繁忙于出外而不能如以往般时常做菜或烘焙,感谢你们一直以来的支持。

Today I am sharing this simple an yummy cake recipe which I am personally fond of.  Hope you like it.
今天在此与您分享一道我本人喜爱的简易即松软可口的蛋糕食谱,希望您也喜欢。


龙珠果海绵蛋糕
Dragon Fruit Sponge Cake

Ingredients 材料
(A)
225g Golden Churn Butter 金桶牛油
150g Castor Sugar 细砂糖
5 Egg Yolks 蛋黄
188g Dragon Fruit Puree 龙珠果泥
225g Self Raising Flour 自发面粉 (sifted 过沥)
3 Tbsp Milk 鲜奶

(B)
5 Egg Whites 蛋清
25g Castor Sugar 细砂糖


Method 步骤


Preheat oven to 170C degrees. Grease bottom and sides of a 8" round cake pan and line bottom with parchment paper.
烤箱预热至170C度。准备一个8寸圆形蛋糕模具,模具底部涂上油质再铺上一层烘焙纸。

In a large mixing bowl beat the butter and sugar with an electric mixer until light and fluffy. Gradually beat in egg yolks, one at a time until well combined. Stir in dragon fruit puree and mix well.
将牛油与细砂糖置于圆底容器中,用电动打蛋器搅拌打发后,再分次把蛋黄加入拌匀才加入龙珠果泥,混匀。


Add in half of the sifted flour and fold to combine. Add milk until incorporated. Fold in remaining flour till combined.
把一半已过筛的发粉加入以上的奶油蛋黄糊里,以翻拌混合。再倒入牛奶混合入面糊,接着把剩余的面粉混入拌匀。

Place egg whites in a mixing bowl and beat until frothy. Add castor sugar and continue beating until firm peaks.
将蛋白倒入另一个搅拌碗中,打至发泡再把幼糖加入继续打发至达到了硬性发泡的状态。那就是当提起打蛋器的时候,蛋白能拉出一个短小直立的尖角即可。


Fold in beaten egg whites to the cake batter in 3 batches till combined.
分三次陆续把打发的蛋白霜拌入蛋糕糊,拌匀。

Transfer batter into the prepared cake mould and bake in the center rack of the preheated oven for 50-60 mins until the skewer inserted comes out clean.
面糊倒入蛋糕模具,送入已预热好的烤箱的中层烘烤50-60分钟至蛋糕熟透及边缘开始萎缩即可。

Invert the cake onto the cooling rack for 10 minutes before unmoulding.
蛋糕烤熟后,倒扣置于铁架待凉10分钟后便可脱模。


Do link back to Coco Sweet Tooth if you have used any information as published in this blog.

Sunday, January 1, 2017

咖啡燕菜千层糕 Coffee Agar Agar Layer Cake

Happy New Year!
新年快乐!


Beginning a new chapter to more exciting kitchen ventures and a big thank you to all the great bloggers and Facebook supporters who truly inspires me since I started learning baking 3 years ago. There are still so much more to learn and let's motivate experiment and to share out better recipes.
新的一年意味着一个更精彩即充满着更多的下厨考验,在此我要感谢所有这3年里我开始学习烘焙的博客和Facebook网友们的支持,还有他们的烘焙烹饪方面给予的启发。必然学问是无止尽而且还有很多所要学习的,让我们彼此激励对方一起尝试不同的食谱,分享出更好的食谱给予大家。

Here is an adapted recipe from Alan Ooi's "In Love With Cakes".
在此所分享的蛋糕食谱取自于黄思纶的‘我爱蛋糕’食谱书籍。


咖啡燕菜千层糕
Coffee Agar Agar Layer Cake


Ingredients 材料
(A)
175g Salted Butter 咸奶油
125g Castor Sugar 细砂糖
1 Tsp Vanilla Extract 香草精
3 Large Eggs 大号鸡蛋
175g Self Raising Flour 自发面粉

(B)
825ml Water 清水
140g Brown Sugar 红糖
5 Tsp Agar Agar Powder 燕菜粉
3 Tsp Instant Coffee Powder 即溶咖啡粉
2 Tsp Chhocolate Emulco 巧克力香精

(C)
400ml Coconut Milk
400ml Water 椰浆
110g Castor Sugar 细砂糖
100ml Fresh Milk 鲜奶
50g Corn Flour 玉米粉
1/3 Tsp Salt 盐
2 Tbsp Agar Agar Powder 燕菜粉


Method 做法


Preheat oven to 180C degrees. Grease and line a 24x24cm baking pan.
烤箱预热至180C度。准备一个24x24cm方型模具。盘底涂抹食油铺上一层烘焙纸。

In a mixing bowl, cream butter and sugar (A) until light and fluffy.  Add vanilla extract to combine.
把A的奶油及细砂糖倒入搅拌盆内,用打蛋器打至松发。加入香草精搅匀。

Gradually add eggs (A) in 3 additions and mix until even before adding another.
然后分次把3粒鸡蛋A混入,每个鸡蛋均匀的混入后才加入一直到混匀为止。


Sift in flour (A) and lightly fold to combine. Pour into prepared mould.
沥入粉料A,拌匀转入预备好的4x24cm方型模具。

Bake in a preheated oven at 180C degrees for 22-25 mins until baked.
放入预热至180C度的烤箱烤22-25分钟至熟透即可。


Unmould cake and leave to cool on wire rack.
蛋糕烤熟后脱模,置于铁架待凉备用。

Combine (B) into a saucepan and cook while stirring until boil. Transfer cooked mixture into a deep 22-23cm square baking pan and leave until 80% set.
把材料B混入煮锅,一直搅拌煮滚里活。倒入一个22-23cm方型蛋糕模具待放至8分凝固。


Repeat the same process by boiling (C) in a saucepan. Pour over the almost set coffee layer and leave till 80% set.
重复同样的做法把材料C放入煮锅煮滚。倒入在已8分凝固的咖啡燕菜层B上,待放至8分凝固。


Trim the baked cake (A) layer and assemble over the coconut milk agar agar (C) layer. Gently press the sponge cake (A) onto the agar agar layer.
把蛋糕A稍微切割掉边缘足以装入及盖上椰浆燕菜层C上,并轻轻按压。

Allow to cool before chilling the cake in the refrigerator.
待冷却后放入冰箱冷冻。


Do link back to Coco Sweet Tooth if you have used any information as published in this blog

Printfriendly

Related Posts Plugin for WordPress, Blogger...