Saturday, March 19, 2016

无麸质三宝狗蛋糕 Gluten Free 3 Goodies Doggy Cake


Yesterday was another memorable day for us as we celebrated my eldest furry kid's 14th birthday! In human age, that's a very huge number equivalent to 98 years old!
昨天是我的爱犬老大的14岁生日,同时也是一个很有意义及值得纪念的日子。以人类的岁数计算的话它已相等于98的人寿了!


Still we are very thankful for having her with us all these years and our love for her grows every single day. Watching her happily running about as a puppy and gradually progressing to a feeble, blind, deaf and arthritic aged doggy, we have nothing else to ask for except for her welfare and comfort during such difficult time.
尽管如此,我们对于它这多年的存在万分感激而对它的爱护也日益的增加。眼看着它从幼小可爱活泼的小狗逐渐步入老化成一只微弱,盲,聋及又受到全身因关节炎而疼痛的老狗,我已不再有任何何求,只要它过的舒适即不受太多的苦我就满足了。

With each passing birthday celebration, we prayed for her well being hoping for being able celebrate the many following birthdays to come.
当它每过一个生日,我俩都为它祈祷愿能在以后的日子能够再继续为它庆祝生日。


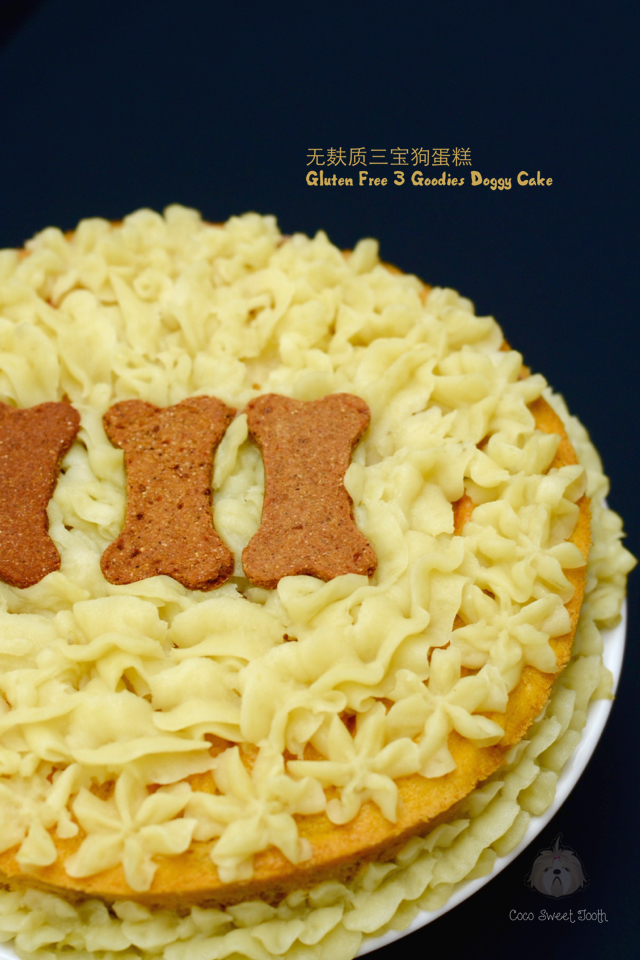
As my old baby girl is highly allergic to wheat and rice, I have specially made her a gluten free cake with purple sweet potato, potatoes, pumpkin and organic wheat free chicken treats. The cake turned out so well while filling the house with the aroma of sweet potatoes. It smells so good that I am so tempted to eat them. If you wish to do so, I suggest you increase the sugar content and also to omit the doggy treats in the recipe. Just follow the rest of the recipe and you will be chomping the cake away on your own.
由于我的爱犬对含有小麦和米类的食物过敏,我就特别为它制做了一道无麸质的生日蛋糕。蛋糕是采用紫地瓜,马铃薯,南瓜,鸡蛋和有机无麦鸡肉饼为主原料来制做的。烘焙出来的蛋糕特别的香浓,整个屋里填满了蛋糕的香味,就连我都忍不住想去吃。其实这道蛋糕食谱您也可品尝。您只需添加配方里的糖份及去掉里头的有机无麦鸡肉饼,然后配上自己喜欢的配料再根据食谱的做法就可以制做出一道美味可口的蛋糕了。或许到时你也会像我的狗狗一样抢着来吃哦!


Happy Birthday Lady Coco! May you be blessed always!


无麸质三宝狗蛋糕 
Gluten Free 3 Goodies Doggy Cake

Ingredients 材料
(A)
60g Tapioca Flour 木薯粉
60g Potato Flour 马铃薯粉
1/2 Tsp Baking Powder 发酵粉

(B)
150g Purple Sweet Potatoes 紫地瓜
140g Pumpkin 南瓜
80g Gluten Free Chicken Treats 有机无麦鸡肉饼
4 Large Eggs 鸡蛋(大)
35g Brown Organic Sugar 有机红糖
60g Corn Oil 玉米油
80g Coconut Milk 椰浆

(C)
350 Potatoes 马铃薯
Few Gluten Free Chicken Treats 有机无麦鸡肉饼


Method 做法


Sieve and combine ingredients (A) together into a bowl until mixed. Set aside.
把材料A一起混合,沥入碗里。搁置待用。

Transfer chicken treats (B) into a food processor and process it to fine bits. Set aside.
有机无麦鸡肉饼B倒入食品加工机搅碎成粗粉状。搁置待用。

Steam pumpkin and mashed while its hot. Cover and set aside to cool.
南瓜以大火蒸熟,趁热捣碎成糊状。盖上搁置待凉。


Cut potatoes into cubes and steam until tender. Immediately add 1 Tbsp of corn oil and coconut milk each into the  steamed potatoes and mashed it while its hot. Transfer mashed potatoes into a piping bag and set aside for later use.
马铃薯切丁后用大火蒸熟透至软化,马上各自倒入1汤匙玉米油和椰浆混入,趁热捣碎成泥状。把马铃薯泥放入已套上挤花嘴的挤花袋里,封起来搁置备用。

Cut purple potatoes into cubes and stem until tender. Immediately add 1 Tbsp of corn oil and 2 Tbsp coconut milk into the  steamed potatoes and mashed it while its hot. Cover and set aside to cool.
紫地瓜切丁后用大火蒸熟透至软化,马上倒入1汤匙玉米油和2汤匙椰浆混入,趁热捣碎成糊状。立刻盖起来搁置待凉。

Preheat oven to 160C degrees.
烤箱预热至160C度。


Using an electrical mixer, beat eggs until frothy. Add sugar and continue beating on medium speed until the mixture is thick and tripled in volume.
使用电动打蛋器把搅拌碗里的鸡蛋打至发泡,加入糖后继续以中速打发至体积变3倍大即可。

Whisk in the floor mixture (A) in 2 additions and fold to combine.
份两次把所有的粉料A沥入,拌匀。


Add in the balance corn oil and coconut milk to fold to incorporate.
加入剩余的玉米油和椰浆,拌匀。

Divide the batter into 3 equal portions.  Add mashed purple sweet potato to one portion while the balance 2 parts to be combine with mashed pumpkin and blended chicken treats each.
将面糊分成3等份。第一份拌入紫地瓜泥,拌匀。接着的两份各自拌入南瓜泥与有机无麦鸡肉粉饼。

Fold all the batter to combine. The batter with the purple sweet potato will be drier than the other two batters.
全部的三份面糊都是用翻拌的方法拌匀。紫地瓜面糊的那份会稍微带干。


Spoon in the 3 different cake batter into a greased 7-8 inch cake pan.
各自把3份面糊依序地勺入一个抹了油脂的7-8寸的蛋糕模具。

Transfer the cake pan into the preheat oven and bake for 30-35 mins or until cooked.
送入已预热至160C度的烤箱的中层烘烤30-35分钟至熟透为止。

Cool the cake onto the cooling rack for 30 mins. Unmould the cake and place it on a flat plate.
将模具取出烤箱,摆在铁架上待凉30分钟后才脱模取出蛋糕装入一个瓶面盘中。


Pipe mashed potatoes onto the cake surface and decorate with chicken treats as desired.
把马铃薯泥从挤花袋里在蛋糕的表面上挤出自己喜欢的装饰,最后在装饰好的蛋糕上摆几份
有机无麦鸡肉饼即可。


Do link back to Coco Sweet Tooth if you have used any information as published in this blog. 

Friday, March 18, 2016

软款椒鹽卷餅 Soft Cinnamon Pretzels

Pretzel is a type of baked bread of German origin. It is commonly shaped into a twisted knot with harder texture than bread and the top is usually sprinkled with coarse salt.
椒盐卷饼是原自德国的一种咸面包。由于它一般的形状都是蝴蝶形,因此也有人称它为蝴蝶脆饼。传通的椒盐卷饼的面包组织比一般的面包来得硬,面包表面都是加上粗盐。


Today I am making the sweet and soft version of pretzel which appeal more to the members of our household.
今天我选择制做的椒盐卷饼是甜软式的,家人比较喜欢吃软式的面包。


软款椒鹽卷餅
Soft Cinnamon Pretzels

Ingredients 材料
(A)
173g Lukewarm Water 30-35C degrees 30-35度的温水
3g Instant Dried Yeast 速发干酵母
15g Brown Sugar 红糖
105g Bread Flour 高筋面粉
300g Plain Flour 中筋面粉
3g Salt 盐

(B)
40g Baking Soda 小苏打粉
500g Hot Water 热水

(C)
50g Salted Butter 牛油 (melted 融化)

(D)
2 Tsp Cinnamon Powder 桂花粉
100g Castor Sugar 细糖


Directions 做法

Combine instant yeast and warm water (A) into the mixing bowl of a stand mixer and allow it to stand for 10 mins.
将材料A的速发干酵母和温水一起混入搅拌器的钢盆里,搅匀后搁置10分钟。

Add in bread flour and brown sugar. Stir to combine. Allow the mixture to rest for 15 mins.

加入高筋面粉和红糖,捣匀。再搁置息面15分钟。

Add in plain flour and with the mixer with hook attachment,  combine on low speed to form a dough. If the mixture is dry, add an extra 1 to 2 more tablespoons of water.
再倒入中筋面粉,以慢速将材料搅拌成团。若面团过干,可以再加1-2汤匙的清水。

Add in salt and adjust the mixer to medium low and continue kneading for another 10-13 mins to form a smooth and elastic dough.
把盐混入后,将搅拌器转用中速把面团搓10-13分钟至面团表面光滑及有弹性即可。


Transfer the dough to a slightly greased bowl, cover bowl with either cling wrap or cloth. Allow the dough to proof for an hour or until the dough doubled in size.
将揉好的面团滚圆, 收口朝下捏紧放入涂抹少许油的盆中, 罩上拧干的湿布或保鲜膜, 放置到温暖很密闭的空间进行第一次发酵约60分钟或至少两倍大.

In a large bowl, dissolve baking soda with hot water (B), set aside to cool.
准备一个大碗,把材料B的小苏打粉和热水一起混匀,搁置待凉。

When the dough has risen, turn out the dough onto a lightly floured worktop and divide into 10 equal pieces.
桌面上撒些面粉,把发酵完的面团取出,分割成10等份。


Roll each piece into a rope and twist into a pretzel shape. Dip each pretzel into the baking soda water (B) and drain.
用手掌将小面团揉成细长的面绳然后做造型。之后浸泡入苏打水,沥干。

Place the pretzels onto a baking pan lined with silpat or parchment paper. Place the baking pan into a unheated oven and proof for another 40mins or until doubled in size.
椒鹽卷餅沥干后,各自排在已铺上烘焙纸或耐热烘培垫。把烤盘送入未开火的烤箱发酵40分钟至膨胀双倍大即可。

Combine ingredients (D) into a bowl and set aside.
将材料D混入小碗,搁置待用。


8-10 Mins prior to baking time, remove baking pan from oven and turn on the oven heat to 230C degrees.
发酵好前8-10分钟, 将烤盘从烤箱中取出, 把烤箱预热至230C度.

Brush the pretzel surface with melted butter and bake in the middle level of a preheated oven at 230C degrees for 7 mins.
在椒盐卷饼的表层涂上一层融化的牛油然后把模具送入已预热至230C度的烤箱的中层烘烤7分钟.

Remove pretzels from oven and immediately brush the top with melted butter again. Allow the  pretzels to cool completely before dusting the top with cinnamon sugar (D) toppings. 
烤熟后将椒盐卷饼取出,马上在卷饼的表层涂上融化的牛油,摆在铁架待凉后再把桂花粉糖D撒上装饰。


Do link back to Coco Sweet Tooth if you have used any information as published in this blog. 


Thursday, March 17, 2016

超软咖啡湿蛋糕 Super Moist Coffee Cake


Sharing this straight forward and easy (without having to separate egg whites) coffee cake recipe.
与您分享这道简易即又不须分隔蛋黄白做法的咖啡蛋糕食谱。

If you share the same taste preference like me, then you'll love this cake. Its true to its word, moist and melting soft with a strong hint of coffee aroma.
您若是也和我有同样的偏好的话,那么你一定会喜欢上这道蛋糕食谱。这蛋糕非常湿软可口,带有浓厚的咖啡香真的好好吃。


超软咖啡湿蛋糕
Super Moist Coffee Cake
Recipe credits from Bonbini


Ingredients 材料

(A)
3/4 Cup Almond Flour 杏仁粉
1/3 Cup Plain Flour 中筋面粉
1/4 Cup Cocoa Powder 可可粉
1/2 Tsp Baking Soda 小苏打粉
1/2 Tsp Salt 盐

(B)
172g Unsalted Butter 无盐牛油 (room temp 室内回温)
145g Light Brown Sugar 红糖
2 Large Eggs 鸡蛋(大)

(C)
1/2 Cup Yoghurt 酸奶
1 Tsp Vinegar 白醋

(D)
2 Tsp Instant Coffee 即溶咖啡
1 Pkt 2-in-1 Black Coffee Sachet 二合一黑咖啡袋
70ml Hot Water 滚水


Method 做法


Preheat oven at 160C degrees.
烤箱预热至160C度。

Line and grease bottom and sides of a rectangular baking pan size 10x22x6.5cmH.
准备一个长形蛋糕模具10x22x6.5cmH。模底和侧边涂油后铺上烘培纸。

Combine ingredients (A) evenly and set aside.
将材料A一起混匀搁置待用。

Combine ingredients (C) until even. Set aside.
将材料C一起混匀搁置待用。

Combine ingredients (D) evenly and set aside to cool.
将材料C一起混匀搁置待凉备用。


Cream the butter and sugar until light and fluffy. 

将牛油和红糖打至松发。

Add in eggs to the creamed butter mixture one at a time till incorporated.
把鸡蛋分次加入打发的牛油霜,混匀。

With the mixer on low, add 1/2 of the mixed flour mixture (A) into the egg butter mixture and combine. Add 1/2 of the yoghurt mixture (C) into the batter and combine.
将1/2的粉料A倒入牛油鸡蛋霜内,以慢速混匀后再放入1/2份的酸奶糊C,搅匀。


Continue the same process for the balance flour (A) and yogurt mixture (C) until thoroughly combine.
继续用以上的步骤把剩余的粉料A和酸奶糊C依序的混入至均匀为止。

Add in the coffee mixture (D) into the batter and combine.
最后把咖啡液D加入蛋糕糊内,混匀即可。


Transfer batter into the prepared baking pan and bake in a preheated oven at 160C degrees for 35-40 mins until a skewer inserted comes out clean.
把混好的蛋糕糊倒入蛋糕模具送入已预热至160C度的烤箱烘烤35-40分钟至蛋糕熟透。

Place the baking pan onto a cooling rack and allow the cake to cool in mould for 15-20 mins before
unmoulding.
烘培完成后将蛋糕模从烤箱取出放上铁架待凉15-20分钟后才脱模取出蛋糕。


Do link back to Coco Sweet Tooth if you have used any information as published in this blog. 

Wednesday, March 16, 2016

地瓜芋头软面包 Sweet Potato and Yam Combo Bread


Another soft and fragrant bread I am extremely happy with the outcome.
又是一道我极为满意的可口软面包。


地瓜芋头软面包
Sweet Potato and Yam
 Combo Bread


Ingredients 材料

Tang Zhong 汤种 (A)

35g Bread Flour 高筋面粉
175g Water 清水


(B)
170g Tangzhong 汤种
100g Yellow Sweet Potato 地瓜 (steam and mashed 蒸后搅成泥状)
100g Yam 芋头 (steam and mashed 蒸后搅成泥状)
540g Bread Flour 高筋面粉
3 Tbsp Cake Flour 蛋糕粉
12g Milk Powder 奶粉
1 Tbsp Instant Dried Yeast 速发干酵母
45g Castor Sugar 细糖
2 Eggs 鸡蛋
50g Unsalted Butter 无盐牛油 (melted and cooled 融化冷却)
160g Milk 牛奶
1 Tsp Salt 盐


Method 做法

Combine ingredients (A) into a heatproof saucepan and cook over medium heat while stirring continuously until the mixture thickens with no visible lumps. Once the mixture reaches 65C degrees the water roux is ready. I just cook and stir until it has thickened like baby porridge. 将材料A里的水和高筋面粉加入耐热锅/盆搅拌均匀成面糊,然后以中小火加热,边煮边搅拌一直煮到面糊开始变浓稠就息火继续搅拌至无粒粒或如婴儿粥般即可。


Transfer the tang zhong paste to a clean bowl and place a piece of cling wrap directly over the top of the mixture to prevent skin from forming on the surface. Allow the mixture to cool before using. Refrigerate the water roux once it has cooled. I kept the leftovers in the fridge for not more than 4 days.
把汤种面糊倒入一个干净的碗内然后表面层铺上一层保鲜纸以防面糊表面上生一层皮。汤种糊一旦冷却后便可加入面包材料里混合。剩余的汤种面糊可收入冰箱不超过4天。

Combine all ingredients (A) and (B) into the bowl of a stand mixer with dough hook and mix with lower speed until all ingredients are well combined. Increase the speed to medium and continue kneading for approx 15-18 mins, until the dough becomes smooth and pass the window pane test.
将所有材料 (A)和 (B) 倒入搅拌器的钢盆中以慢速度搅拌搓揉成为一个不粘手的面团. 继续以中速把面团搅拌(大约15-18分钟)成为撑得起薄膜的面团.


Transfer the dough to a slightly greased bowl, cover bowl with either cling wrap or cloth. Allow the dough to proof for an hour or until the dough doubled in size.
将揉好的面团滚圆, 收口朝下捏紧放入涂抹少许油的盆中, 罩上拧干的湿布或保鲜膜, 放置到温暖很密闭的空间进行第一次发酵约60分钟或至少两倍大.

Test the readiness of the dough with a finger lightly dusted with low gluten or cake flour. The dough is ready when it remain indented after the finger pokes into it. If not, continue to proof for another 5-10 mins before using the finger to poke and perform the test.
第一次发酵完成后, 用手指沾上低筋面粉, 然后直接戳入面团中心. 如果戳出的洞陵没有弹回的迹象, 便完成第一次发酵. 如果戳出的洞渐渐回缩, 则再继续发酵5-10分钟, 然后再用同样的方方式测试.

Punch down the dough. Remove the dough from the bowl and place it on a floured worktop. Divide the dough into 10 equal portions and mould it round. Let it rest for another 15 mins.
工作桌上洒上一些高筋面粉. 将发酵好的面团从盆子中移出. 面团表面也洒上一些高筋面粉, 然后将面团用手压下去将气体挤出来. 把面团平均分割成10等份, 然后滚成圆形, 盖上拧干的湿布或保鲜膜再让面团休息15分钟.

Sprinkle the worktop with bread flour, use a rolling pin to roll each dough into long rectangle shape with width to fit the baking pan. Start rolling out from the shorter end of the dough into a roulade. Repeat the process for the balance 9 ps of dough. 
台座上撒些高筋面粉,将休息好的面团用擀面棍把面团擀成长方形,宽度同烤模短向宽,然后由短卷起。再重复同样的做法把其余的九份面团完成。

Place the 5 cylindrical bread dough (seams down) into a greased close lid loaf pan 20cmx12cmx11.5cmD. Place another 5 pcs of dough onto the next layer.
将卷好的面团收口朝下朝内排入已涂抹不可融化奶油的有盖面包烤模中20x12x11.5cmD以免沾粘。再把其余的五份面团排上之前的面团上层。


Spray some water over the surface with a fine mist nozzle. Final proof the bread in a unheated oven for another 50-60 mins.
将烤模放入未开火的烤箱中, 面团表面喷些水然后盖上烤箱门, 再侍发酵50-60分钟至两倍大.


8-10 Mins prior to baking time, remove baking pan from oven and turn on the oven heat to 210C degrees.
发酵好前8-10分钟, 将烤盘从烤箱中取出, 烤箱打开预热刊至210C度.

Close the lid and bake in the middle lower level of a preheated oven at 210C degrees for 35-38 mins.
把模具的盖关上然后放进已经预热至210C度的烤箱中层烘烤35-38分钟.

Remove bread from oven and turn it out onto cooling rack to cool.
烤好后马上倒扣出来放在铁网架上放凉。


Do link back to Coco Sweet Tooth if you have used any information as published in this blog. 


Monday, March 14, 2016

香草蔓越莓鲜奶油软面包 Vanilla Cranberry Pain A La Crème Bread


Found this lovely bread idea from Domestic Gothess blog to use up the leftover whipped cream from my recent swiss roll cake project.
为了用完之前剩余的动物性鲜奶油霜,我便在Domestic Gothess 的博客里找到了这道超好吃的面包食谱。

I have made some adaptations to deliver a softer texture bread which my hubby loves.
因为想把面包做成丈夫喜好的湿软面包,我在这食谱中做了少许的修改。


香草蔓越莓鲜奶油软面包 
Vanilla Cranberry Pain A La Crème Bread


Ingredients 材料

(A)
120g Whipping Cream 动物性鲜奶油
15g Icing Sugar 糖粉 (sifted 过沥)
2 Tsp Pure Vanilla Extract 香草精

(B)
345g Bread Flour 面包粉
35g Cake Flour 蛋糕粉
6g Instant Dried Yeast 速发干酵母
40g Castor Sugar 细糖
1 Egg 鸡蛋
1 Egg Yolk 蛋黄
120g Milk 鲜奶
30g Whipping Cream 动物性鲜奶油
7g Salt 盐

(C)
30g Butter 牛油

(D)
20g Dried Cranberries 蔓越莓干


Method 做法

Whip the whipping cream from (A) in a chilled mixing bowl with electrical mixer from medium to high speed until fluffy. Whisk in sifted icing sugar and vanilla extract and continue whisking till stiff peaks. Set aside.
把材料A的动物性鲜奶油放入已冷却的容器内,用搅拌机由慢而快的速度搅打至变浓稠时加入幼糖, 香草精继续搅打。直到打发至体积变大而不会流动的状态即可. 搁置待用。

Combine all ingredients (B) into the bowl of a stand mixer and whipped cream (A) with dough hook and mix with lower speed until all ingredients are well combined.
将所有材料(B)和打发的动物性奶油(A) 倒入搅拌器的钢盆中以慢速度搅拌搓揉成为一个不粘手的面团.

Add in butter (C) and slowly increase the speed to medium and continue kneading for another 10 mins before adding in dried cranberries (D). Continue to knead for another 8-10 mins until the dough becomes smooth and pass the window pane test.
把切成小块的奶油C加入然后依照片揉面标准程序继续以中速把面团搅拌10分钟后再加入蔓越莓干再继续搅拌8-10分钟直到成为撑得起薄膜的面团即可.

Transfer the dough to a slightly greased bowl, cover bowl with either cling wrap or cloth. Allow the dough to proof for an hour or until the dough doubled in size.
将揉好的面团滚圆, 收口朝下捏紧放入涂抹少许油的盆中, 罩上拧干的湿布或保鲜膜, 放置到温暖很密闭的空间进行第一次发酵约60分钟或至少两倍大.

Test the readiness of the dough with a finger lightly dusted with low gluten or cake flour. The dough is ready when it remain indented after the finger pokes into it. 
第一次发酵完成后, 用手指沾上低筋面粉, 然后直接戳入面团中心. 如果戳出的洞陵没有弹回的迹象, 便完成第一次发酵. 如果戳出的洞渐渐回缩, 则再继续发酵5-10分钟, 然后再用同样的方式测试.

Sprinkle some bread flour on the worktop. Remove the dough from the bowl and punch down the dough. Divide the dough into 4 equal portions and mould it round. Cover with either cling wrap or damp cloth and allow it to rest for another 15 mins before shaping.
工作桌上洒上一些高筋面粉. 将发酵好的面团从盆子中移出. 面团表面也洒上一些高筋面粉, 然后将面团用手压下去将气体挤出来. 把面团平均分割成4等份, 然后滚成圆形盖上拧干的湿布或保鲜膜再让面团休息15分钟.


Flatten and roll out each dough into rectangular shape, cut and shape the bread as illustrated in the picture. Press braided ends tightly and tuck them under the dough. Repeat the same steps for the remaining 3 portions of dough.
将每个面团拼合擀成长方形,然后依据图片说明般切割做造型。编好后尾端捏紧后收口朝下。重复同样的步骤完成其余的3份面团。


Transfer 3 portions of  braided dough into a greased 5x9x3.5 inch rectangular bread pan. Place the other braided dough onto a onto a baking tray lined with parchment paper or non stick silicone baking mat. 
取3份编好的面团装入已涂抹油脂的5x9x3.5寸面包模具。另一份面团变摆在已铺上烘培纸或不粘用硅胶烘烤垫。

Spray some water over the buns with a fine mist nozzle. Final proof the bread in a unheated oven for another 50-60 mins.
将烤盘放入烤箱中, 面团表面喷些水然后盖上烤箱门, 再侍发酵50-60分钟至两倍大.

8-10 Mins prior to baking time, remove baking pan from oven and turn on the oven heat to 170C degrees.
发酵好前8-10分钟, 将烤盘从烤箱中取出, 烤箱打开预热刊至170C度.

Egg wash the surface and of the dough and transfer the bread pan into the middle lower level of a preheated oven and bake for 35-37 mins for the loaf bread at 170C degrees while only 25-28 mins for the single braided dough until golden brown.
面团表面涂上一层全蛋液,放进已经预热至170C度的烤箱中下层烘烤35-37分钟, 而那没装入面包模具的一份面团只需烘烤25-28分钟至表面呈现金黄色即可.

Remove baking pan from oven and turn it out onto cooling rack to cool.
烤好后马上倒扣出来放在铁网架上放凉。


Do link back to Coco Sweet Tooth if you have used any information as published in this blog. 


Printfriendly

Related Posts Plugin for WordPress, Blogger...