Sunday, July 5, 2015

榴莲冰淇淋蛋糕 Melted Durian Ice Cream Cake

Following my recent success in making a 4 ingredient cake with melted ice cream, I decided to go for another by using durian ice cream as I was feeling nostalgic during the durian season of our home country. 
自从我上星期找到用现成雪糕制作的蛋糕后, 昨天心又痒痒了起来便去购买了榴莲口味的冰淇淋来制做个榴莲蛋糕吧!


The durians sold in Jakarta, somehow, never succeeded in luring me into buying them. In my opinion, the durians lack the pungent durian fragrance as what I would expect from it. Even by standing next to any durian stalls or durian selling counters at supermarket, I could hardly detect any smell of it.  To be on the safe side, I bought a box of locally made durian ice cream to test making the durian cake. I randomly picked the least expensive brand as I wasn't sure how the cake would turn out.
早期当我在雅加达超级市场遇到有售卖榴莲时,都会走上前去探看。可惜次次都闻不到榴莲的香味而价格又贵。一般的普通品种榴莲价格于6-10美元一公斤。那天我也没刻意去选,心里因不很确定蛋糕的成功率所以便买了一盒最廉价的榴莲口味雪糕去试验。


Luckily this selected brand of durian ice cream smells fragrant enough to make me salivate from the smell of it. I promised myself that I would definitely make desserts from fresh durian flesh when I shift back to KL one day.
幸好做出来的蛋糕很香。 我告诉自己以后回马来西亚据住时一定会买新鲜榴莲来制作蛋糕,甜品。

Personally, I find the cake a bit compact and the texture seems more like the chinese kueh than cake. Despite that, I still received rave review from my regular food sampling critics. I think next time I shall try using the eggs separation method instead of lumping all mixture together. Maybe I might get a lighter cake.
对于这批制造出来的雪糕榴莲蛋糕我到是认为像粿多于蛋糕。看来下次我再试把蛋白蛋黄分隔搅拌再混合,相信效果会较好蛋糕应该会柔软些。


榴莲冰淇淋蛋糕 
Melted Durian Ice Cream Cake

Ingredients
260g Self Raising Flour 自发面粉
160g Castor Sugar 细糖
3/4 Tsp Salt 盐
900L Durian Ice Cream (melted)
60ml Vegetable Oil 植物油
1 Tbsp Vanilla Extract 香草精
6 Large Eggs 温室回温妈鸡蛋 (At Room Temp) 


Directions:

Preheat oven at 175C degrees.
先把烤箱预热至175C度.

Line and grease the bottom of an 8 inch round cake pan.
取一个8寸圆形蛋糕模, 底下垫上塑胶纸。 纸上沫少许菜油。

In the bowl of a stand mixer, place eggs, sugar, salt and mix until combined. Stir in melted ice cream and continue mixing until thoroughly mixed. 
将鸡蛋,糖,盐加入搅拌器的钢盆中一起混合至均匀。 接着又拌入化榴莲冰淇淋继续搅拌至完全混合。

Add vegetable oil and vanilla extract respectively until evenly mix.
分别加入植物油和香草精搅拌混至完全混合。

Gently fold in sieved raising flour and mix until batter is smooth and lump free. 

轻轻的拌入过筛好的面粉拌匀,直到面糊光滑无结块。

Bake in preheated oven at 175C degrees for 30 mins. Reduce oven temperature to 160C and continue baking for another another 15mins or until toothpick inserted comes out clean.
把面糊放入预热烤箱以175℃度烘烤25分钟,然后再调低烤箱的温度160℃继续烘烤10-15分钟或直到蛋糕完全熟透为至。

Remove from heat and unmould cake on the cooling rack. 
烘烤后马上把蛋糕脱模放在架上待凉.


Friday, July 3, 2015

法式香草千层蛋糕 French Style Vanilla Mille Crepes


Another popular but expensive dessert in Jakarta, which, I personally find it overpriced between USD25 to USD50 for an 8" cake sold in cake outlets. Instead of buying the cake, I bought a recipe book solely with Mille Crepes recipes at RM20. 
我身边的亲友家属都非常喜爱吃米勒薄饼千层蛋糕,但是这类蛋糕在此卖得很贵。一个八吋圆形蛋糕售价于25至50美元之间。结果我选择用20马币购买了制造米勒薄饼千层蛋糕的食谱。

With the money spent on buying the ingredients plus the recipe book 'French Style Mille Crepes' by Coco Kong, its was still far from what I would have to pay for the cake, but still get a full size cake.
买了一本江丽风老师的'French Style Mille Crepes 法式浪漫千层蛋糕' 食谱专辑系列丛书38,再加上购买蛋糕材料后还是没有达到在外购买整个蛋糕的费用。


I have increased 30% to originally stated ingredients for the crepe to cater for 'broken crepes' from inexperienced frying and handling. Being new to this, the extra also take into consideration of the possibility of frying the crepe layers with inconsistent thickness. True enough, I only managed to get 16 layers of crepes from adding the 30% buffer ingredients. Based on the recipe, the original recipe is capable of producing 18-20pieces of crepe layers :P.
对于新手的自己,我还在原述的材料份量多加了三十巴先,预备多余以免错手间中把餅皮处里不好或是餅皮煎得厚而影响蛋糕层的制造数量等等 。以原述的材料成份所述应可以达到18-20薄餅层,而当我在预加30%的材料后所制造的只有16层而这一类的蛋糕要越多层就越好看越有口感。

For this posting, I decided to readjust the ingredients for batter with 50% extra from the original recipe. Personally, I prefer to have a higher cake and I hope you could create more layers through that. 
所以,通过这个尝试后便在此写上比原述的材料预加50%成份希望你们能制造出更多层更完美的作品。

According to the author, the crepes batter (A) is allowed 30 mins resting before adding in the melted butter for better batter consistency. If butter is added in too early,  it will create thick finishing to the crepes.
根据笔者所述,等面糊休息30分钟后才加入融化的奶油会有助于制造薄细表层的薄饼皮。


法式香草千层蛋糕 
French Style Vanilla Mille Crepes

To Make Crepes 蛋糕皮料 (A)
355g Low Fat UHT Milk 低脂鲜奶
5 Grade A Large Eggs 鸡蛋
1/2 Tsp Salt 盐
2 Stick Vanilla Pods (Scrape Out Seeds) 香草两支(取出种子)
45g Icing Sugar 糖粉
100g Plain Flour 中筋面粉

(B)
45g Unsalted Butter (melted by double boiling) 隔水炖溶无盐奶油

To Make Filling 馅料(C)
130g Vanilla Flavored Soya Milk 香草味豆浆
70g Instant Custard Powder 即溶蛋黄粉
1 Stick Vanilla Pod (Scrape Out Seeds) 香草一支(取出种子)

(D)
300g Whipping Cream 植物性鲜奶油 


Method

Get ready a 22-24cm non stick flat frying pan, 1 palette knife, cake turntable and an 8" flat serving plate or cake board.
準备好一个22-24cm不粘平底锅,抹刀1把,蛋糕转盘和一个8“平底盘子或蛋糕板。

Combine all ingredient (A) into a large mixing bowl and mix until the batter is smooth. Strain through a sieve. Cover batter with cling wrap and allow to sit / rest for 30 minutes. 
将材料(A)放入一个大碗里搅拌均匀后过滤, 休面30分钟.

Prepare melted butter from ingredient (B) and set aside to cool for later use.
把无盐奶油隔水炖溶后,离火待用。

Add in melted butter to batter (A) and mix well just prior to frying the crepes. 
煎蛋糕层之前加入溶化的无盐奶油拌匀.

Heat a non-stick frying pan over medium heat. Use a ladle to scoop the crepes batter into the pan while tilting to lightly fill the pan with the cake batter. Pour off any excess batter back into the mixing bowl. Cook crepe until the surface starts to bubble and the bottom layer has set.
以中火预热平底锅,用勺子舀入适量的面糊,迅速将锅转一圈至面糊薄薄地沾满锅底直到面皮底面煎熟。尽量不要倒入过多面糊,若有表面上有剩余的面糊尽可倒回面糊碗中。

When the edges turn to pale golden, use a spatula to ease away the layer from the pan. At this point, you may carefully lift up the crepe by hand or any other tools to make sure the crepes does not break.
Place the cooked crepes on a baking tray while finishing the remaining batter. Stir well to prevent the batter from thickening before cooking each layer. Repeat the process until the batter is all used up.
当饼皮煎至边沿微黄时, 用划刀把饼皮划离锅, 再轻轻的用手把饼皮取出放在在一个容器或烤盘上, 重复做法至完成. 千万要记得每当倒入面糊入锅时必须先搅匀, 以防止面糊浓稠。

Beat the whipping cream with a hand held electric hand beater / mixer until thickened。Set aside.
用手持电动打蛋器将植物性鲜奶油打发。待用。 

Combine all ingredients (C) into a large mixing bowl and beat until thickened. Add in whipped cream, mix well.
将材料(C) 倒入一个大盆中以打蛋器搅打至浓稠,加入打发的(D)植物性鲜奶油料拌匀。

To assemble cake, place cake board or plate on the turntable. Place one piece of crepe layer on the board / plate. Spread a thin layer of filling on top. Stack on another piece of crepe. Lightly flatten each layer with hand to sandwich the cream onto the crepe. 
组合蛋糕, 将蛋糕板放在蛋糕转盘上,铺一层饼皮,抹一层薄薄的馅料在表面,然后用手轻按餅皮中间部份使馅料分布均匀。 


Spread on a thin layer of the filling over the top of the crepe and place another piece of crepe over it. Press down lightly with hands.  Repeat the process until the last layer. Do not spread filling on the final top layer.
继续铺上另一层饼皮,抹一层薄薄的馅料在表面,用手轻按餅皮中间部份使馅料分布均匀。 重复至完成。 最后一层不须抹馅料。

Wrap the cake with cling wrap and chill cake overnight before serving.
以保鲜花跑纸包好, 放入冰箱冷藏隔夜才切出享用。


Thursday, July 2, 2015

Kuih Ondeh Ondeh


Finding vegan related food in Jakarta is a daunting task for me ever since I embarked on the journey of becoming a vegan. At most, I am lucky to find 1 or 2 vegetarian dish at more established or pricey restaurants whereby they 'might' help to omit all requested ingredients (onion, garlic, chives, eggs, alcohol or sauces of all animal origin) from certain vegetable dishes. Usually I do ended with a humble plate of stir fry green vegetable costing between USD8-12 per serving.  Unless the place serves full vegetarian food, or, me and hubby will have to order separate set of food / dishes.

自从我开始吃长素后, 才发现原来在雅加达寻找相关的素食餐馆是件困难之事. 在这个人口中有90%都是回教徒而他们大多数都是专吃牛肉的肉食者, 能购买到的菜类都相当有限. 我在这三年里真是吃腻了包菜,菜心,空心菜,白菜甚直我每次回吉隆坡都会从那儿带入20-30公斤回雅加达。若是我和丈夫一起的话,所带入(进飞机仓)的数量会高达90kg公斤。由于进口食品在此都非常贵,再加上选择有限,只好次次得辛苦的把巨重的行礼搬运入国。

The nearest vegetarian restaurant is at least 30-45mins drive away from our place. After going there continuously for 2 years, the place holds less appeal than to eat home cook meal.  I was told there are lots of good vegetarian restaurants in the northern part of Jakarta but the 1hr traveling time, plus additional 30-60mins of extended time for possible traffic congestion, put us off completely.

我俩平时所光顾的素菜馆都需要上30-45分钟的车程,若想找要多一点选择的话那就得去交通涌济的唐人区才能遇上。去那儿的车程须要一个半至两个小时。就因为如此,我在几年里都没正试去那一区试找素食馆。

Today I am in the mood for something sweet and totally vegan, specially made for tummy. I have made ondeh ondeh many times using 蓝赛珍 Agnes Chang's Hawkers' Delights 街边风味小食, and I find the recipe pretty satisfactory.

今天突然想吃甜食唯有自己下厨了。食谱取于蓝赛珍的街边风味小食。


Kuih Ondeh Ondeh

Skin 表皮(A)
360g Glutinous Rice Flour 糯米粉
180ml Hot Water 热水
3 Tbsp Thick Pandan Juice 浓缩班兰叶汁(Applicable, in the absence of instant pandan
paste)
6-10 Drops Store Bought Pandan Paste 罐装浓缩班兰叶汁
2 Tbsp Castor Sugar 幼糖
Sufficient Coconut Milk (for mixing dough) 适量椰浆
1.5 Tbsp Oil 食油
Few Drops Green Coloring 数滴青色素 (if necessary)

Filling 馅料(B)
1 Big Piece of Gula Melaka, chopped 一块椰糖
3 Tbsp Castor Sugar 3大匙细糖 

Topping / Coating 沾料 (C)
1 Grated Young White Coconut 嫩白椰丝
1 Tsp Salt 盐


Directions

Combined grated coconut with salt and steam for 10 minutes. Set aside.
把椰丝和盐混合在钢食盆们中用中火蒸熟10分钟. 离火侍凉.

Pour hot water into the glutinous rice flour and mix. Add in the remaining ingredients (A) and continue kneading until a soft dough is formed.
将热水玻入糯米粉中搅匀, 加入数滴浓缩班兰叶汁, 幼糖, 适量椰浆, 油及青色素, 搓至软硬适中的面团.

Form small balls with the dough and fill some cut gula melaka onto the centre of the dough, sealed tightly.
将面粉团做成小球, 放入少许馅料包好.


Cook in a pot filled with boiling water. When the kueh floats up, it is cooked and ready for coating. Immediately coat with steamed grated coconut. Serve hot or cold.
放入1/2锅滚水中煮至熟及浮起, 捞起, 沾上椰丝, 便可供食


Tuesday, June 30, 2015

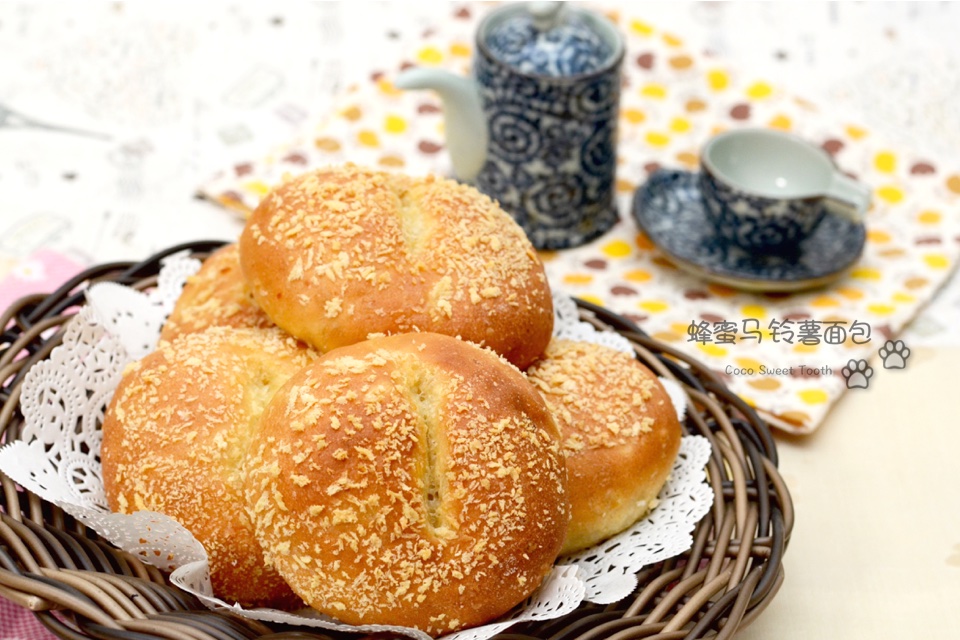
蜂蜜马铃薯面包 Potato Honey Buns

Prior to my using of 周老师的美食教室 '天然手作面包101道 recipe books as my daily bread reference guide, my loyalty had been solely towards Carol Hu's 烘焙新手必备的第二本书 The Second Book of Baking for Beginners by Carol Hu 胡涓涓 back then. These days I was swamped with too many baking books and downloaded recipes to choose from, which, sometimes I felt to be a strain on which and where to pick from.

I believe some of you share the same sentiments as I do. 

To me both of the above stated recipe books are equally great book to invest in, if you read Chinese language. Carol Hu's book offers more recipes with elaborate pictorial step by step instructions, a definite point for anyone who is new to baking.

Anyway, back to this recipe. Our entire household love potatoes and I usually use it for cooking than baking. To use it for baking requires extra preparation work of steaming and mashing and honestly I dread that extra step just for the sake of adding it to the bread dough, more so when I can't taste the potato in the final product.

But once you have tried making it you will see the difference in the bread texture against other bread recipes.


蜂蜜马铃薯面包 
Potato Honey Buns
(Makes 8 buns)

Ingredients (A)
100g Mashed Potato 马铃薯泥
70g UHT Fresh Milk 鲜奶
35g Honey 蜂蜜
1 Egg 全蛋
190g Bread Flour 高筋面粉
30g Cake Flour 低筋面粉
1/2 Tsp Instant Yeast 速发干酵母
1/8 Tsp Salt 盐

(B)
20g Unsalted Butter 无盐奶油

Topping (C)
Unsalted Butter无盐奶油, julienned 切成细条
Bread Crumbs 面包屑(Optional)


Method

Combine all ingredients (A) into the bowl of a stand mixer with dough hook and mix with lower speed until all ingredients are well combined.
将所有材料(A) 倒入搅拌器的钢盆中以慢速度搅拌搓揉成为一个不粘手的面团.

Add (B) butter and slowly increase the speed to medium for approx 15-18 mins, until the dough becomes smooth and pass the window pane test.
再将切成小块的奶油(B), 加入面团中搅拌搓揉到完全融合. 依照片揉面标准程序继续以中速把面团搅拌成为撑得起薄膜的面团.

Transfer the dough to a slightly greased bowl, cover bowl with either cling wrap or cloth. Allow the dough to proof for an hour or until the dough doubled in size.
将揉好的面团滚圆, 收口朝下捏紧放入涂抹少许油的盆中, 罩上拧干的湿布或保鲜膜, 放置到温暖很密闭的空间进行第一次发酵约60分钟或至少两倍大.

Test the readiness of the dough with a finger lightly dusted with low gluten or cake flour. The dough is ready when it remain indented after the finger pokes into it.
第一次发酵时间到达后, 用手指沾上低筋面粉, 然后直接戳入面团中心. 如果戳出的洞陵没有弹回的迹象, 便完成第一次发酵. 如果戳出的洞渐渐回缩, 则再继续发酵5-10分钟, 然后再用同样的心方式测试.

Punch down the dough. Divide the dough into 8 equal portions and mould it round. Let it rest for another 15 mins.
工作桌上洒上一些高筋面粉. 将发酵好的面团从盆子中移出.  面团表面也洒上一些高筋面粉, 然后将面团用手压下去将气体挤出来. 把面团平均分割成8等份, 然后滚成圆形, 盖上拧干的湿布或保鲜膜再让面团休息15分钟.

Brush a thin coat of water on the surface of the buns. Coat the top with bread crumbs and place the buns on the baking tray. Continue the process for the balance buns. 
在面包表面均匀刷上一层清水, 然后沾上一层面包屑. 完成的面团收口朝下间隔整齐排放在烤盘上.

Spray some water over the buns with a fine mist nozzle. Final proof the buns in a unheated oven for another 50-60 mins.
将整盘的面团放入烤箱中, 面团表面喷些水然后盖上烤箱门, 再侍发酵50-60分钟至两倍大.

8-10 Mins prior to baking time, remove baking tray from oven and turn on the oven heat to 170C degrees.
发酵好前8-10分钟, 将烤盘从烤箱中取出, 烤箱打开预热刊至170C度.

Apply oil to a razor blade and slowly cut a short and thin groove line over the buns surface. Place 1-2 strips of butter into the cut groove. Repeat the process for all the buns.
用一把涂上少许油的利刀, 在面团中央切开一道深痕. 将切成条状的奶油放在面团缺口上.

Bake the buns in the middle lower level of a preheated oven at 170C degrees for 18-20 mins.
放进已经预热至170C度的烤箱中下层愤烘烤18-20分钟, 至表面呈现金黄色即可.


Saturday, June 27, 2015

咖啡花生布丁 Coffee Peanut Layered Pudding


Pudding, agar agar, jelly or anything close to that form I will wallop everything in mere seconds (provided it is free from animal by product, dairy and eggs).

Despite my crazy love for it, I normally prefer to bake than doing the preparing for pudding like desserts. Yesterday, I came across a packet of leftover fresh grated coconut in the freezer so here I am mooring through my collection of books for something with distinct taste and color as the subject for my next photo shoot.

Recipe derived from Sweet Jelly 菜燕甜品 by Khoo See Yew 丘思耀.  Another neglected pudding jelly recipe book bought 2 years ago but yet to try.  As I have not tested any from this book but from the outcome of my first attempt, I think this recipe passed reasonably.

咖啡花生布丁 
Coffee Peanut Layered Pudding

Ingredients 材料
(A) Sugar Syrup 糖水
180g Golden / Castor Sugar 细糖
300ml Water 水
Few Pandan Leaves 少许香兰叶

(B)
70g Green Bean Starch 绿豆澄粉
250g Water 水
1 Tbsp 即溶咖啡粉

(C)
240ml Water 水
240ml Sugar Syrup 糖水

(D)
100ml Thick Coconut Milk 浓椰汁
30g Green Bean Starch 绿豆澄粉

(E)
300ml Peanut Mixture 花生混糊
(100g Peanut 花生 + 500ml Water 水, cooked till tender and blend 煮软, 用混合器𤧷或磨烂)
120ml Sugar Syrup 糖水
1/4 Tsp Salt 盐

Method 做法

Combine ingredients (A) in a pot and boil until sugar dissolves completely and the aroma of pandan is infused into the syrup.
把材料(A)混合在锅中煮沸,直到糖完全溶解和香兰的香气注入糖浆。

In a separate heat proof pot with medium low heat, warm up ingredients (C). Combine ingredients (B) evenly and transfer the mixture the the pot of (C). Keep mixing / stirring until mixture becomes slightly thick and transparent. Remove from heat and set aside.
把材料(B)混合搅拌成糊. 煮滚材料(C), 把(B)咖啡糊慢慢加入, 继续搅拌成糊状. 离火待用。 

Cook ingredients (E) under medium low heat  until combined. Stir in ingredient (D) and continue mixing until slightly thickens. Remove from heat. 
把材料(D)混合搅拌好, 慢慢加入正煮滚的材料(E),  继续搅拌成糊状. 离火.

Spoon both mixtures alternately into then jelly mould. 
用汤勺将2种面糊分次倒入模型内.

Leave to cool before cutting. Best eaten after refrigerated.
待凉切块, 冷食更佳.


Do link back to Coco Sweet Tooth if you have used any information as published in this blog.

This post is linked to Cook Your Books Event #24hosted by Joyce of Kitchen Flavours

Ogura Red Bean Ice Cream Cupcake

Found this super easy 3 ingredient recipe from  Kirbie Cravings site last week and had it bookmarked in my To-Bake-List'.  Hence, the recipe came into mind when I had limited time to bake when I had to complete several baking recipes within a span of 3+ hours (including preparation and cleaning). This batch of cupcakes is also made for my landlady on the same day when I presented her with the Butterflakes Herb Bread for their buka puasa.

The original recipe called for full fat chocolate ice cream but I opted for something lighter and non chocolatey as during then I also made them moist chocolate cake using rice cooker with satisfactory outcome. Knowing their family is true fan of chocolates and cream cheese products, I shall apply chocolate topping to complement the red bean ice cream.


I have made some adaptations to see if it work and it did.  From this experience, I reckoned this is a very forgiving recipe where you can adapt to your preference and still get a fairly smooth textured cake with tender crumb.

Do try out with other ingredients and share with me the outcome.  In case you need help with the measurement conversion here is the link  or Link 2. Happy baking!


Ogura Red Bean Ice Cream Cupcake
Recipe adapted from Kirbie Cravings


700ml Ogura Red Bean Ice Cream
50g Castor Sugar
120g Self Raising Flour
2 Small Eggs

Chocolate Glaze Topping  (Optional)


DIRECTIONS:

Preheat oven to 170C degrees.  Prepare muffin cups on baking tray.

In a sauce pan, heat up ice cream until melted. Stir in castor sugar and mix until fully combined and melted. Set aside to cool until lukewarm.

Beat in eggs and combine until even.

Whisk in flour and mix with hand whisk or electric mixer until no flour lumps remain.

Pour into individual muffin cups and bake at 170C degrees for 20-22mins or until a toothpick inserted comes out clean.

Glaze with toppings, if desired.


Thursday, June 25, 2015

Butterflake Herbs Bread

Received a beautiful custom made chest from my landlord early this week and I have been contemplating on what to give back as a thank you gesture. And since this month is the holy fasting month of Ramadan and I have also missed the landlady's birthday last week, I decided on making her a belated birthday cake and something savory for their buka puasa.

The original recipe only calls for all purpose flour and I have adapted the flour mixture to a combination of bread flour and all purpose flour. Otherwise, the bread will be less springy and compact by using all purpose flour alone.


Being a bread person and after this attempt, I still think I would make it more bread like the next time. This recipe is good for 2 loafs of bread. If you are using smaller bread pan or smaller capacity bread machine, you might want to half the amount.

Enjoy!


Butterflake Herbs Bread
Recipe adapted from King Arthur's Flour

Dough Ingredients (A)
230g UHT Fresh Milk
60g Salted Butter
40g Sugar
2 Grade A Large Eggs
2 Tsp Instant Dry Yeast
260g Bread Flour
260g Plain Flour
21g Potato Flour

Butter Herbs Filling (B)
120g Unsalted Butter, softened
1/2 Tsp Dried Basil
1/2 Tsp Dried Parsley
1/4 Tsp Oregano
1/2 Tsp Garlic Powder

Directions

Heat up milk in a saucepan (until slightly simmer) or using microwave (for 1 minute). 

Pour heated milk over the butter. Add sugar and stir until sugar and butter thoroughly dissolved. Allow the mixture to cool to lukewarm around 39-40C degrees. 

Transfer the mixture to the mixing bowl of your stand mixer or bread machine. Add in eggs, instant yeast and flour. Mix the mixture until a dough is formed. At this point, add more milk if the mixture is too dry and crumbly. 

If you are using stand mixer, continue kneading the dough on medium speed for another 20-25 mins until it is soft,  smooth and pliable. Transfer the dough to a slightly greased bowl, cover bowl with either cling wrap or cloth. Allow the covered dough to proof for 1-2 hours or until doubled in size. 

For bread machine users, allow the machine to finish its cycle and proof accordingly.

Combine all ingredients (B) into a smooth paste. Set aside for later use.


Test the readiness of the dough with a finger lightly dusted with low gluten or cake flour. The dough is ready when the dough remain indented after the finger pokes into it.


Punch down the dough. Mould it round again and allow to rest (covered with cling wrap or wet cloth) for another 15 mins.

Roll out the dough on a slightly floured work top about 1/2" thick. Cut in 4" to 4-1/2" circles with a cutter or muffin rings.

Lightly grease or flour 2 pcs of bread pans 9.5" x 5" x 4.5".

Apply butter toppings on the surface of each circle, fold into half and place with the flat side facing down. Repeat the process until all the dough have been used up.

Lightly sprinkle water mist over the bread and leave to proof into an unheated oven for 50-60 mins.

Egg Wash the surface and bake the loaf at the lower rack of a preheated oven at 175C degrees for 25-30mins.


Printfriendly

Related Posts Plugin for WordPress, Blogger...