Tuesday, March 24, 2015

Flossy Chicken Bun 鸡肉松奶酥面包


Last week I came across several packets of chicken floss which we brought back from Malaysia during the recent Chinese New Year holiday. Prior to turning vegan, I used quite a fair bit chicken floss in baking and occasionally as toppings to congee or certain dishes. 

The last time I made chicken flossy buns was at least 2 years ago and ever since then I have been buying from Bread Talk whenever my hubby got sick of eating home made breads. For this bread, I fully utilized our supply of chicken floss to the fullest as bread fillings and decorations.

Here is the taiwanese soft bread recipe which I use extensively in most of my bread recipe. With this recipe, I could cut down the '汤种' scalded dough method and go straight into making the bread while still expecting soft airy outcome.  


Flossy Chicken Bun

Soft Bun Dough 基本面團 (软式餐包)
Adapted from 周老师的美食教室 '天然手作面包101 道

320g Water 水
5g Apple Cider Vinegar 萍果醋 
5g Instant Yeast 快发乾酵母
520g High Protein Flour 高筋面粉
100g Low Protein Flour 低筋面粉
80g Castor Sugar 细白砂糖
7.5g Salt 盐
1 Grade A Egg 鸡蛋 (50g nett weight)
80g Unsalted Butter 无盐奶油


Fillings (Optional)
200g Salted Butter 奶油
180g Icing Sugar 糖粉
100g Eggs 鸡蛋
200g Milk Powder 奶粉
200g Chicken Floss 鸡肉松  

  • Cream butter and icing sugar until well blended.
  • Add in eggs, cream until smooth. Add in milk powder and chicken floss, mix until well combined.
  • Set Aside or keep in fridge until ready for use

Directions 
  • In a mixing bowl of a stand mixer, combine all  ingredients (except butterl) together and using a dough hook, mix all ingredients until the dough gathers to form a ball. 
  • Add butter and continue kneading for 15-20 mins on medium speed until the dough no longer stick onto the wall of the mixing bowl, or, when performing the window pane test, the stretch dough forms a thin pane without breaking.
  • Gather the dough and roll it into a ball and let it proof in a lightly oiled bowl. Cover the bowl with a damp cloth and leave for 2 hours or until doubled in size at room temperature.
  • Remove the dough from bowl and punch down the air. Divide the dough into 20 portions. Roll each portion into a small ball, cover and allow it to rest for 20mins. 
  • Flatten each ball and roll into a round disc or rectangle shape. Place the fillings in the centre, shape and seal the seams accordingly. 
  • Place each buns on a lined / greased baking tray. Apply a coat of egg wash over the buns and let it proof for 55 mins.
  • Bake the buns at 185C degrees (lowest rack of the oven) or 180C degrees (middle rack) for 12 minutes. Set aside to cool.
  • Spread the top with mayonnaise and coat the buns with extra chicken floss. 


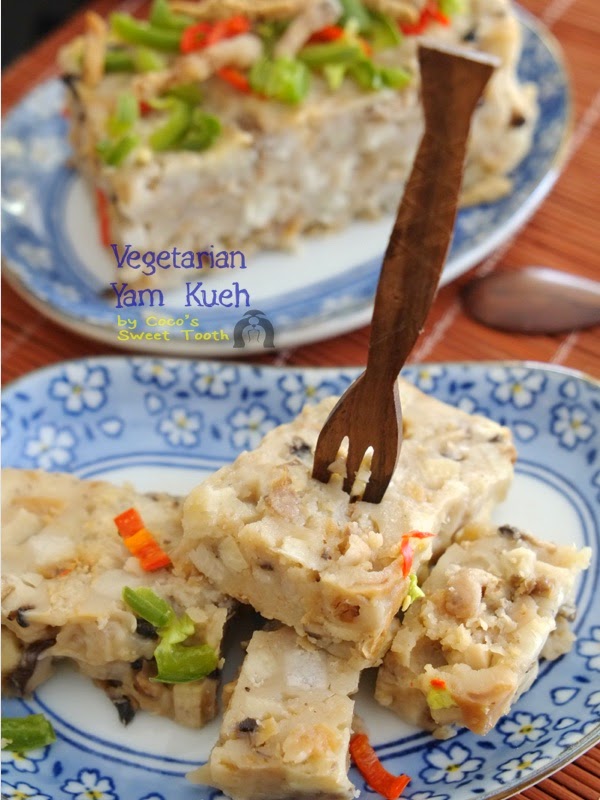
Vegetarian Yam Kueh 素芋头糕

Yesterday my maid brought back 3 huge yam when she came back from Bogor costing only USD3 in total. So we set about putting it to good use and settle for something savory, which is how we arrived at making yam kueh.

Instead of making the traditional ones using dried shrimps, shallots and other non vegan ingredients, I decided to adapt the recipe from baking corner's Steam Yam Cake's recipe to the vegan version.

Ingredients

  • 400g Yam (diced)
  • 300ml Water
  • 40g Preserved Turnips(Chai Poh 菜脯)
  • 30g Vegetarian Ikan Bilis (fried & crushed)
  • 4 Shitake Mushroom (diced)
  • 6 Chinese Mushroom (soaked and diced)
Seasoning
  • 1 Tbsp Mushroom Oyster Sauce (Vegetarian)
  • 1 Tbsp Light Soy Sauce
  • 1 Tbsp Sugar 
  • 1/2 Tbsp Salt
  • Dash of Pepper
Batter (mix together)
  • 200g Rice Flour
  • 3 Tbsp Corn Flour
  • 350ml Water
Toppings (Optional)
  • Some Vegetarian Ikan Bilis (fried)
  • Red Chillis (sliced)
  • Green Peppers (sliced)


Directions :
  • With 5 Tbsp of cooking oil salute turnips (chai poh) until fragrant. Remove and set aside.
  • Using 2 Tbsp sesame oil, stir fry the diced yam under medium heat for 5 minutes. Remove and set aside.
  • Using the same wok laced with leftover oil from frying the yam, stir in the mushrooms, ikan bilis and continue to stir fry until fragrant. Add in turnips, yam and 300ml water and continue stir frying until combined.
  • Stir in seasonings and batter.
  • Continue stirring with low heat until mixture thickens. 
  • Remove from heat. Transfer the batter into a 8x8 inch steaming tray lined with banana leaf at the bottom.
  • Steam under high heat for 30 mins.
  • Remove and apply toppings. Let cool.


Thursday, March 19, 2015

Gluten Free Pumpkin Cake.......love gesture to my furkid Lady Coco


Lady Coco, our 1st furry kid turned 13th two days ago. She has been part of our life for almost 13 years and is the only one among the trio that who still sleeps on the same bed with us every night when we are home. Her growing up years had been challenging with hospital visits, surgeries, hereditary food and substance allergies, constant itch and bodily stress from all forms of allergies. Shortly after we bought her home from the pet shop in SS2 PJ, she started to display signs of fits and from that moment onwards we have been constantly on our toes to keep her alive. 


The first 2 years she was put on steroid medications which sustained her fits but worsened her skin reactions to allergens with either sores or irritations. After that we stopped her medication completely and tried our best to care for her conditions with natural remedies. Despite all the discomfort, she managed to brace through years of health and physical challenges as happy as she could and enjoying all the attention from lots of people throughout her lives. Being highly allergic to all sorts of read meat (except pork), wheat, rice, peas, yeast, dairy, dust, mangoes, cats dander, house mites, cockroaches etc. We ended up preparing home cooked food for her since most commercial dog food contains either each or some of the stated ingredients. Luckily we managed to find a suitable prescriptive dog food which are only sold by veterinary clinics. 


Thank god she is never picky on food. She gobbles down anything we offer, anything, including fruits, vitamin capsules, tablets or vegetables. For her 13th birthday, I came up with a safe version of gluten free cake which smell so good and tasty looking that they (the trios) woofed up within minutes.


Here is the recipe in case you want to try making for your furbabies.

GLUTEN FREE PUMPKIN CAKE
(For the cake)
50g almond flour
60g Tapioca flour
10g Potato Flour
1 Grade A Egg
65g creamy unsalted & unsweetened peanut butter
60ml olive oil
5ml vanilla extract
80ml honey
270g fresh pumpkin (cooked and mashed)

(For the topping - optional)
1/4 cup unrefined organic coconut oil (freeze the oil for 5-7 mins until its solidifies like butter)
2-3 Tbsp Icing sugar
4-6 Tbsp coconut or soy milk


Directions
(Cake)
  • Preheat the oven to 175C degrees and grease or line baking pan with oil and parchment paper. I use a non stick pie mould with removable base hence I only did the grease part.
  • Sift all the flours and set aside.
  • In a mixing bowl, add egg, peanut butter, cooking oil, vanilla extract, honey and whisk until batter is light and thoroughly combined. Add in mashed pumpkin and comtinue mixing until well blended. 
  • Fold in the sifted flour and combine. Transfer batter into baking mould and bake for 25-30mins. Depending on the size of mould use. 
  • Remove and set to cool.


(Frosting Decoration)
  • Pour coconut oil into an ice cube mould and freeze for 5-7 minutes until it solidifies like butter. Remove the coconut oil/butter from the freezer. Using a handheld mixer or whisk, cream the coconut oil until it breaks up and becomes smooth and slightly fluffy. 
  • Add in 1/4 of the powdered sugar and 2 tablespoons of soy milk and continue mixing until nice and smooth. Continue adding powdered sugar along with tablespoons of soy milk as needed until everything is combined. 
  • Frost the cake as desired. Decorate with any fruits or treats according to your furkids preference.
  • Referigerate the cake for 10-15 mins after the frosting to stabilize the cream.


Note : 

This frosting melts pretty easily, so make  sure whatever you put it on is nice and cool. 

When using this frosting and other coconut oil based frostings, try to keep your cake in temperatures below coconut oil's melting point or your frosting may slip and slide away.


Saturday, March 14, 2015

Vegetarian Pita Bread 口袋面包


Also known as 口袋面包 as indicated from the recipe book I am currently using by 周淑玲 titled 周老师的美食教室 "天然手作面包101道路". 

The beauty of this bread is the ease of making with minimal ingredients and lesser baking time. All it takes is 5mins of baking time once it have completed the 2 cycles of proofing. 

Initially I was rather skeptical wondering how would 5 mins be sufficient to bake the proof dough and once its in the oven you will be amazed by how it puffs up almost instantly hence producing a hollow core. The hollow core is like an empty pocket which allows you to fill it with anothing to go along with it. Yes, it is very versatile as the skin is thin and the hollow core is huge to accomodate lots of fillings to keep one seriously full to the brim. 

Personally I prefer to fill it with the home made Vegetarian Lentils which I coincidentally made few days ago. My husband also likes to use it as a burger wrap packed with lettuce, egg, chicken or ham. 


VEGETARIAN PITA BREAD


Ingredients 
240g Lukewarm water (less than 35C degrees)
4g Istant Yeast
300g Bread Flour
100g Low Protein Flour15g Castor sugar
4g Salt
15g Rice Bran Oil or any oil of preference


Directions :
  • In a mixing bowl of a stand mixer, combine all  ingredients (except salt and oil) together and let stand for 15 to 20 minutes for mixture to rise and  make a loose sponge. 
  • Add oil and salt into sponge and continue mixing at low speed, using a dough hook attachment, until dough is soft, supple, and slightly sticky. If  dough sticks to the sides of the bowl, add up to  1/4 cup more flour, a little at a time.
  • Knead dough with mixer on low speed until slightly springy and still soft, 5 to 6 minutes. Turn dough out onto a floured work surface and form into a ball.
  • Transfer the dough / ball to another bowl coated  with 1/4 tsp of cooking oil (any oil will do) and cover the bowl with clingwrap and let sit for 30mins.
  • Remove dough from bowl and place onto a floured work surface. Lightly pat into a flat shape about 1 inch thick. Use a knife to cut dough into  8 pieces. 
  • Form each piece into a small round ball with a smooth top, pulling dough from the sides and tucking the ends underneath the bottom. Cover dough balls with lightly oiled plastic wrap and let rest for 15 minutes. 
  • Sprinkle a small amount of flour on a work surface and top of a dough ball, gently pat dough ball flat with your fingers or using a rolling pin to form a flat round disc about 1/4 inch thick or 16cm circles. 
  • Arrange the flat disc on baking paper / mats and allow to proof for another 30 mins. Repeat with remaining dough balls. 
  • Preheat the oven to 250C degrees together with an empty baking pan / tray into the oven and heat it until it is burning hot. Remove the preheated baking tray / pan from oven and place a sheet of the baking mat with the proofed doughs over the tray. Immediately transfer the baking tray back into the hot oven (middle lower rack) and bake for 5 mins. Pita bread will begin to puff up and fill with hot air. 
  • Stack cooked breads on a plate; when cool enough to handle, break breads in half and open the pocket inside for stuffing.


Vegetarian Lentils / Dhal


Ever since turning vegan, I started experimenting with different ways of cooking vegetables to replace the occasional food cravings for certain food which I used to take. With onions, garlic, chives, eggs, dairy, honey and any meat off my food list, I found myself constrain when it comes to cooking  for myself alone. My husband and family members albeit accept vegetable meals but weren't ready to dive into the vegan bandwagon like me.


And usually after cooking food for them, I do not feel incline to prepare another set of food solely for myself. Despite all the eggs and dairy laden pastries I have posted, I do not actually consume them other than my partake in the baking and photography. I have been frequently asked by people how would I know if the non vegan food I have prepared have reached the required taste without sampling, well, I guess it all boils down to gut feeling which have not failed me so far. 

My first encounter with eating dhal was through roti canai and I love it!  Now, every time I cook curry chicken for the family I would start to crave for curry dishes.  Apart from cooking vegetarian potato curry,  Dhal is the next closest alternative for me.  This is a relative easy to cook recipe which I find satisfying and fulfilling.

Apart from eating it with roti canai (indian pancake), I also plan to use it to fill the Pita Bread next on my baking list.


Ingredients
(A) 240g Yellow / red lentils (wash and rinse well)
      3 cm Fresh ginger, sliced
      2 Bay leaves (optional)
      1 Cinnamon Stick

(B) 2 Tomatoes (cubed)
      2 small potatoes (cubed)
     50g Cauliflower (cut in small pieces)

(C) 40g Rice Bran Oil
      50g Vegetarian Curry Powder
      1 tbsp Vegetarian Tom Yum Powder
      1 tsp Cumin ( i didn't use any)
      1/2 tsp Garam Masala
      2 tsp Lemongrass powder
      1 Tbsp Mixed Herbs
      1 Cup Tomato Ketchup
      1 tbsp Vegetarian Chilli Sauce
      100ml water and salt to taste


  • Place (A) with 1.75 liters of water in a pan and bring to boil, skimming surface to remove scum. Reduce heat to medium. Simmer vigorously for 40 mins or until lentils have softened.
  • In a separate pot, place ingredients (B) with 1 liter of water and boil under medium heat for 20 mins until potatoes and cauliflowers have softened and the tomatoes turns mushy. Drain and set aside for later use.
  • Heat oil in a non stick wok / pot over medium heat. Add the cooked ingredients from (B) and continue to stir fry for 2 minutes. Add curry powder and tom yum powder and continue stir frying until fragrant. Stir in cumin, lemon grass powder, mixed herbs and garam masala and continue to cook for a further minute until fragrant.
  • Add tomato ketchup and chili sauce.
  • Add lentils (A) and water and continue to cook for flavors to develop. Then season with salt.
  • Add more water if necessary.


Friday, March 13, 2015

Vegan Cranberry & Raisins Dinner Rolls


Made this batch for my vegan brother and sisters in KL. Gotta freeze it and bring over next weekend. 

Recipe adapted from a book 周老師的美食教室-天然手作面包 listed under 'Food Literature' Album.

This book specialize in recipes on taiwanese soft or sweet bread. And it also comes with a tutorial DVD. I have modified the ingredients to vegan ones and still produce a relatively soft fluffy bread.


Ingredients:-

~ 200g Non dairy soy milk
~ 1 Tbsp Apple Cider Vinegar
~ 5g Instant dry yeast
~ 330g High Protein Flour
~ 70g Low Protein Flour
~ 40g Soft Brown Sugar
~ 40g Castor Sugar
~ 4g Salt
~ 10g Organic Flaxseeds
~ 15g of dried cranberries
~ 15g of golden raisins
~ 20g of corn oil


~ 20g of non dairy margarine / butter


  • In a mixer fitted with a dough hook, combine flour, instant yeast, sugar and corn oil into a mixing bowl.
  • Gradually add in lukewarm soy milk to form into a slightly sticky soft dough. Add in apple cider vinegar, salt and continue to knead until smooth and elastic (about 10 minutes). I prefer to use vinegar and reduce usage of yeast as I don't really fancy the yeasty smell or after taste of the bread.
  • Add in non dairy margarine / butter and continue to knead until fully incorporated.  Lastly, add in organic seeds, cranberries and raisins and continue kneading until the dough is smooth and shiny. It should be able to stretched to form a thin membrane before it breaks.
  • Remove dough from the mixer and place it in a greased stainless steel bowl. Cover with a cling film and leave in a warm place until the dough doubled in size. [To test if the dough has risen properly, dip a finger into bread flour and poke into the centre of the dough. When you pull your finger out, the hole should remain. If the dough springs back, then it should be proved further.]
  • Punch down the dough to knock the air out. Rest for 10 min
  • Divide and cut the dough into 8 portions and roll into smaller balls. 
  • Place the buns onto a greased baking tray. Sprinkle a thin layer of water over the buns and leave them to proof (i kept mine in the oven)  until the buns nearly doubled in sizes.
  • Preheat oven to 170C degrees for 10 mins.
  • Lightly brush the top of the buns with non dairy soya milk.
  • Bake the buns at 170C degrees (lower / 2nd lowest rack) or 160C degrees (middle rack) of the oven for 12 mins. Reduce the heat by another 10C degrees and continue baking for another 5-8 mins until golden brown. 
  • Remove from oven and immediately brush a thin layer of olive oil over the top of the buns. This process helps to retain the moisture of the bread and keeping it soft.
  • You may store the unfinished buns in the freezer for later consumption.

Tri Colour Ogura Cupcake 三色相思蛋糕


三色相思蛋糕
Tri Colour Ogura Cupcake 


Last week I came across this recipe from Sze Min's Blog which pique my interest so I went about trying it out the following day.


The process preparation process is almost similar to that of making chiffon cake. The cake turned out with the same texture and fluffiness of chiffon, or maybe finer I reckon. It is a relatively easy to make cake and I have adapted it to cupcakes version to lessen the baking time. Generally I prefer to bake the cake with smaller muffin / cupcake moulds since I don't fancy doing the preparation and lining of the typical cake mould. The added plus point of making it into cupcake version helps to save baking time and the trouble of slicing the cake later (lazy me!). 


Ingredients (A)

50g Corn Oil
1/8 tsp Salt
60g Milk
5 Grade A Egg Yolks
1 Grade A Egg
70g Cake Flour


  • Pour 2-1/2 cups water into baking tray and place baking rack on / over the tray and preheat oven at 160C degrees.
  • Combine corn oil, milk, salt, egg yolks and egg into a mixing bowl and beat until frothy.
  • Sift in cake flour and mix well. Set aside.


Ingredients (B)

5 Egg Whites (Grade A)
70g Castor Sugar
1 tsp Lemon Juice 

  • Using a handheld or stand mixer, beat the egg whites, lemon juice and castor sugar until soft peak is formed. 
  • Fold in half of meringue (B) mixture into the egg yolk mixture (A) until well mixed. Fold in the balance of the egg white meringue (B) into the mixture until fully blended.

Ingredients (C)

1 Tbsp Espresso / Any instant coffee powder (Mix with 1-2 Tbsp hot water and set aside)

1-2 Drops of Pandan Extract (I use the store bought ones with rich color)

  • Divide the cake batter into 3 equal portions. 1st portion to be left as it is. 2nd portion to be mixed with Pandan extract and the last portion to be mixed with 10ml of the coffee mixture.
  • Pour the batter alternately by different color into the cupcake mould. Place the mould directly onto of the baking rack.
  • Steam bake at 160C degrees for 25 mins (depending on the size of the cupcake mould).
  • Invert the cupcake after baking and let cool before serving. 


Printfriendly

Related Posts Plugin for WordPress, Blogger...