Tuesday, March 8, 2016

素芋缽 Vegetarian Yam Ring

After years of procrastination, I finally got to make my first yam ring. My method may seem adhoc and differ from others but most importantly it is the outcome that counts. Through this attempt, I managed to overcome the fear of trying.

经过多年的拖延,我终于亲自下手制做出第一个芋缽 。虽然,我所采用的方法较为随性而且与其他人的做法有所不同,但是对我来说的还是成果为先。从这次的尝试中我学会克服了不敢尝试新领域的恐惧。

Among the 3 portions of yam rings, I tried frying one portion with electrical air fryer while the other 2 portions using conventional deep frying method. Although the one using air fryer method is healthy and firm, still it couldn't beat the crisp texture of the deep fried ones.
在三份面团中,我尝试取出一份采用空气炸锅来炸熟,其余的两份就使用油炸方式。最后相比之下那份采用空气炸锅虽然健康及芋肉结实,但是还是不如油炸的香脆可口。


素芋缽
Vegetarian Yam Ring

Ingredients 材料

(For Yam Ring 芋缽)
600g Yam 芋头
10 Tbsp Wheat Starch 小麦淀粉
10 Tbsp Boiling Water 滚水
1 Tsp Salt 盐
2 Tbsp Vegetable Shortening 素植物酥油
2 Tbsp Sugar 糖
1/2 Tsp Pepper 胡椒粉
1/2 Tsp Five Spice Powder 五香粉
Cooking Oil for Deep Frying 食油


(Fillings 内陷)
1 pc Carrot 红萝卜
5 pcs Water Chestnut 马蹄
3 stems Baby Sweet Corn 玉米心
8 pcs Chinese Mushrooms 香菇
1 pc Capsicum 辣椒 (any color 任何颜色即可)
80g Vegetarian Chicken Meat 素鸡肉

1/2 Tbsp Sesame Oil麻油
1 Tbsp Cooking Oil 食油
1 Tsp Sugar 糖
1 Tbsp Vegetarian Oyster Sauce 素蚝油
Some Pepper 胡椒粉少许
1 Tbsp Light Soy Sauce 酱清


Method 做法

Peel yam and cut into small cubes. Steam over high heat for 20 mins until soft. While the yam hot, immediately mash it into puree form.
芋头去皮切丁,以大火蒸熟至软即可。趁热捣成蓉。

In a mixing bowl, combine boiling water with wheat starch and stir well. Add in the rest of the yam ring ingredients and mix thoroughly to form a dough paste. Wrap and refrigerate the dough for minimum 2 hours or more.
把滚水和小麦淀粉混入盆,搅匀后便将蒸热的芋蓉及其余的芋缽料依序的拌入,搓均匀成团。再包好后送入冰箱冷藏2个小时以便整形。


Divide the yam paste into 3 portions. Wrap each portion around a heatproof metal bowl to form a bowl shape.
把面团分成3等份, 然后将各份的面团紧进地环绕着一个耐热或铁碗,以形成一个碗形。

Immersed the entire bowl into the a deep fryer filled with enough amount of heated cooking oil to evenly fry the entire yam bowl. Deep under medium low temperature to evenly cook the yam without the the surface turning overly browned. The yam ring will slowly detached from the metal bowl when its sufficiently cook.
将整个芋缽和铁碗一起沉浸入盛有足够及已烧热的食油的炸锅内,以中小火均匀地把芋缽肉炸熟既又能保持表面金黄的而不过于焦黄即可。炸熟的芋缽将会逐渐从铁碗底部脱离。

Remove and set aside.
离火后搁置待用。


Dice all filling ingredients.  Boil carrot and sweet corn in boiling water for 8-10 mins to soften.
把全部馅料切丁。红萝卜和玉米心倒入另一个煮锅以滚水煮8至10分钟至熟软。

Heat up sesame and cooking oil in wok and stir fry the ingredients until aromatic. Stir in vegetarian oyster sauce, soy sauce, sugar and pepper to taste.
将麻油,食油倒入炒锅烧热。爆炒所有的馅料。加入盐,糖,素蚝油,胡椒粉及酱清调味。


Thicken the mixture with cornstarch water.
最后加入少许玉米淀粉水增加浓度即可。

Transfer fillings into the prepared yam bowls. 
把炒好的馅料倒入芋缽内即可。


Note 参考事项:

If you are keen to try out the air fryer version, here is what I did.
Preheat air fryer at 160C degrees. Spray a coat of cooking over the yam dough and transfer it into the air fryer and cook for 15-20 mins until cooked. Set aside.
您若想尝试采用空气炸锅来制做的话,可以跟随我的做法。
把空气炸锅预热至160C度。在芋缽的表面涂抹一层食油后送入空气炸锅以15至20分钟至炸熟为止。搁置待用。


Yam crust cooked with air fryer.


Do link back to Coco Sweet Tooth if you have used any information as published in this blog. 


Monday, February 29, 2016

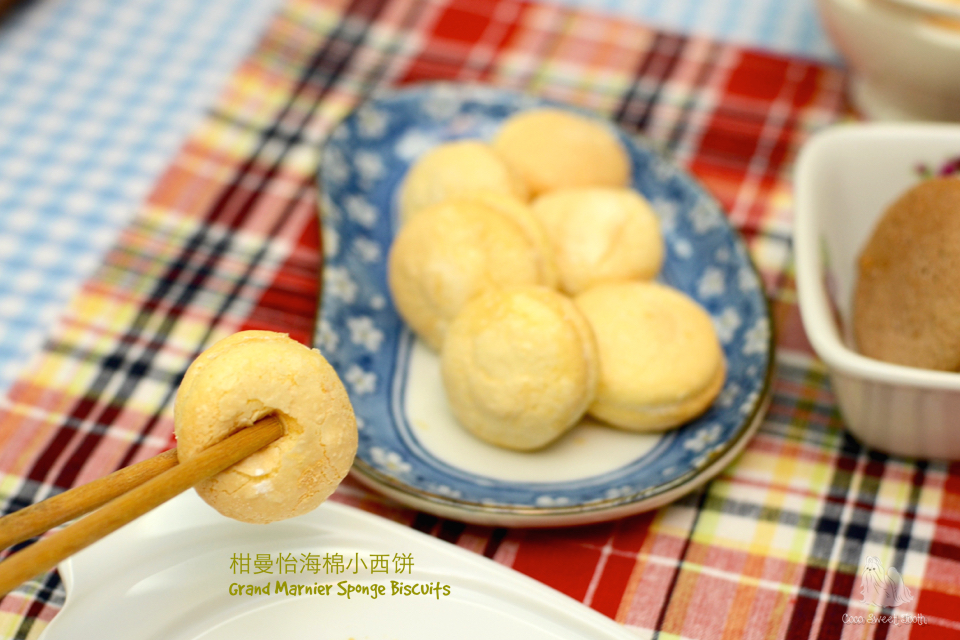
柑曼怡海棉小西饼 Grand Marnier Sponge Biscuits


Grand Marnier is actually a orange flavored cognac liquer that originates from France in 1880. I only started using this liquor into some of my baking projects after experimenting one of dailydelicious recipes 2 years ago. Because of that, I purposely bought a bottle of that cognac hoping to introduce into more of my works. Still, a whole bottle of it is too much since my husband and I stopped drinking completely for many years.

柑曼怡也是在1880年原自法国的一种香橙味的科涅克白兰地。我是于两年前从dailydelicious的博客食谱学习采用于数些烘培上。就因此我还的别购买了一大瓶装的柑曼怡酒,为了希望可以多试验更多的食谱。此外我和先生都戒酒多年,想要快点用完这一瓶柑曼怡酒却是有点困难。


This is another lovely recipe from Carol Hu's "First Book of Baking for Beginners" which I have adapted and incorporated the use of the neglected liquor. Despite its being named as biscuits, the soft texture seem more like a soft sponge cake. Anyway, I am very happy with this recipe and very excited to share this with you. Hope you enjoy making it as much as I did.
今天这道取自湖涓涓的‘烘焙新手必备的第一本书’正好可以用上那瓶被冷落的柑曼怡酒。虽然名字上是西饼,制做出来倒是威风蛋糕松软的效果。总结上我很满意这道食谱,非常兴奋地与您分享。希望您也能如我一样享受地享受制做这道小西饼。

柑曼怡海棉小西饼 
Grand Marnier Sponge Biscuits

Ingredients 材料
(A)
2 Egg Yolks 蛋黄
10g Castor Sugar 细糖
20g Corn Oil 玉米油
20ml Milk 鲜奶
2 Tsp Grand Marnier 柑曼怡酒
40g Cake Flour 蛋糕粉

(B)
2 Egg Whites 蛋白
1 Tsp Lemon Juice 柠檬汁
30g Castor Sugar 细糖

(C)
Icing Sugar 糖粉

(D)
90g Unsalted Butter 无盐牛油
50g Icing Sugar 糖粉
1-1/2 Tsp Grand Marnier 柑曼怡酒


Method 做法

Prepare and measure all ingredients accordingly. Use cold eggs from the fridge.
所有材料量秤好,鸡蛋使用冰的。

Line baking trap with parchment paper or silicon baking mat.
烤盘上铺上烘焙纸或者烤盘垫

Preheat oven to 170C degrees.
烤箱预热170度。

Combine egg yolks and castor sugar into a mixing bowl and mix with a hand whisk till even.
将蛋黄加幼砂糖用打蛋器搅拌均匀。

Add corn oil and combine.
然后将玉米油加入搅拌均匀。

Add in sifted flour, milk and grand marnier liquor in two batches, whisk till smooth and incorporated. Set aside.
把过沥的粉料, 牛奶和柑曼怡酒精分两次交错混入,搅拌均匀成无粉粒的面糊。搁置待用。


In a dry and grease free mixing bowl, whisk the egg whites (B) until frothy. Add lemon juice and continue whisking until the meringue thicken and increase in volume before adding in castor sugar. Increase the mixer to higher speed and continue whisking until firm peaks form. 
把材料B的蛋白倒入另一个搅拌盆里,用搅拌机将蛋白(B)打至粗泡状。将柠檬汁倒入继续搅打至体积变大后再把幼糖加入,以快速把蛋白打成尾端稍微弯曲的蛋白霜即可。

Transfer the egg yolk batter (A) into the beaten egg whites, use a rubber spatula to combine.
将拌匀的面糊A倒入蛋白霜内混合,以橡皮刮刀由下而上翻转的方式混均匀。


Transfer batter into a piping bag inserted with a 1cm round nozzle.
混合完成的面糊装入挤花袋中,使用1cm圆嘴挤花嘴。

Pipe and arrange a 2.5cm diameter ball onto the baking tray.
在烤盘上间隔挤上直径2.5cm圆形面糊.

When completed, dip a finger with water then smoothen the surface of the batter.
将面糊全部挤完后,手指沾水把面糊表面抹平。


Sift a layer of icing sugar (C) over the biscuits batter.
在挤完的面糊表面筛上一层糖粉(C)以免表面沾粘。

Transfer baking tray into the middle rack of a preheated oven and bake at 170C degrees for 12-14 min until the surface has browned.
送入已预热至170C度的烤箱中层烘烤12-14分钟至表面呈现黄色即可。

To prepare the sponge biscuits fillings (D), cut butter to cubes and allow to soften to room temperature. In a mixing bowl, cream the butter until pale and fluffy. Add icing sugar to combine and lastly stir in Grand Marnier until even. 
奶油馅料D做法是先将无盐奶油切小块温室回温,用打蛋器打散成乳霜状。接着加入糖粉混合后再加入柑曼怡酒精混匀即可。

Allow the sponge biscuits to cool completely before applying the butter cream fillings.
出炉完全放凉后,再将奶油馅料抹在两片饼中间后夹起来即可。


Notes:

I mix 1/2 the balance of the cake batter with 1 Tbsp of Cocoa Powder. If you would also like to make the chocolate version, you may incorporate the cocoa powder as well.
我在剩余的蛋糕糊内加入1大汤匙的可可粉来做两种不同口味的西饼。你也可以将做好的蛋糕面糊分成两份,一份加入可可粉而另一份保持原为。


Do link back to Coco Sweet Tooth if you have used any information as published in this blog. 


Sunday, February 28, 2016

咖喱鸡 Curry Chicken


During my childhood days,  eating home cooked curry chicken was not as available as today. My mom would have to prepare and cook the curry paste from scratch. The time consuming process of stir frying the curry paste until thoroughly cooked and the oil separates from the paste simply discouraged me to cook this dish.
记得我童年的时候,要吃家里制做的咖喱鸡并不如现今般容易。我母亲得从制做咖喱酱料做起,完成了酱料后才能正式进入煮咖喱鸡的步骤。就因为制做过程及拌炒咖喱酱至油脂分离及酱料熟透有点花时间,我后来都一直没有下手尝试做。

And now 30 years later when store bought curry paste are easily available, the idea of making this dish seems more inviting. Whenever I go back Malaysia, I would buy from various brands of curry paste to stock up in Indonesia.
而现今30年后倒出都能买到现成的咖喱酱料,我就不再排斥煮咖喱的念头。每当我回马来西亚时都会购买许多不同的现成咖喱酱料带回印尼。

Today I am making this curry paste from scratch so as I can adjust to the preferred taste accordingly.
今天我制做的这道咖喱鸡食谱是完全从零做起,尤其是咖喱酱料方面,可以调出自己喜欢的味道。


咖喱鸡
Curry Chicken

Ingredients 材料

(A)
850g Chicken 鸡肉块
1 Tbsp Curry Powder 咖喱粉
1-2 Tbsp Light Soy Sauce 酱清

(B)
8 Dried Chillis 红辣椒干
3-4 Fresh Red Chillis 红辣椒
6 Shallots 青葱
6 Garlic 蒜
4 cm Ginger 姜
1 cm Galangal 南疆
2 cm Tumeric 黄姜
2 Onions 洋葱
5 Tbsp Curry Powder 咖喱粉
300ml Water 清水 (Soak dry chili 泡浸红辣椒干)


(C)
4 Potatoes 马铃薯 (cut into chunks 切块)
1-2 Cups Cooking Oil for frying 食油

(D)
8-12 Tbsp Cooking Oil 食油
1-2 Tsp Chili Powder 红辣椒粉
2 Stalks Lemon Grass 香茅
Some Curry Leaves 咖喱叶少许
200ml Coconut Cream 浓椰浆
600ml Water 清水
600-800ml Water 清水
3 Tsp Salt 盐
2 Tsp Sugar 糖


Method 做法

Chicken chopped to bit size. Season with curry powder and light soy sauce till even. Set aside for an hour.
鸡肉切块后加入其余材料A里的咖喱粉和酱清,混匀。搁置一小时。

Soak dry chills in 300ml of water till soften. Drain and reserve the water for blending. Deseed the chilis and cut to thick chunks.
材料B的红辣椒干泡浸300ml清水至软。取出辣椒干保存着泡浸辣椒的清水。将辣椒去掉种子,切块。


Cut onions to smaller size and set aside.
洋葱切块搁置。

Transfer all ingredients (B) into food processor and evenly process into paste form. Add more water if the paste is too dry. Set aside.
将材料B全部倒入搅拌机,搅拌成糊状。若水不够可以添加少许以便容易拌匀。

Heat up oil (ingredients C) in a deep fryer and deep fry the potatoes under medium heat for 2 mins. Remove potatoes from fryer and set aside.
把材料C的食油烧热后,倒入马铃薯块以中火炸2分钟后取出,搁置待用。


Add 8 Tbsp of the cooking oil from frying the potatoes into a frying wok and heat up. Stir in the curry paste and continue to sauté the curry paste until it sizzles and aromatic. Stir in red chili powder, lemongrass and curry leaves into the mixture and continue stirring non stop for at least 10mins to avoid the paste from sticking onto the wok base and getting burnt.
取出8汤匙之前用于炸马铃薯的食油,放入炒锅烧热。加入搅拌好的咖喱酱料不断的拌炒至表面起泡泡及出味。序录的拌入辣椒粉,香茅和咖喱叶继续不停的拌炒至少10分钟,留意以免酱料沾锅底不然会烧焦。


Adjust the heat to medium low when the paste dries up too soon.  Add another few more tablespoons of oil to help the curry paste to cook evenly. Continue stir frying for another 5-10 mins or more until the oil starts to appear on the surface.
这是若酱料有速干的迹象,调低火候,拌入多几汤匙的食油来帮助咖喱酱料煮熟。继续不停的拌炒5-10分钟一直到表面呈现一层油脂即可。

Toss in the seasoned chicken and stir fry for another 5 mins to evenly coat the chicken pieces with the paste.
这是便可以加入鸡肉块拌炒5分钟把酱料均匀混入。

Add 600ml water, salt and sugar and allow the curry to simmer for 5 minutes before adding in potatoes. Stir to combine and continue to simmer the curry under medium low heat for another 10 mins.
倒入600ml 清水,盐和糖拌匀后再焖煮5分钟才加马铃薯块。搅匀油在继续以中火焖煮10分钟。


Combine coconut cream with 600ml water till mixed. Pour coconut mixture into the curry and allow to simmer another 5-10 mins.
将浓椰浆和600ml的清水一起混入碗中,混匀。倒入咖喱锅里拌匀,继续焖煮5-10分钟。

Add more water and salt if needed.
间中可以另加多水份及盐调味。

Serve with rice or bread.
拿来配饭或面包都很好吃。


Do link back to Coco Sweet Tooth if you have used any information as published in this blog. 


Saturday, February 27, 2016

咖啡戚风香酒卷 Coffee Liquer Swiss Roll.........Soft and Yummy!


For several days, I was itching to make a roll cake but was too occupied to do so. Finally, I mustered the determination to run through my collections of recipe books and settled for this easy and yet delicious swiss roll recipe from Carol Hu's "First Book of Baking for Beginners".


前几天我一直有着想制做蛋糕卷的冲动但因太忙而没下手。后来,自己硬着头皮立下非做的意愿才去收集的食谱书籍里找出这道简易又富酒香的美味蛋糕食谱取自湖涓涓的‘烘焙新手必备的第一本书’。

If you are a coffee person then this is just what you might want to try making. I have made some modifications from the original recipe to cater to my husband's tastebuds.

你若也是咖啡爱好者的话可以尝试制做看看。我在这道蛋糕食谱里做了少许修改来配合丈夫口味上的要求。


咖啡戚风香酒卷
Coffee Liquer Swiss Roll


Ingredients 材料

(A)
4 Egg Yolks 蛋黄
30g Castor Sugar 幼糖
32g Corn Oil 玉米油
40g Milk 牛奶
2 Tbsp Instant Coffee 即溶咖啡粉
56g Cake Flour 低筋面粉
25g Rice Flour 在来米粉

(B)
4 Egg Whites 蛋清
1 Tsp Lemon Juice 柠檬汁
50g Castor Sugar 幼糖

(C)
200ml Fresh Whipping Cream 动物性鲜奶油
30g Castor Sugar 幼糖
1 Tsp Kahlua Liquor 卡鲁哇咖啡酒


Method 做法


Prepare and measure all ingredients accordingly. Use cold eggs from the fridge.

所有材料量秤好,鸡蛋使用冰的。

Combine cake and rice flour evenly. Sift and set aside.
低筋面粉和在来米粉用沥网过筛。搁置待用。

Microwave the milk for a minute. Stir in instant coffee granules until dissolved. Set aside to cool. 
牛奶放入微波炉加热1分钟,将即溶咖啡粉加入混合,待凉备用。


Line and grease the baking tray with parchment paper. As I was using a 37cmx27cm heat proof silicone roulade baking sheet, I skip the lining part.
烤盘铺上已抹油的烘焙纸。我采用了的是的瑞士卷垫烤盤, 卷垫低也涂上油脂。


Preheat oven at 170C degrees

烤箱预热170度。


Combine egg yolks and castor sugar into a mixing bowl and mix with a hand whisk till even.
将蛋黄加幼砂糖用打蛋器搅拌均匀。

Add corn oil and combine.
然后将玉米油加入搅拌均匀。

Add in sifted flours and coffee mixture in two batches, whisk till smooth and incorporated.
把过沥的粉料,咖啡牛奶分两次交错混入,搅拌均匀成无粉粒的面糊。


In a dry and grease free mixing bowl, whisk the egg whites (B) until frothy. Add lemon juice and 1/2 of the castor sugar and continue whisking until the meringue thicken and increase in volume before adding in the balance castor sugar. Increase the mixer to higher speed and continue whisking until firm peaks and when the meringue does not drop out when the bowl is flipped upside down. This is crucial step to prevent the cake from breaking during rolling.
把材料B的蛋白倒入另一个搅拌盆里,用搅拌机将蛋白(B)打至粗泡状。将柠檬汁及一半的幼糖倒入继续搅打至体积变大后再把剩余的幼糖加入,以快速把蛋白打至发泡而蛋白会固定于容器内,倒扣时也不会流动即可,否则在卷蛋糕的时候容易破裂。

Slowly whisk in 1/3 of the beaten egg whites to incorporate into the egg yolk batter (A). Gently fold in the balance beaten egg whites with rubber spatula to combine.
取出1/3份量的蛋白霜混入蛋黄面糊中搅匀,用打蛋器轻轻地稍微拌合。接着才加入其余的蛋白霜,改用橡皮刮刀轻轻的从容器底部刮起拌匀。


Gently transfer the cake batter into a greased heat proof silicone roulade baking sheet. Level the surface, tap the baking sheet on the countertop to release trapped air pockets. Transfer the baking sheet into the middle rack of a preheated oven and bake at 170C degrees for 12-15 mins until the surface has browned and cake springs back when press.
把蛋糕糊轻轻的倒入已抹油的瑞士卷垫烤盤, 用小刮板将表面抹平。烤盘在桌面上轻敲几下震出气泡后送入预热的烤箱中层以170度烘烤15分钟左右或至到表面呈金黄色,触感有弹性即可。

Invert the cake onto a damp kitchen towel and remove the baking sheet. Immediately roll up the cake with the kitchen towel before placing it to cool on a cooling rack.
蛋糕出炉后,马上倒扣摆上一块湿台布,把蛋糕卷垫拿开趁热用台布把蛋糕卷起来摆在铁架上散热。

The colder the whipping cream the easier it is to whip. Whip the whipping cream in a chilled mixing bowl with electrical mixer from medium to high speed until fluffy. Whisk in sifted icing sugar and vanilla extract and continue whisking till stiff peaks.
这是候把材料C的动物性鲜奶油放入已冷却的容器内,用搅拌机由慢而快的速度搅打至变浓稠时加入幼糖,卡鲁哇咖啡酒继续搅打。直到打发至体积变大而不会流动的状态即可。


Unroll the cooled cake, spread a layer of the kahlua cream over the cake top.
将已冷却的蛋糕卷打开,把打发的卡鲁哇咖啡酒鲜奶油涂抹上蛋糕表面。

Place a rolling pin underneath the parchment paper the cake is sitting on. With both hands and the rolling pin to push the cake forward to roll up the cake. 
将擀面棍放在蛋糕纸下方,以双手借助擀面棍紧密的卷起蛋糕。

Once the cake is rolled up, twist the two sides of the parchment paper and refrigerate the wrapped cake for 1 hour to set.
卷完后用蛋糕纸包住蛋糕体,两端稍微扭紧,冷藏1小时待蛋糕卷定型。

Remove parchment paper, trim both ends and slice to serve.
去掉蛋糕纸,切去两头就可享用。


Do link back to Coco Sweet Tooth if you have used any information as published in this blog. 


Wednesday, February 24, 2016

素梅菜瘦肉羹 Vegetarian Braised Mui Choy With Peanuts


Mui Choy is a type of pickled chinese mustard or known as preserved vegetables which is widely used in chinese cooking and also one of my preferred dish that goes well with both rice or porridge. I have adapted this recipe to a vegetarian version so that I also get to eat them.


梅菜干其实是一种采用盐腌后风干制成的菜干,是常使用于中式料理上,同时也是我爱吃的菜肴之一。梅菜焖花生瘦肉无论配饭或粥都非常好吃。如今我已成了素食主义者所以今天在此与您所分享的梅菜扣肉食谱也是修改成一口即又是素食版的。


素梅菜瘦肉羹
Vegetarian Braised Mui Choy With Peanuts


Ingredients 材料

(A)
170g Sweet Mui Choy 甜梅菜
150g Salty Mui Choy 咸梅菜
120g Peanuts 花生米
200g Vegetarian Meat 素肉(菇制的)
6 pcs Chinese Mushrooms 花菇
8g Ginger 生姜 (cut into strips 切成幼条)


(B)
3 Tbsp Cooking Oil 食油
2 Tbsp Sesame Oil 麻油
2-3 Tbsp Vegetarian Oyster Sauce 素蚝油
1 Tsp Sugar 糖
900-1300ml Water 清水

Method 做法


Soak peanuts overnight. Drain.
花生米泡浸隔夜。洗净沥干。


Boil peanuts with sufficient water until softened. Drain and set aside.
花生米倒入小锅盛满足够的清水焖煮至软化。沥干搁置待用。


Combine both Mui Choy into a basin and wash thoroughly. Soak for 2-3 hours and drain. Cut thinly.
把甜和咸梅菜一起装入盆彻底的洗净。泡浸2-3小时后将水倒掉。切丝。


Soak chinese mushrooms until soften. Dice and set aside.
花菇泡浸至软化。切丁搁置待用。


Wash vegetarian meat thoroughly to rid of oil. Slice into thin strips.
将素肉彻底的洗净及去除油迹。切成幼条搁置。


Heat up frying pan (no need cooking) . Stir in Mui Choy and stir fry until slightly dry and aromatic. Remove and set aside.
炒锅烧热 (无须放油) ,搅入梅菜干再继续拌炒至梅菜香味出来即可取出离锅。


Add cooking oil and ginger into the frying pan. Saute until aromatic before adding in vegetarian meat. Stir in diced mushrooms. Continue tossing and stir frying the ingredients for several mins then add in the mui choy and boiled peanuts and stir till even. Continue to stir fry until evenly combined. 
炒锅里倒入食油烧热,加入生姜爆香。拌入素肉翻炒一下后加入香菇丁继续拌炒数分钟才加入梅菜和花生米,炒匀。


Add sesame oil, vegetarian oyster sauce and sugar. Stir to combine. Lastly pour in 9ooml water and allow the mixture to simmer under medium low heat for 10 mins.
加入麻油,素蚝油及糖拌炒混合。最后倒入900毫升清水,以中小火焖煮10分钟。


Transfer everything into a claypot and allow the mui choy to simmer for 1-2 hours until the ingredients soften.
将所有材料转入另一个砂锅,以小火慢慢焖煮梅菜1-2小时至软化和熟透。


While simmering, you may add the balance water whenever necessary.
中途焖煮时,您可倒入其余的清水若锅里的水份过于减少。


Do link back to Coco Sweet Tooth if you have used any information as published in this blog. 


Printfriendly

Related Posts Plugin for WordPress, Blogger...