Saturday, April 2, 2016

蛋白班兰蛋糕卷 Egg Whites Pandan Swiss Roll


I was left with a tub of egg whites from the recent making of Indonesia lapis layered cakes 2 weeks ago. Hence I searched from the net for recipes to ease up the leftover egg whites and I came across a white cake recipe from Ann Low's blog which seemed easy and yummy.
前两个星期我因制做了两道印尼千层蛋糕而剩下一大罐的蛋清。为了用掉那些蛋清,我便在网络上寻找能帮助运用蛋清的烘培食谱,最后便于Ann Low's 的博客里看上了一道即简易而又美味的蛋白蛋糕卷的食谱。


To enhance the taste and outlook of the roll cake, I have made some adaptations to arrive at my duo flavor version.
我在原著的食谱里做了少许修改来制做这道双味蛋糕卷的版本。

Thank you Ann Low for this inspiring cake recipe. 
非常感谢Ann Low食谱给予的灵感。


蛋白班兰蛋糕卷
Egg Whites Pandan Swiss Roll


Ingredients 材料

(A)
3 Tbsp Corn Oil 玉米油
60g UHT Fresh Milk 鲜奶

20g Caster Sugar 细糖
1/4 Tsp Salt 盐
40g Plain Flour 中筋面粉
10g Rice Flour 粘米粉
1/2 Tsp Vanilla Powder 香草粉

(B)
2 Tbsp Corn Oil 玉米油
40g UHT Fresh Milk 鲜奶

15g Caster Sugar 细糖
29g Plain Flour 中筋面粉
7g Rice Flour 粘米粉
1 Tbsp Pandan Extract 班兰精

(C)
282g Egg Whites 蛋白
60g Caster Sugar 细糖

(D)
130g Pandan Kaya Jam 班兰加央

Directions 做法


Combine plain flour, rice flour and vanilla powder of (A) evenly. Sift and set aside. 
材料A里的中筋面粉,粘米和香草粉一起加入碗用沥网过筛。搁置待用。


Repeat the same process for the flour ingredients from (B). Set aside.
也把材料B的粉料如上的做法然后搁置待用。


Line and grease a 38x17cm baking tray with parchment paper. 
在38x17cm的烤盘铺上烘焙纸,纸上涂抹少许油脂。


Preheat oven at 160C degrees
烤箱预热160度。


In a mixing bowl, add corn oil, milk, salt and sugar (of A) together and mix evenly. Sift in sifted flour mixture (A) and use a hand whisk to combine. Set aside.
把材料A的玉米油,鲜奶,盐 和糖一起倒入碗,搅匀。再把之前过沥好的粉料A沥入,用打蛋器捣匀。搁置待用。


In another mixing bowl, combine corn oil, pandan extract, milk and sugar (of B) together until mixed. Sift in sifted flour mixture (B) and use a hand whisk to combine. Set aside.
在另一个搅拌碗中,把材料B的玉米油,鲜奶,班兰精和糖一起倒入碗,搅匀。再把之前过沥好的粉料B沥入,用打蛋器捣匀。搁置待用。


In a dry and grease free mixing bowl, whisk the cold egg whites (C) until frothy. Add 1/2 of the castor sugar and continue whisking until the meringue thicken and increase in volume before sifting in the balance castor sugar. Increase the mixer to higher speed and continue whisking until firm peaks and when the meringue does not drop out when the bowl is flipped upside down. This is crucial step to prevent the cake from breaking during rolling.
把材料C的冷藏蛋白倒入另一个搅拌盆里,用搅拌机将蛋白(C)打至粗泡状。将一半的幼糖倒入继续搅打至体积变大后再把剩余的幼糖沥入,以快速把蛋白打至发泡而蛋白会固定于容器内,倒扣时也不会流动即可,否则在卷蛋糕的时候容易破裂。 


Divide the meringue into 2 portions of 136g and 205g respectively.
将打发的蛋白霜分成两份量。一份为136克而另一份为205克。


From the 1st portion of 136g , add 1/3 of the beaten egg whites into the pandan cake batter (B) and fold to incorporate. Continue to fold in the balance beaten egg whites with rubber spatula until evenly combined. Set aside. 
从136克的第一份蛋白霜里,取出1/3份量的蛋白霜拌入班兰面糊B中用橡皮刮刀拌合。接着才加入其余的蛋白霜,轻轻的从容器底部刮起拌匀。搁置待用。


From the 2nd portion of 205g , add 1/3 of the beaten egg whites into the vanilla cake batter (A) and fold to incorporate. Continue to fold in the balance beaten egg whites with rubber spatula until evenly combined. 
从205克的第二份蛋白霜里,取出1/3份量的蛋白霜拌入香草面糊A中用橡皮刮刀拌合。接着才加入其余的蛋白霜,轻轻的从容器底部刮起拌匀。


Pour the 2 cake batters alternately into the prepared baking tray. Level the surface, tap the baking tray on the countertop to release trapped air pockets. Transfer the baking tray into the middle rack of a preheated oven and bake at 160C degrees for 15-16 mins until the surface has browned and cake springs back when press. 
把两种蛋糕糊交替地倒入烤盘。 用小刮板将表面抹平。烤盘在桌面上轻敲几下震出气泡后送入预热的烤箱中层以160度烘烤15-16分钟左右或至到表面呈金黄色,触感有弹性即可。
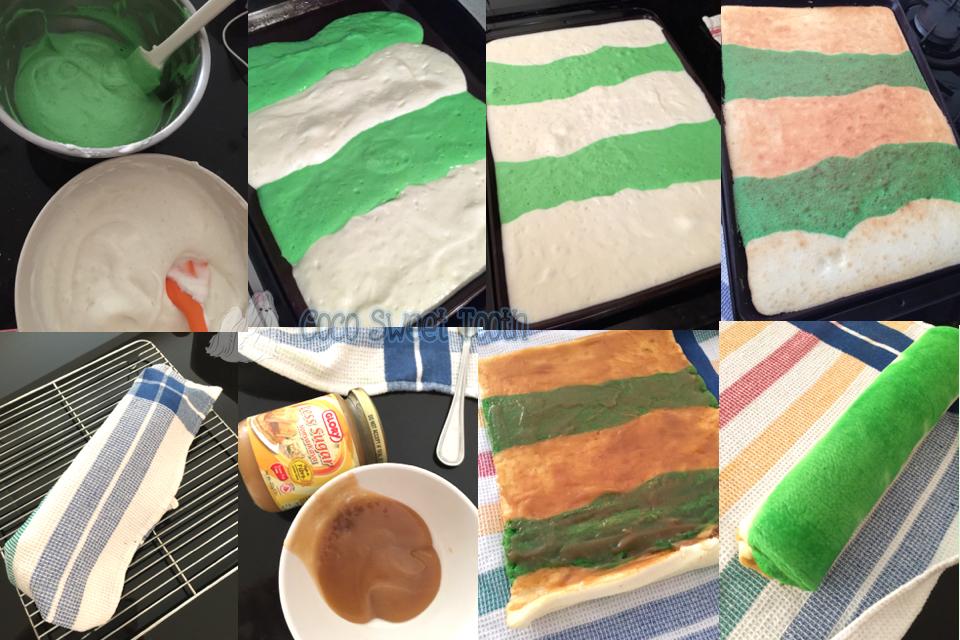

Invert the cake onto a damp kitchen towel and remove the baking tray and parchment paper. Immediately roll up the cake with the kitchen towel before placing it to cool on a cooling rack. 
蛋糕出炉后,马上倒扣摆上一块湿台布,把烘培纸撕开趁热用台布把蛋糕卷起来摆在铁架上散热。 


Heat up pandan kaya jam in microwave for 30 seconds to soften. 
把班兰加央放入微波炉30秒加热软化。


Unroll the cooled cake, spread a layer of the pandan kaya jam over the cake top. 
将已冷却的蛋糕卷打开,把班兰加央涂抹上蛋糕表面。 


Roll up the cake
再次把蛋糕卷起来。 


Once the cake is rolled up, twist the two sides of the kitchen towel / parchment paper and refrigerate the wrapped cake for 1 hour to set. 
卷完后用蛋糕纸包住蛋糕体,两端稍微扭紧,冷藏1小时待蛋糕卷定型。 


Remove parchment paper, trim both ends and slice to serve. 
去掉蛋糕纸,切去两头就可享用。 


Do link back to Coco Sweet Tooth if you have used any information as published in this blog. 


Friday, April 1, 2016

紫地瓜超软面包 Very Soft Sweet Potato Toast


I love making bread more than pastries. Breads are very easy to make once you understand and have successfully gone through the actual process of baking. That shall be the foundation to base on to move on to making many other types of bread.
在烘焙上,我比较爱制做面包。其实,制做面包并不难,您只要明白面包制做的过程和掌握了基础,而且已顺利烘烤出第一道面包,那就能尝试以面包制做原理来做出更多不同的面包。


This is a straight forward method to achieve a soft and fluffy bread without the hassle of preparing tangzhong or starter dough. Do give it a try and I am sure you would be proud of the outcome.
这是一道直接而又不须采用汤种或中种面团制做出来既松软,富有地瓜香的面包食谱。你不妨试试做看,我相信您一定会很满意制做出来的面包结果而感到自豪。

Happy Baking! 
祝您烘焙愉快!


紫地瓜超软面包
Very Soft Sweet Potato Toast


Ingredients 材料

(A)

200g Mashed Purple Sweet Potato 紫地瓜泥

(B)
465g Bread Flour 高筋面粉
15g Milk Powder 奶粉
8g Instant Dried Yeast 速发干酵母
85g Castor Sugar 细糖
1 Large Egg 鸡蛋(大)
20g Egg White 蛋白
195g Milk 牛奶
3g Sea Salt 海盐

(C)
65g Unsalted Butter 无盐牛油


Directions 做法


Combine all ingredients (A) and (B) into the bowl of a stand mixer with dough hook and mix with lower speed until all ingredients are well combined.
将所有材料(A)和 (B)倒入搅拌器的钢盆中以慢速度搅拌搓揉成为一个不粘手的面团.

Add in butter (C) and slowly increase the speed to medium and continue kneading for approx 15-18 mins, until the dough becomes smooth and pass the window pane test.

把切成小块的奶油C加入然后依照片揉面标准程序继续以中速把面团搅拌(大约15-18分钟)成为撑得起薄膜的面团.


Transfer the dough to a slightly greased bowl, cover bowl with either cling wrap or cloth. Allow the dough to proof for an hour or until the dough doubled in size.
将揉好的面团滚圆, 收口朝下捏紧放入涂抹少许油的盆中, 罩上拧干的湿布或保鲜膜, 放置到温暖很密闭的空间进行第一次发酵约60分钟或至少两倍大.

Test the readiness of the dough with a finger lightly dusted with low gluten or cake flour. The dough is ready when it remain indented after the finger pokes into it. If not, continue to proof for another 5-10 mins before using the finger to poke and perform the test.
第一次发酵完成后, 用手指沾上低筋面粉, 然后直接戳入面团中心. 如果戳出的洞陵没有弹回的迹象, 便完成第一次发酵. 如果戳出的洞渐渐回缩, 则再继续发酵5-10分钟, 然后再用同样的方方式测试.


Punch down the dough. Remove the dough from the bowl and place it on a floured worktop. Divide the dough into 6 equal portions and mould it round. Let it rest for another 15 mins.
工作桌上洒上一些高筋面粉. 将发酵好的面团从盆子中移出. 面团表面也洒上一些高筋面粉, 然后将面团用手压下去将气体挤出来. 把面团平均分割成6等份, 然后滚成圆形, 盖上拧干的湿布或保鲜膜再让面团休息15分钟.

Sprinkle the worktop with bread flour, use a rolling pin to roll each dough into long rectangle shape with width to fit the baking pan. Start rolling out from the shorter end of the dough into a roulade. Repeat the process for the balance 5 ps of dough. 
台座上撒些高筋面粉,将休息好的面团用擀面棍把面团擀成长方形,宽度同烤模短向宽,然后由短卷起。再重复同样的做法把其余的五份面团完成。

Place the 3 cylindrical bread dough (seams down) into a greased loaf pan 21cmx11.5cmx6.5cmD. Repeat the same process for the balance 3 bread dough into another greased loaf pan of equivalent size.
将卷好的三份面团收口朝下朝内排入已涂抹不可融化奶油的面包烤模中21x11.5x6.5cmD以免沾粘。再把其余的三份面团排入另一个同等及已涂抹不可融化奶油的面包烤模中。


Spray some water over the surface with a fine mist nozzle. Final proof the bread in a unheated oven for another 50-60 mins.
将烤模放入未开火的烤箱中, 面团表面喷些水然后盖上烤箱门, 再侍发酵50-60分钟至两倍大.

8-10 Mins prior to baking time, remove baking pan from oven and turn on the oven heat to 170C degrees.
发酵好前8-10分钟, 将烤盘从烤箱中取出, 烤箱打开预热刊至170C度.

Apply egg wash over the bread surface.
在面团表面涂上全蛋液。

Bake in the lowest level of a preheated oven at 170C degrees for 38-40 mins.
然后送入已经预热至170C度的烤箱中层烘烤38-40分钟.

Remove bread from oven and turn it out onto cooling rack to cool.
烤好后马上倒扣出来放在铁网架上放凉。


Do link back to Coco Sweet Tooth if you have used any information as published in this blog. 


Thursday, March 31, 2016

全素鳄梨果奶油意大利面 Creamy Vegan Avocado Pasta

Avocados are nutritious fruit with abundant nutrients such as fiber, potassium, Vitamin E, B-vitamins, and folic acid. These fruits does not contain any cholesterol or sodium, and are low in saturated fat. They also act as a "nutrient booster" by enabling the body to absorb more fat-soluble nutrients, such as alpha and beta-carotene and lutein, in foods that are eaten with the fruit.


鳄梨果, 也称名为牛油果,是一种营养含量很高的水果。它的营养成份有纤维,钾,维他命E,B和叶酸等。就因如此,鳄梨果也被吉尼斯世界纪录里评为最有营养的水果。除此以外,这些水果不包含任何胆固醇或钠,它们还充当“养分助推器”能使身体吸收更多脂溶性营养物,例如α-和β-胡萝卜素和叶黄素,在被食用与水果的食品。


Apart from eaten as fruits, avocados is also a good alternative to saturated fat laden recipes. Hence, in place of using double cream for my pasta, I have opted to use blended avocados for my vegan version of creamy pasta.
除了当水果吃,鳄梨果也是采用于含需要脂肪的食谱上。所以,我这道全素的奶油意大利面也是采用鳄梨果来制做奶油酱来取代动物性奶油的需求。


Its truly yummy and healthier than the milk cream version. Yum!
结果制做出来的意大利面不但健康而且还真的好好吃!


全素鳄梨果奶油意大利面
Creamy Avocado Pasta


Ingredients 材料

(A)
250g Penne 通心粉

(B)
110g Cherry Tomato 樱桃番茄, halved 切半
190g Frozen Peas 冷冻豌豆
135g Fresh White Button Mushrooms 鲜蘑菇, sliced 切片
4 Ripe Avocados 熟透的鳄梨果, halved 切半, seeded去种子 and peeled 去皮
350-400ml Water 清水 (blending 搅拌用)

(C)
4 Tbsp Olive Oil 橄榄油
1 Tbsp Sesame Oil 麻油
1 Tbsp Oregano Powder 牛至粉
1-2 Tbsp Basil Powder 紫苏粉
2-3 Tbsp Sea Salt 海盐
2 Tbsp Freshly Squeezed Lemon Juice 鲜柠檬汁
Ground Black Pepper to taste 黑胡椒粉调味

(D)
1.5 Lit Water 清水
1 Tbsp Salt 盐
1 Tbsp Olive Oil 橄榄油

(E)
Some baked almond slice 少许的烘脆的杏仁片


Directions 做法
To make avocado sauce, transfer avocados and 350-400ml of water (B) into the bowl of a food processor and blend into thick paste. Set aside.

先准备鳄梨果奶油酱。把鳄梨果和350-400公升的清水B倒入料理机搅碎成泥状。搁置待用。

Heat up 1.5 liters of water (D) in a pot. Add salt and olive oil and combine (D). 
另外把1.5公升的清水D装入柱国里烧热。加入盐和橄榄油D混匀。


When the water starts to boil, add in penne (A) pasta and cook according to the package instructions. 
当水开始沸腾时,便可倒入通心粉然后依据包装提议的煮法煮熟后即可离火。

Drain and soak the cooked penne into a cold water for 10sec. Drain.
将煮熟的通心粉捞出,转入冷水泡浸10秒后捞起沥干。


Heat up olive and sesame oil (C) into a frying pan. Toss in the remaining ingredients from (B) and stir fry for a minute. Add cooked penne and avocado paste. Stir fry for 30 seconds to combine. Add the remaining seasoning ingredients from (C) and give it a few stir before removing it from heat. 
把材料C里的橄榄油和麻油倒入炒锅烧热。再倒入材料B剩余的材料快速炒拌1分钟。加入通心粉和鳄梨果奶油酱继续翻炒半分钟。最后将剩余的材料C的配料拌入,快速炒匀即可离火。


Garnish with baked almond slices. Serve immediately.
通心粉表面可以撒少许的烘脆的杏仁片。即可品尝。


Do link back to Coco Sweet Tooth if you have used any information as published in this blog. 


Wednesday, March 23, 2016

苏拉巴亚夹心蛋糕 Surabaya Layer Cake


Indonesia is famous for its Lapis Legit (Sweet Layer) cakes, which was originally developed and brought into the country during the Dutch colony. Over the years, the cake has further developed into many variations localized version. Unlike traditional lapis legit cake which is more time consuming to make, Surabaya lapis cake only have 3 cake layers to work on.  
印尼的千层蛋糕一直以来都是很出名。这种蛋糕其实源自于荷兰国,在荷兰统治印尼期间,也带来了荷兰道地和千层蛋糕相似的蛋糕。随着时间的流逝,印尼当地人也把原来的千层蛋糕逐渐启发了许多不同的版本。传统的千层蛋糕因需要制做许多的蛋糕层而比只有三层蛋糕层的苏拉巴亚夹心蛋糕更花时间。


As compared to the traditional lapis leg, this cake yields a softer texture,  as the entire cake base is sponge cake. Whatever the case, both type of cakes are yummy cakes with its own baking methods and characteristics.
跟印度传统千层蛋糕比较的话,这苏拉巴亚夹心蛋糕会来得松软,那是因为这蛋糕的体质偏向海绵蛋糕。总而言之,对我来说这两种蛋糕都有着不同的烘培方法和特征,制做出来的蛋糕都很好吃,

苏拉巴亚夹心蛋糕
Surabaya Layer Cake

Ingredients 材料
(A)
150g Eggs 全蛋
410g Egg Yolks 蛋黄
190g Castor Sugar 幼糖
1-1/2 Tsp Ovelette 乳化剂

(B)

100g Cake Flour 蛋糕粉
23g Milk Powder 奶粉
30g Corn Flour 玉米粉
1 Tsp Vanilla Bean Powder 香草粉

(C)

200g Unsalted Butter 无盐牛油 (melted 溶化)
100g Salted Butter 咸牛油 (melted 溶化)
3 Tsp Condensed Milk 炼奶
(D)
1-1/2 Tbsp Cocoa Powder 可可粉
1-1/2 Tsp Chocolate Emulco 可可膏
3 Tbsp Warm Water 温水

(E)

Strawberry Jam 草莓果酱


Directions 做法


Preheat oven to 180C degrees.
烤箱预热至180C度。

Grease and line 3 pcs of individual 8 inch square baking pan. Set aside.
取三个8寸四方形蛋糕模,抹油后垫上烘焙纸。搁置待用。

Combine together ingredients (B) into a bowl and sift till even. Set aside.
将材料B的粉料一起混合入碗中,混匀搁置。


Combine (D) into a another bowl and stir till dissolved. Set aside.
把材料D混入另一个碗,拌匀后搁置待用。

Heat up all butter into a saucepan with double boiler till dissolved.  Set aside to cool before using.
把牛油一起放入锅放上另一个锅上,隔水烧热至融化。搁置待凉备用。


Transfer ingredients (A) into the bowl of a stand mixer with whisk attachment, beat until thick and fluffy.
材料A放入已安装上打蛋配件的的搅拌碗内,把鸡蛋搅拌至浓稠和松发。

With the mixer on low speed, add in sifted flour mixture (B) and mix well.
加入过沥的粉料B,以慢速拌匀即可。

Add melted butter mixture (C) into the mixer in 3 batches and mix well after each addition. Add in condensed milk to combine.
这是便可分三次加入溶化牛油拌匀,每次加入一次都虚充份打匀才可加入下一份。混入炼奶拌匀。

Divide batter into 3 equal portions. Fold chocolate mixture (D) into one of the portion till incorporated.
将面糊分成3等份,其中一份加入可可液D后以翻拌方式混匀。


Transfer the 3 portions of batters into each separate pans. Use the back of the spoon to level the surface.  Bake the cakes in the preheated oven for 20 mins until cooked.
把面糊分别倒入三个蛋糕模内,再用汤匙的背面抹平蛋糕糊表层。然后送入已预热的烤箱烘烤20分钟至熟透。

Turn out the cake onto a cooling rack and allow to cool completely before assembling.
蛋糕脱模后摆在铁架上待凉后才组合。

To assemble, place one vanilla cake layer onto a cake board.
将一片香草蛋糕层置于蛋糕板上。


Spread the top with strawberry jam. I ran out of this jam hence I used dark apricot jam. 
蛋糕表面上涂抹一层草莓果酱。我当时家里缺草莓果酱而采用了黑杏酱取代。

Place the second cake layer with the the chocolate layer. Spread the top with strawberry jam.
把可可巧克力蛋糕层盖上之前的的香草蛋糕层之上。然后再在可可巧克蛋糕表层次上涂抹草莓果酱。

Cover the last cake layer over the cake.  Lightly use palm to press down the layers.
最后也把第三层的蛋糕盖上。轻轻的用手掌在蛋糕表面上压一压。

Trim the edges and serve.
以齿刀将蛋糕边缘修平后便可品尝了。


Do link back to Coco Sweet Tooth if you have used any information as published in this blog. 

Tuesday, March 22, 2016

有机五谷全蛋吐司 Organic 5 Grains Egg Toast


Love this straight forward and yummy protein rich bread recipe with minimal oil and yet packed with  healthy mixed grains. Highly recommended!
超爱这种简易和富含蛋白质即少油的面包配方。我还在食谱里添加了健康的杂粮使面包更增添香味。强烈推存!


有机五谷全蛋吐司
Organic 5 Grains Egg Toast


Ingredients 材料
400g Bread Flour 面包粉
100g Cake Flour 蛋糕粉
9g Instant Dried Yeast 速发干酵母
90g Castor Sugar 细糖
410g Eggs 鸡蛋
50g Organic 5 Grains Powder 有机五谷粮粉

2 Tbsp Ground Black Sesame 黑芝麻粉
30g Corn Oil 玉米油
1 Tsp Salt 盐


Method 做法

Combine all ingredients into the bowl of a stand mixer with dough hook and mix with lower speed until all ingredients are well combined.
将所有材料(B)和打发的动物性奶油(A) 倒入搅拌器的钢盆中以慢速度搅拌搓揉成为一个不粘手的面团.

Increase the speed to medium and continue kneading for 15-18 mins until the dough becomes smooth and until it pass the window pane test. 
依照片揉面标准程序继续以中速把面团搅拌15-18分钟直到成为撑得起薄膜的面团即可. 


Transfer the dough to a slightly greased bowl, cover bowl with either cling wrap or cloth. Allow the dough to proof for an hour or until the dough doubled in size.
将揉好的面团滚圆, 收口朝下捏紧放入涂抹少许油的盆中, 罩上拧干的湿布或保鲜膜, 放置到温暖很密闭的空间进行第一次发酵约60分钟或至少两倍大.

Test the readiness of the dough with a finger lightly dusted with low gluten or cake flour. The dough is ready when it remain indented after the finger pokes into it. 
第一次发酵完成后, 用手指沾上低筋面粉, 然后直接戳入面团中心. 如果戳出的洞陵没有弹回的迹象, 便完成第一次发酵. 如果戳出的洞渐渐回缩, 则再继续发酵5-10分钟, 然后再用同样的方式测试.

Sprinkle some bread flour on the worktop. Remove the dough from the bowl and punch down the dough. Divide the dough into 8 equal portions and mould it round. Cover with either cling wrap or damp cloth and allow it to rest for another 15 mins before shaping.
工作桌上洒上一些高筋面粉. 将发酵好的面团从盆子中移出. 面团表面也洒上一些高筋面粉, 然后将面团用手压下去将气体挤出来. 把面团平均分割成8等份, 然后滚成圆形盖上拧干的湿布或保鲜膜再让面团静置松弛15分钟.


Mould the 8 doughs into roulades and equally transfer into individual greased 5x9x3.5 inch rectangular bread pan.
将休息好的八份面团整形成長方型然后圈起来,平均地放入已涂抹油的两个面包模具。


Spray some water over the dough with a fine mist nozzle. Final proof the breads in a unheated oven for another 50-60 mins.
将烤盘放入未开火的烤箱中, 面团表面喷些水然后盖上烤箱门, 再侍发酵50-60分钟至两倍大.

8-10 Mins prior to baking time, remove baking pan from oven and turn on the oven heat to 180C degrees.
发酵好前8-10分钟, 将烤盘从烤箱中取出, 烤箱打开预热刊至180C度.

Transfer the bread pans into the lower level of a preheated oven and bake for 35-38 mins. When the top starts to brown in the midst of baking, cover the top with aluminum paper to avoid over browning.
送入已经预热至180C度的烤箱下层烘烤35-38分钟. 烘烤的中途若面包已上色的话,盖一张锡纸在面包上以免过焦。

Remove baking pan from oven and turn it out onto cooling rack to cool.
烤好后马上倒扣出来放在铁网架上放凉。


Notes 留意事项:
In this recipe, the only source of liquid content comes from the big amount of eggs, hence will result in the browning of the bread within 10 mins of baking. Do cover the top with aluminum paper sooner to avoid over browning.
面团液体全部使用蛋液,入炉后10分钟之内就会上色,需及时加盖锡纸。


Do link back to Coco Sweet Tooth if you have used any information as published in this blog. 


Printfriendly

Related Posts Plugin for WordPress, Blogger...