Monday, May 15, 2017

摩摩查查蒸糕 Simple Bubur Cha Cha Cake


The first time when I come across this recipe from Amy Wong's 'Aromas of Kuihs' and I wondered how would it taste like as I have never seen or tasted bubur cha cha in such form other than the creamy dessert we used to have.  To satisfy my curiosity, I decided to also adapt and attempt this steamed kuih since I happened to prepare the same ingredients for Bubur Cha Cha dessert.
当我第一次从黄春梅的‘层层糕粿香’里见到这道食谱的时候早已幻想着它的味道,特别是摩摩查查糖水制成蒸糕根本就从来没见识过。为了满足自己的好奇心便在弄摩摩查查糖水时也顺便一起采用同样的材料加以稍微修改制成。

Once you already have the ingredients prepared, making it is as easy as a breeze.  In general, it taste relatively good.. a cooked and pudding version of the dessert. Something new and usual.
一旦有了现成的材料,制做起来其实一点也不困难。尝试了之后,感觉就如吃着蒸熟布丁版本的摩摩查查糖水,另有一份新的特色。


摩摩查查蒸糕
Simple Bubur Cha Cha Cake


Ingredients 材料

(A)
160g Sugar 砂糖
1/2 Tsp Salt 盐
850ml Water 清水

(B)
180g Rice Flour 粘米粉
40g Corn Flour 玉米粉
100g Tapioca Flour 木薯粉
350ml Coconut Milk 椰浆

(C)
100g Orange Flesh Sweet Potatoes 橙肉番薯 (diced 切丁)
100g Purple Flesh Sweet Potatoes 紫肉番薯 (diced 切丁)
80g Yam 芋头 (diced 切丁)
40g Colored Sago Pearls 颜色沙谷粒
Tapioca Jelly 木薯粉块 (Optional)


Method 做法


Boil sago pearls (C) separately in saucepan with sufficient water till cooked. Drain. Soak in cold water and set aside.
把颜色沙谷粒C配入适量的清水在锅里煮熟,沥干又再泡浸冷水里搁置备用。

Cook (C) sweet potatoes and yam until softened. Set aside.
将材料C里的两种番薯及芋头煮熟,搁置备用。

Combine (A) into a saucepan and boil till sugar dissolves. Remove from heat and set aside.
将材料A一起混入煮锅煮滚把糖融化后离火搁置。


Combine (B) into a mixing bowl and stir to mix. Sieve the mixture.  Add (A) to combine and mix evenly. Divide mixture into three equal portions.
把B一起混入盆里,拌匀后过沥。接着把糖浆A拌入搅匀,在把粉浆分成三等份。

Cook one portion of the mixture under low heat until slightly thickened. Transfer mixture into an 8 inch steaming tray. Sprinkle 1/3 portion of the ingredients (C) over the mixture and steam at medium high heat for 15 mins.
先把第一份粉浆用小火煮至稍微浓稠,置入个8寸蒸盘,撒入1/3份材料C,转入蒸锅以中火蒸15分钟。

Repeat the cooking and preparation for the next portion of the mixture as per the earlier layer. Sprinkle the second portion of (C) onto the layer and steam for 15 mins.
用同样做法重复第二份的粉浆,然后撒上第二层材料C于上,继续以中火蒸15分钟。
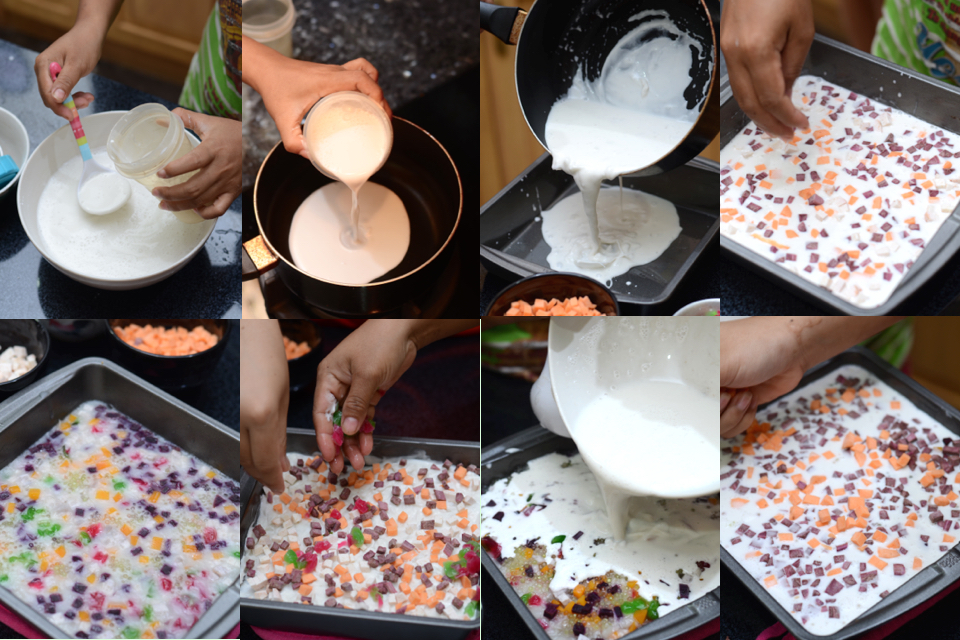

Pour the balance portion of the mixture into the steaming tray. Sprinkle the last portion of (C) on top and steam for 20-25 mins.
最后一份剩余的粉浆勿需放入锅里煮浓稠,就直接置入蒸盘加入蒸熟的第二层蒸糕上,把剩余的材料C撒入,再转入蒸锅蒸20-25分钟至熟即可。

Allow to cool slightly before serving.
离火后把蒸盘摆在铁架待凉即可。


Do link back to Coco Sweet Tooth if you have used any information as published in this blog.

Sunday, May 14, 2017

基本素叁巴辣椒酱 Basic Vegetarian Sambal Paste

Indonesians consume lots and lots of chillies and beef. I used to think I have pretty good tolerance to spicy food but now after residing in Indonesia for 5 years, I realize that I am far from Indonesian standards.
印尼人大部分都爱吃辣椒和牛肉。在我还没搬迁来印尼的时候,一直都认为自己能吃辣,后来才知道印尼人吃辣的耐力远远超越我们的水平。

My three lived in helpers are no exception. Through them I have learnt to adapt to having lots of spicy food in my daily diet since I hardly indulge them with beef meat except for occasional fish and chicken.
现在家中的三位员工也不略外,跟他们相处的日子里我学习去适应更多不同的热辣食物,特别是因为家里少煮肉类除了偶尔有给予鱼或鸡肉之外多半的菜肴都是蔬菜。为了要令他们能吃得舒服唯有多煮些带辣的菜肴满足他们的胃口。

After changing my eating habits to full vegetarian I totally abstain from eating onions and garlic and over time develop strong resistance to its presence in any food. So I ended up making my home made version of chili sauce, chill paste for cooking and household consumption.
如今转吃素既又不吃任何葱或蒜,多半时候都得从家里自己制做免葱蒜的酱料当拌料。

Last year I posted a sambal recipe when I made Nasi Lemak and if you are interested you may visit the link for more information. Today I am making this basic sambal / chili paste which I use it for every forms of cooking on spicy food from stir fry to curry dishes. We usually made them in bulk and freeze them in various containers to maintain its freshness. This is a rather big batch of sambal paste but once you have it you can use some to adapt to assorted types of sambal sauce catered for different food. Very versatile.
去年我曾在博客里分享一道叁巴辣椒酱来配合椰浆饭,你可以拿来参考。今天所制做的是道基本叁巴辣椒酱适于用在日常烹饪上,比如拌炒入菜肴,炒饭,面,咖喱菜肴等等。此外您还可拿来变通混入不同的调味料制做出不同的辣椒拌酱,淋酱。因此我平时会准备多的份量来冰藏一旦要用上时都有现料。

With this new batch of sambal paste, I will try to make several versions of ready to eat sambal chilies and post it in my blog whenever I have time.
现在有了这批叁巴酱后,接着我就会取来弄出不同吃法的辣椒酱,然后一旦有空便会在博客里与你分享。


基本素叁巴辣椒酱
Basic Vegetarian Sambal Paste


Ingredients 材料

(A)
260g Tomato 番茄
2 Kg Red Chillies 红辣椒
1 Kg Curly Chillies 皱皮圈辣椒
2 Stalks Lemongrass 香茅
50g Galangal 南疆
2cm Tumeric Root 黄姜
500-600ml Water 清水

(B)
500-600ml Cooking Oil 食油
4 Stalks Lemongrass 香茅 (crushed 压扁)
10pcs  Kaffir Lime Leaves 箭叶
6pcs Fresh Bay Leaves 月桂叶


Method 做法

Soak, wash red chillies, remove seeds and cut to pieces.
浸泡新鲜红辣椒,取出种子后把辣椒切块。

Combine (A) into a blender filled with water and blend into paste
将材料A一起放入食物加工机,加入水搅拌成泥状。

Remove and transfer chillies paste to a (heated) deep frying pan or wok filled with heated oil (B) and stir continuously on low heat for 5 mins.
把搅好的辣椒泥放入已预热B食油的炒锅里,以小火不断的翻炒或搅拌。


Add (B) lemongrass, kaffir lim leaves and fresh bay leaves to the mixture and stir fry non stop for 20-25 min until the sambal mixture thickens. Once the oil starts to separate from the paste and rise to the surface it is deemed ready.
加入香茅,箭叶和 daun salam 继续不停的翻炒20至25分钟,一直翻炒及搅拌至叁峇酱稍转浓稠深红色油跟酱体开始隔离,表层形成一层辣椒油即可。

Allow the sambal paste to cool completely before storing. Keep the extra paste in the freezer for future use.
让叁巴辣椒酱冷却后才转入容器。把多余的叁巴酱冰藏以保新鲜。


Do link back to Coco Sweet Tooth if you have used any information as published in this blog.


Saturday, May 13, 2017

素娘惹咖喱面 Vegetarian Nyonya Curry Noodles

Contrary to what people know, going on a vegetarian diet is not as restrictive as ones' believe to be.   The vegetarian community has increased over the decades and with more people embracing this change of eating habits, vegetarian food joints are more easily accessible.
事实上,素食的生活方式并不如一般人们所想象般受限制的饮食方式。在这几十年里,吃素的人口急逐地增加而到处都可找到素食餐馆及素食贩卖店。

There are also many websites which share links or recipes related to vegetarian food.  Once you start looking, you'll be spoil for choice wondering which to try.
甚至还有许多素食网络给予素食相关的链接,博客分享不同的素食食谱。一旦找起来真是会眼花不知从何开始。

Apart from internet websites and food blogs, I am very much in favor of this vegetarian recipe book which I acquired from Malaysia last year. Most of the listed recipes are really good and tested with good outcome, particularly this Nyonya Curry Noodles that I am sharing today.

除了网络和博客以外,我也非常喜欢这本去年从马来西亚所购买的‘槟城好吃素食大排挡’食谱书籍。里面所写的食谱多部份都很好吃既保证煮出好效果,就连我今天这道娘惹咖喱面都是取自于此。

Highly Recommended!
强力推荐!


素娘惹咖喱面
Vegetarian Nyonya Curry Noodles


Ingredients 材料

Soup Base 基本汤底 (A)
3 Lit Water 清水
5 Pcs Pandan Leaves 班兰叶
5 Stalks Lemongrass 香茅 (crushed 拍扁)
1 Stalk Ginger Bud 姜花
1 Yam Bean 沙葛 (cut to pieces 切块)
10 Pcs Kaffir Lime Leaves 疯柑叶

Vegetarian Sambal 素叁巴 (B)
110ml Cooking Oil 食油
150ml Water 清水
10 Red Chillies 红辣椒
8g Dried Chillies 辣椒干
2 Tomatoes 番茄
3 Stalks Lemongrass 香茅
10 Vegetarian Belacan 素马来栈
10 Candlenuts 石粟果


(C)
3 Tbsp Curry Powder 咖喱粉
2 Tbsp Ketumbar Powder 芫茜籽粉
1 Tbsp Tumeric Powder 黄姜粉
130ml Coconut Milk 浓椰浆
1 Tbsp Sugar 砂糖
1 Tsp Salt 盐

Seasoning 调味料 (D)
70ml Light Soy Sauce 酱清
70g Rock Sugar 冰糖
1 Tbsp Vegetarian Mushroom Powder 素香菇粉
400ml Coconut Milk 浓椰浆
30 Tofu Puffs  豆腐卜 (halved 切半)
50g Vegetarian Chicken 素鸡肉 (shredded 切丝)
Salt to Taste 盐

(E)
600g yellow noodles 黄面
200g Mee Hoon 米粉 (soaked 泡浸)
200g Bean Sprouts 豆芽
200g Long Beans 长豆 (cut in sections 切段)
1 carrot 红萝卜 (cut to strips 切条)
50g Vegetarian Chicken 素鸡肉 (shredded 切丝)
1 Stalk Ginger Bud 姜花 (finely chopped 切碎)
Some mint leaves 适量薄荷叶


Method 做法

Combine all ingredients (B) into food processor and blend to paste. Set aside.
把材料B一起混入食物加工机搅拌成糊状搁置待用。

Combine all soup base ingredients into a stock pot and bring to boil. Lower heat and continue to simmer for 1/2 hour. Strain and discard solid ingredients.
将基本汤底材料放入汤锅煮滚,转小火煮多1/2小时后才把渣料全部捞起保留汤底。


Heat up wok, add 3 Tbsp cooking oil, blended (B) and saute with low heat until the oil starts to separate.
烧热炒锅,加入3大汤匙食油,搅好的B叁巴酱用小火翻炒20分钟至爆香及出油为止。

Add (C) and continue stir fry until aromatic. Add soup base (A) and bring the curry mixture to boil. Add seasoning ingredients (D) and bring to boil. Reduce heat to lowest and allow to simmer for another 15-20 mins or until (E) is ready for serving.
加入C继续把素叁巴炒香,加入汤底煮滚既加入调味料D,再转最低的火候熬煮15-20分钟或以上即可。

Bring a pot of water to boil. Blanch and drain (E) yellow noodles, meehoon, bean sprouts, long beans, shredded vegetarian chicken and carrot. Set aside.
另煮一锅的滚水,各自把E里的黄面条,米粉,豆芽,长豆,素鸡肉丝和萝卜条汤过,沥干水搁置待用。


Arrange some ingredients (E) into individual serving bowl and top with the hot curry soup. Sprinkle mint leaves and chopped ginger bud on top. Serve.
把适量的材料E放入碗里,淋入咖喱汤,放上薄荷叶和姜花碎即可享用。


Do link back to Coco Sweet Tooth if you have used any information as published in this blog.

Thursday, May 11, 2017

蒸木薯糕 Steamed Ubi Kayu Kuih


Whilst Malaysia celebrates Wesak Day yesterday, Indonesia officially celebrate this today and hence it is another public holiday for many companies.
昨天马来西亚庆祝卫塞节但印尼卫的卫塞节是今天,有许多公司今天放假营业。


Yesterday we made a good batch of vegetarian nyonya curry noodles which I will be sharing the recipe when I am done with the writing. 
我们昨天弄了一道相当可口的素娘惹咖喱面,待我完成写完那份食谱后将会马上与你分享。


For today, I am sharing this super easy steamed tapioca kuih recipe which I am extremely with. I had tried making many versions of steamed tapioca kuih in the past and this is one of the few good versions I am happy with. This recipe is certainly a keeper for future remake.

今天所分享的是这道极容易又满意的蒸木薯糕食谱,在我所尝试制做的木薯糕中算是非常不错的版本, 看来我因该会继续采用这项蒸木薯糕食谱一直到遇上还更好的版本。


蒸木薯糕 
Steamed Ubi Kayu Kuih
Recipe adapted from Beyond Norm


Ingredients 材料


(A)

700g Grated Tapioca 木薯丝
130g Sugar 砂糖
210ml Water 清水
175ml Coconut Milk 浓椰浆
3/4 Tsp Salt 盐

(B)

Red Food Coloring 食用红色素
Green Food Coloring 食用青色素
3 Pandan Leaves 班兰叶

(C)

300g Fresh Grated Young Coconut 新鲜嫩椰丝
1/3 Tsp Salt 盐
1-2 Pandan Leaves 班兰叶 (cut length)


Method 做法


Combine all ingredients (A) together into a mixing bowl until mixed.

将材料A一起混入搅拌盆,混匀。

Divide the batter into 2 equal portions. Add a few drops of (B) red food coloring into one portion and mix well. Add a few drops of (B) green food coloring into the other portion.

再把混匀好的面糊平均分成两份。一份加入B食用红色色素而另一份加入食用青色色素,混匀。

Grease 2 baking / steaming moulds. Transfer the prepared mixture into individual moulds and level. Place pandan leaves on top of each mixture (as per picture).

准备两个蒸模,模里涂上一层食油。把两份不同颜色的面糊盛入各自的模具,抹平。面糊上铺上一层班兰叶(如图)。

Steam over high heat for 30-35 mins until cooked.

送入蒸锅以大火蒸30至35分钟至熟即可。

Remove from steamer and set aside to cool.

离锅后搁置待凉。


Mix (C) grated coconut and salt together. Transfer onto a steaming tray. Slot pandan leaves into the coconut mixture and steam over medium high heat for 5-6 mins.

这时把C的椰丝和盐一起混匀,置入整盘又插入班兰叶于中,以中火蒸5至六分钟。

Remove from steamer and discard pandan leaves. Set aside to cool.

离火后取出班兰叶,搁置待凉。

When the tapioca kuihs have cooled, cut into desired size with a greased knife. Roll the cut kuihs over the grated coconut to coat evenly. Serve。
待蒸糕冷却后,用巴涂抹上油脂的利刀把蒸糕切块,置入椰丝里滚卷平均的涂抹上椰丝即可品尝。


Do link back to Coco Sweet Tooth if you have used any information as published in this blog.

巧克力挞 Rich Chocolate Tart


After my successful attempt with sweet potato tart with  sweet shortcrust pastry crust, I went on to explore another using normal pastry crust coupled with chocolate fillings. To me both crust are yummy and easy to make and very versatile to go with many types of fillings to make you drool.
自从上回顺利地完成制做甜派挞皮用于番薯挞之后,接着又再尝试制做另一种挞皮来配合巧克力陷料。对我来说,这两种挞皮都很美味既难度不高,两者无论配上多种不同的陷料都会
使你流口水。


巧克力挞

Rich Chocolate Tart

Ingredients 材料


Pastry Crust 挞皮 (A)

90g Unsalted Butter 无盐奶油 (cubed 切丁)
150g Pastry or Plain Flour 普通面粉
1 Tsp Castor Sugar 细砂糖
1/4 Tsp Salt 盐
75g Ice Cold Water 冰水

Chocolate Fillings 巧克力内陷 (B)

375ml Whipping Cream 植物淡奶油
225g Milk Chocolate 牛奶巧克力 (chopped 切碎)
2 Large Eggs 大号鸡蛋 (beaten 打散)
1 Tsp Pure Vanilla Extract 存香草精
1/4 Tsp Salt 盐

Chocolate Glaze 巧克力糊表层装饰 (C)

3 Tbsp Whipping Cream 植物淡奶油
50g Milk Chocolate 牛奶巧克力 (chopped 切碎)
1 Tsp Light Corn Syrup 玉米糖浆
1 Tbsp Warm Water 温水

Method 做法


Place (A) diced butter and flour together into a plastic bag and freeze overnight.
把A奶油丁和面粉一起混入塑料袋置入冰箱冻结隔夜。

Combine (A) butter, flour, sugar and salt into a food processor and mix until the mixture resembles coarse breadcrumbs. Gradually add water and mix to form a smooth dough and detach from the sides of the mixing bowl of food processor.

将冷冻的A奶油,砂糖和盐一起倒入食物加工机混合至似粗面包屑般,慢慢的加A冰水一直混合到面团体的侧面脱离即可取出。


Remove and transfer dough into a plastic bag. Flatten into a 10-15mm disc and refrigerate overnight.

把面团置入塑料袋再用手压扁成一个10-15mm厚度的碟形面团,置入冰箱冷藏隔夜。

Unwrap dough onto a non stick baking mat, place the cling wrap on the top and roll out to 4-5mm thickness. Gently place the sheet dough into a 2 nos of 20-22cm tart pan with removable base. Gently press dough into the mould without stretching it.

把冷藏好的面团移出,去掉保鲜纸置于不粘硅胶垫上再把保鲜纸铺在面团上。将面团擀成约4至5mm厚度的圆形,轻轻的把杆开的面皮铺在2个20-22cm挞盘上。用手仔细地把挞皮贴入挞盘内。

Remove excess dough by rolling a rolling pin over the top edges. Use a fork to prick holes over the base and freeze the dough for 5 mins before baking.

把多余的挞皮用木杆在挞模的上边滚掉,再用叉子在挞皮上穿孔后又转置入冰箱冷冻5分钟后才送入烤箱烘烤。

Preheat oven to 200C degrees.

烤箱预热至200C度。


Place a sheet of aluminum foil over the chilled dough. Press it well into the bottom edges but avoid covering the top edges of the dough. Add baking weights into the tart mould and bake in the center rack of the preheated oven for 20 mins.
在冷冻的挞面团铺上一层锡纸,用手指把锡纸压入低部及边缘但不要覆盖面团上部的边缘。锡纸上放上一些小石头转送入已预热的烤箱的中层烘烤20分钟。

Remove aluminum foil and baking weights when edges starts to brown. Continue baking the tarts for another 8-10 mins until light golden brown.

把锡纸和小石头取出,再放入烤箱烘烤8至10分钟至表面呈现金黄色即可。

Remove from heat and leave to cool on wire rack before using.
烤模出炉后,放置于铁架待凉后才使用。

Preheat oven to 175C degrees.
烤箱预热至175C度。

To prepare tart fillings, heat whipping cream (B) in saucepan till boil. Pour over chocolate (B) and gently stir and mix until smooth.

准备挞馅料先把B的淡奶油放入锅里加热,立刻倒入B巧克力碎的碗里搅匀。


In a separate bowl, combine (B) beaten egg, vanilla extract and salt until evenly mixed. Transfer egg mixture to melted chocolate mixture and stir to combine.

在另一个碗中,将B鸡蛋液,香草精及盐一起混合,搅匀。转入巧克力奶油混合液B,混匀。

Pour chocolate fillings (B) into the cooled pastry crust (A) and bake in the middle rack of the preheated oven for 20-25 mins until almost set and the center part is still slightly wobbly. Remove from oven and allow the chocolate fillings to set completely when cooled.

把混匀的巧克力内陷B装入已冷却的挞皮A上,置入预热烤箱的中层烘烤20-25分钟至馅料9分熟而中间还有稍微的摇动即可取出。冷却后巧克力内陷既会硬化而定型。

When the chocolate filling cooled and set, bring (C) whipping cream to boil. Remove from heat and stir in chopped chocolates (C) until smooth. Add corn syrup and warm water to mix.

等挞皮里巧克力内陷B冷却后,把C的植物淡奶油烧热,离火即刻倒入巧克力碎C里混匀成糊。再加玉米糖浆和温水混匀成。

Pour chocolate glaze over the chocolate fillings. Tilt and rotate tart to coat evenly. Allow the glaze an hour to set before serving.

把C巧克力糊塗在巧克力内陷B表层上,倾斜并旋转方式把巧克力表层均匀的涂抹即可。完成后再静置一小时待定型即可品尝。


Do link back to Coco Sweet Tooth if you have used any information as published in this blog.


Wednesday, May 10, 2017

香辣椰浆全熟蛋 Spicy Eggs with Coconut Cream


For those home makers who cook almost daily, I believe there would be times when one struggle and ran out of ideas with what to cook for their love ones. It happened to me all the time hence I am always on the look out for new dishes or cooking method to keep the dinner table interesting.
对于那些需要日日下厨的家庭主妇们,我相信您有时侯也会为了菜单选择方面而挣扎着。我也不例外,时常都为了寻求新食谱或不同的煮法来给餐桌带些色彩。

Here is one relatively easy curry like looking dish using mainly hard boiled eggs,  would you like to give it a try?
这是道相当容易制做的咖喱版煮熟蛋,您可否想试试看?


香辣椰浆全熟蛋
Spicy Eggs with Coconut Cream

Ingredients 材料
(A)
8 Grade B Hard Boiled Eggs 全熟蛋 (peeled 去壳)
4-5 Tbsp Cooking Oil 食油

(B)
3 Cloves Garlic 蒜瓣 (chopped 切碎)
3 Tbsp Sambal Goreng 叁峇辣椒酱
2 Tsp Chilli Powder 辣椒粉
20g Galangal 南疆 (chopped 切碎)
95g Red Onions 大葱头 (Chopped 切碎)
2 Stalks Lemon Grass 香茅 (crushed 敲碎)
1 Tsp Sugar 砂糖
2 Tsp Chicken Stock 鸡精调味素
1 Tbsp Tomato Ketchup 茄酱
Salt to taste 盐
100ml Thick Coconut Milk 浓椰浆
250ml Water 清水


Method 做法


Heat up oil (A) and fry hard boiled eggs until golden. Remove and slice into halves and set aside.
把A倒入炒锅烧热,加全熟蛋炒至表层呈现金黄色即可离火,切半搁置待用。


Using the same saucepan with leftover cooking oil,  saute onion, garlic and galangal until aromatic. Add crushed lemon grass, chili powder and sambal goreng ( even store bought ones will do) and stir fry for 1-2 min until fragrant. Add sugar and cook another 3 mins. Lower heat and add coconut milk, ketchup, coconut milk and water. Cook and stir the coconut cream for another 8-10 mins until slightly thickened. Add in eggs and give it a few stirs. Season with salt to taste.
继续把炒蛋的剩油加热爆香B的葱头,蒜米及南疆。又拌入敲碎的香茅,辣椒粉及叁峇辣椒酱(或任何市场贩卖的现成辣椒酱都可)翻炒1至2分钟入味。再加砂糖继续拌炒3分钟调低火侯拌入椰浆,茄酱和清水继续煮8至10分钟至浓稠即可加入切半的全熟蛋拌炒几下,用些盐加以调味即可捞起。


Do link back to Coco Sweet Tooth if you have used any information as published in this blog.


Printfriendly

Related Posts Plugin for WordPress, Blogger...