Wednesday, May 3, 2017

甜甜圈 Homemade Doughnuts


Being an avid baker, I still frequents bakery shops to buy cakes and pastries which I have yet to try making it on my own.   And now, with 3 lived in household helpers, it is no longer economical to upkeep household expenses by constantly buying ready made bakes for breakfast.
虽然自己时常烘培糕点,有时还是会在外购买一些自己还没尝试制做的蛋糕及甜品来品尝。自从家里聘请了三位留舍的家庭员工后,为了控制家里的开销就已减少购买市场贩卖的烘焙糕点当早餐。

Instead of going for another bread recipe, we decided on making doughnuts. A change from the usual bread staples and totally loved by them. The process of doughnut making is almost identical to bread,   easy and also economical than buying.
面包一旦吃久了都会厌倦,今次我们选择制做甜甜圈来给予他们些新鲜感。甜甜圈的制做过程跟面包差不多相似,非常的简单既经济。

This is one good recipe taken from Alex Goh's 'Magic Bread'.
这是一道非常好的食谱取自于吴景发的‘汤出面包香’面包书籍。


甜甜圈
Homemade Doughnuts

Ingredients 材料
(A) 
100g Bread Flour 高筋面粉
110g Boiling Water 滚水

(B)
250g Bread Flour 高筋面粉
150g Plain Flour 普通面粉
8g Instant Yeast 即用酵母粉
50g Castor Sugar 细砂糖
10g Milk Powder奶粉
1 Tsp Baking Powder发粉
6g Sea Salt 海盐

(C)
175g Cold Water 冷水
60g Cold Egg 冷鸡蛋

(D)
50g Butter 无盐牛油

(E)
Cooking Oil 食油

(F) Coating 表面装饰
Castor Sugar 砂糖


Method 做法


Add boiling water from (A) into flour and mix until well blended to form dough. Transfer dough into a clean bowl and place a piece of cling wrap directly onto the paste to prevent a film from forming on the surface. Allow the mixture to cool. Refrigerate for at least 12 hours before using.
将材料A的滚水及面粉一起混合搅拌成团,转入一个干净的碗,马上在面糊表层铺上一层保鲜纸以免面糊表面上生一层皮。等面糊冷却后冷藏12小时后才可使用。

In the bowl of the stand mixer fitted with dough attachment, add  (A) together with all the of ingredients (B), (C) and mix with lower speed until all ingredients are well combined. 
首先将汤种面糊(A)及材料(B)和(C)混入搅拌器的钢盆中,以慢速度搅拌搓揉成团。


Add in butter (D) and slowly increase the speed to medium and continue kneading for approx. 18-22 mins, until the dough becomes smooth and pass the window pane test.
把牛油(D)混入面团然后依揉面标准程序继续以中速把面团搅拌大约18-22分钟,直到成撑得起薄膜的面团即可.
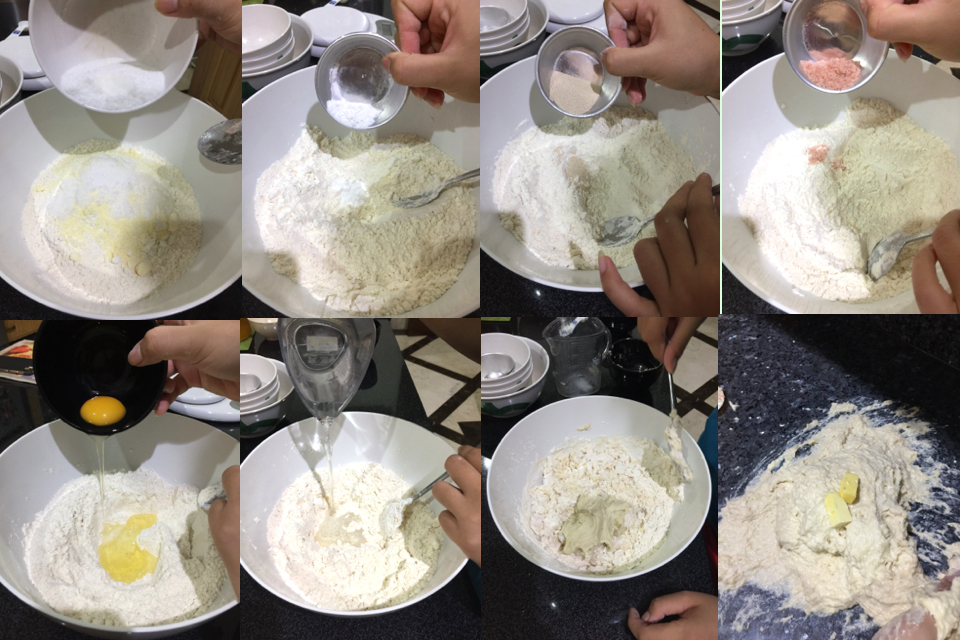

Place dough into a slightly greased bowl. Cover bowl with either cling wrap or cloth and allow the dough to proof for 1 hour or until it doubled in size.
将揉好的面团滚圆,收口朝下捏紧放入涂抹少许油的盆中,盖上拧干的湿布或保鲜纸放置到温暧密闭的空间进行第一次发酵约1小时
至面团变两倍大为止.

Punch down the dough. Divide the dough into 16 equal portions and mould it round. Let it rest for another 15 mins.
将面团用手压除气体,然后把面团平均分割成16等份, 滚圆盖上拧干的湿布或保鲜膜再让面团松弛15分钟.


Press the thumb and index finger together through the center of each dough and adjust to the desired opening and size.  
在每个面团的中心点将拇指和食指按在一起,弄出一个理想的尺寸开口。

Place doughnut dough (seams down) on individual non stick baking paper. Allow to proof for 35 mins.
把造型好的甜甜圈面团(接缝)收口朝下置于不粘的烘焙纸上。再次进行35分钟的发酵。Heat up oil (E) on medium heat till 180C degrees. Drop the doughnuts into the oil and fry until golden brown, flip them over and continue frying  the underside until ready. Remove and place on paper towel lined platter and allow to cool.
把足够的食油(E)倒入炸锅烧热至180C度,轻轻的把发酵好的甜甜圈面团滑入热油锅,以中小火炸至金黄色,再把面团翻面继续把另一面炸至金黄色即可捞起,置于铺上吸油纸的盘上待凉。

When cooled, roll the doughnuts in sugar (F) to coat evenly. Serve.

待甜甜圈凉后便可在表层滚上细砂糖后即可品尝。


Do link back to Coco Sweet Tooth if you have used any information as published in this blog.

Friday, April 21, 2017

红菜头营养面包 Healthy Beet Root Bread


Beetroots are excellent source of folic acid as well as fibre, manganese and potassium. Its widely used for medicinal purposes from treating liver's disorder, preventing constipation and lowering of cholesterol. 
甜菜头是个添有叶酸,纤维,锰及钾的优良来源的日常蔬菜。广泛用于治疗肝脏疾病,以及有助于预防便秘和降低胆固醇的医药用途。


Our household consume this vegetable quite frequently and this time round I decided to try it on healthier bread making. 
家里也经常购买这类蔬菜尝试不同的煮法给家人品尝。今次我想变通一下,试一试采用这甜菜头于面包制做上。

The bread turns out exactly the same color hue as when I previously tried using dragon fruit. 
烤出来的面包效果颜色正如采用龙珠果所作的面包一样出色,味道香浓。


红菜头营养面包
Healthy Beet Root Bread


Ingredients 材料
(A) Tangzhong 汤种
75g Bread Flour 高筋面粉
110g Water 滚水

(B)
560g Bread Flour 高筋面粉
100g Plain Flour 中筋面粉
12g Instant Yeast 即用酵母粉
100g Castor Sugar 细砂糖
11g Sea Salt 海盐
225g Cold Water 冷水

(C)
240g Beet Root 甜菜头泥
100g Water 清水

(D)
75g Dairy Free Butter 植物酥油

(E)
120g Golden Raisins 葡萄干

(F)
 Sesame Seeds 芝麻


Method 做法

Add boiling water from (A) into flour and mix until well blended to form dough. Transfer dough into a clean bowl and place a piece of cling wrap directly onto the paste to prevent a film from forming on the surface. Allow the mixture to cool. Refrigerate for at least 12 hours before using.
将材料A的滚水及面粉一起混合搅拌成团,转入一个干净的碗,马上在面糊表层铺上一层保鲜纸以免面糊表面上生一层皮。等面糊冷却后冷藏12小时后才可使用。


Blend C into paste form. Set aside.
将C一起搅拌成泥,搁置待用。


With the exception of butter (D), combine overnight Tangzhong (A), (B) and (C) into a mixing bowl and knead until all ingredients are well combined.
除了牛油(D)以外,将隔夜汤中(A), (B)及(C)混入一个盆中搅拌搓揉成为一个不粘手的面团.

Add in butter (D) and continue kneading for approx 20-25 mins, until the dough becomes smooth and pass the window pane test. Add (E) to combine. 
把牛油(D)混入面团然后依揉面标准程序继续搓揉大约20-25分钟,搓成为撑得起薄膜的面团后即可混入(E)。

Place dough into a slightly greased bowl. Cover bowl with either cling wrap or cloth and allow the dough to proof for 1-2 hours or until it doubled in size.
将揉好的面团滚圆,收口朝下捏紧放入涂抹少许油的盆中,盖上拧干的湿布或保鲜纸放置到温暧密闭的空间进行第一次发酵约1-2小时至面团变两倍大为止。


Punch down the dough. Divide the dough into 2 equal portions and mould it round. Let it rest for another 15 mins.
将面团用手压除气体,然后把面团平均分割成2等份, 滚圆盖上拧干的湿布或保鲜膜再让面团松弛15分钟.


Grease and line bottom and sides of 2 nos of 21cmx12.5cmx11.5cmD loaf pan. Set aside.
准备两个21cmx12.5cmx11.5cmD面包模具,模具低和则边铺上烘焙纸然后刷上一层油质以免粘黏,搁置备用。

Sprinkle the worktop with bread flour, use a rolling pin to roll each dough into long rectangle shape with width to fit the baking pan. Start rolling out from the longer end of the dough into a swiss roll. Repeat the process for the balance dough.
台座上撒些高筋面粉,将休息好的面团用擀面棍把面团擀成长方形,长度同烤模向宽,然后由长段卷起。再重复同样的做法把其余的面团完成。

Place each bread dough (seams down) into individual 21cmx12.5cmx11.5cmD loaf pan.
将卷好的两份面团收口朝下朝内各自排入21x12.5x11.5cmD
面包烤模中。
Spray some water over the surface with a fine mist nozzle. Sprinkle some sesame seeds (F) over the surface。Final proof the bread in a unheated oven for another 50-60 mins.
将烤模放入未开火的烤箱中, 面团表面喷些水接着撒上少许芝麻粒,然后把烤模置入烤箱, 进行最后一次发酵约50-60分钟至两倍大.


Bake in the second lowest rack of a preheated oven at 170C degrees for 35-38 mins.把模具放进已经预热至170C度的烤箱中下层烘烤35-38分钟即可.

Remove bread from oven and turn it out onto cooling rack to cool.
烤好后马上倒扣出来放在铁网架上放凉。


Do link back to Coco Sweet Tooth if you have used any information as published in this blog

Thursday, April 20, 2017

椰香玉米糕 Coconut Sweet Corn Pudding


Lately I have been busy traveling while leaving me little time to indulge in my photography and culinary experiments. 
这几个月来我都忙于出游而没时间投入自己所爱的摄影及烹饪的工作。

Sharing this simple and yummy dessert recipe which I recently made. Hope you like it.
今天在此分享一道我刚尝试制做的简易即香甜可口的甜点食谱,希望您会喜欢。


椰香玉米糕
Coconut Sweet Corn Pudding


Ingredients 材料
(A)

180g rice flour 粘米粉, sifted 过沥
90g corn flour 玉米粉, sifted 过沥
8 tbsp custard powder 即溶吉士粉, sifted 过沥

(B)
1 tsp salt 盐
400ml Coconut Cream 浓椰浆

600ml Water 清水
150g sugar 砂糖

3 pcs Pandan Leaves 班兰叶 (knotted 打结)
1 can (425g) cream style sweet corn 
   罐头玉米酱 (slightly blended 搅成泥状)
1 tsp vanilla extract 香草精
Yellow coloring 黄色色素 (optional 自选)


Method 做法


Combine coconut cream with water. Stir to combine.
把浓椰浆和清水混合,搅匀搁置。

Combine sifted flour mixture (A), sugar, salt and sweet corn into a deep saucepan. Add coconut mixture and stir to combine.  Add pandan leaves.
接着把全部粉料A,砂糖,盐和玉米泥一起混入煮锅,将椰浆倒入,搅匀。再加班兰叶。

Bring coconut milk and corn mixture to boil while stirring constantly. Add in vanilla and continue to boil until mixture slightly thickens. Add a few drops of yellow colouring (if necessary).
用中小火一边搅拌一边加热后便加香草精,继续煮至浓稠,这时可以倒入食用色素来调色后熄火。

Transfer mixture into a greased 22cm steaming tray and steam over high heat for 50mins.  Allow to cool before serving.
转入一个22cm模具以大火蒸45-50分钟至熟即可离火。置于铁架上待凉后即可品尝。


Do link back to Coco Sweet Tooth if you have used any information as published in this blog.

Thursday, March 30, 2017

美味香烤可乐鸡 Baked Coca Cola Chicken


I used to be a huge fan of coca cola carbonated drinks during teenage days. But now, being in my late forties I steer away from consuming it no matter how tempted I was after drenching in sweat from staying out under the hot sun.
我在童年时期超级爱饮可乐汽水,如今已步入中年为了照顾身体而疏远这类饮品,就算是在太阳底下爆嗮而汗流浃背都会忍着不去动它。


Today I am trying out this recipe adapted from Center Cut Cook which yields extremely good results. The chicken came out juicy and tender while the rich sauce further enhance the satisfaction. This recipe is sure a keeper.
今天尝试了Center Cut Cook网上的这道可乐烤鸡食谱,效果非常满意。烤出来的鸡肉香嫩即多汁,再配上那浓香的烹调酱更加可口。这的确是道值得收藏的好食谱。


美味香烤可乐鸡
Baked Coca Cola Chicken
Recipe adapted from here

Ingredients 材料
(A)
1.2kg Chicken Thighs 鸡腿肉
1 Tbsp Shaoxing Wine 绍兴花雕酒
1 Tsp Salt 盐
1 Tbsp Soy Sauce 酱清

(B)
3 Medium Potatoes 马铃薯 (中)(cut to bite size 切块)
1 Tbsp Cooking Oil 食油

(C)
500ml Coca Cola 可口可乐汽水
1/2 Cup White White 白葡萄酒
1/4 Cup Soy Sauce 酱清
2 Tbsp Dark Soy Sauce 黑酱油
2 Tbsp Distilled White Vinegar 白醋
2 Tbsp Sugar 砂糖
6 Cloves Garlic 蒜瓣 (smashed 打碎)
2 Inch Ginger 姜 (smashed 打碎)

(D)
1-2 Tsp Cinnamon Powder 桂花粉
3 Tbsp Corn Flour 玉米粉
1/4 Cup Water 清水
Salt to Taste 盐


Method 做法


Combine (A) into a bowl until mix. Refrigerate overnight to marinate.
把材料A一起混入碗,混匀后送入冰箱隔夜让调味料吸收。

Heat up cooking oil (B) and add potatoes in a skillet. Cover and cook for 5-6 minutes until partial cook. Remove and set aside.
材料B的食油倒入煎锅烧热,把马铃薯块放入拌炒5-6分钟至6分熟即可离火搁置备用。

Arrange chicken pieces (without overlapping) and potatoes into a greased oven proof casserole dish. Sprinkle cinnamon powder (D) over the top. Set aside.
将鸡肉块,马铃薯摆入已涂上食油的耐热砂锅(不要重叠), 然后撒上桂花粉,搁置。

Combine ingredients (C) mixture into a saucepan and cook under medium heat until simmer for 5 mins.
把材料C酱料一起混入锅以中火烧热至沸腾五分钟后离火。

Pour the simmering mixture into the chicken lined casserole dish. Bake in a preheated oven at 160C degrees for 30 mins.
然后再把沸腾的酱料C倒入鸡肉砂锅里,转送入已预热至160C度的烤箱烘烤30分钟。


Flip the chicken pieces over and continue to bake for another 30 mins.
取出砂锅,把鸡肉块翻过来又继续送入烤箱烘烤30分钟。

Remove casserole dish from oven and scoop up the chicken and potatoes onto a plate.
把砂锅从烤箱取出,取出鸡肉和马铃薯块暂置入另一个盘上。

Dissolve (D) corn flour with 1/4 cup water into a small bowl.
将D的玉米粉料及1/4碗清水混匀。

Strain the coca cola mixture into a saucepan and discard the ginger and garlic. Cook and stir over medium heat. Add corn starch mixture to thicken the sauce. Add salt to taste.  Set aside for later use.
把砂锅的可乐酱汁过沥置入另一个煮锅,取出姜和蒜碎。接着用中小火把可乐酱汁煮热,拌入玉米淀粉汁一边煮一边搅拌至酱汁变浓稠即可加入盐调味。搁置代用。

Place the chicken ad potatoes back into the casserole dish and back into the oven and bake for a further 5-10 mins until the skin crisps.
又再把取出的鸡肉和马铃薯块排入砂锅,送入烤箱烘烤5-10分钟至鸡肉表皮稍微变脆即可。

Pour the thicken sauce over the the chicken and serve warm.
把浓稠的可乐酱汁倒在鸡肉上即可品尝。


Do link back to Coco Sweet Tooth if you have used any information as published in this blog.


Wednesday, March 29, 2017

乳酪香肠蔬菜面包 Grated Cheese and Sausage Bread


Looking for a simple bread recipe to make store bought looking bread at home? This is one simple  pizza-like version of savory bread which is pillowy soft and equally yummy.
您可否也想要尝试自己试做些商店贩卖的面包呢?今天在此跟您分享一道即简易披萨类似般的软面包,跟商店贩卖的面包相比一点也不输色。


乳酪香肠蔬菜面包
Grated Cheese and Sausage Bread

Ingredients 材料
(A)
260g Bread Flour 面包粉
65g Cake Flour 蛋糕粉
7g Instant Dried Yeast 速溶干酵母
45g Castor Sugar 细砂糖
5g Salt 盐
1 Egg 鸡蛋
100g Milk 牛奶
95g Water 清水

(B)
38g Unsalted Butter 无盐牛油

(C) Toppings 表面装饰
4 Chicken Sausage 鸡肉香肠 (grated 切丝)
Corn 玉米粒
1/2 Red Capsicum 红辣椒 (diced 切丁)
Cheddar Cheese 切达乳酪 (grated 切丝)
Mayonnaise 蛋黄酱


Method 做法


With the exception of (B) butter, combine all the ingredients (A) mixing bowl and knead till combined.
除了无盐牛油B以外,所有把材料A混入盆中混合搓匀成团。

Add unsalted butter (B) and slowly increase the speed to medium and continue kneading for approx. 20-25 mins, until the dough becomes smooth and pass the window pane test. The same applies when you are completely kneading by hand.
加入无盐牛油(B)然后依照揉面标准程序继续以中速把面团搅拌(大约20-25分钟)手搓面团也是以相同的标准程序将面团搓成撑得起薄膜的面团。


Place dough into a slightly greased bowl. Cover bowl with either cling wrap or cloth and allow the dough to proof for 1-2 hours or until it doubled in size.
将揉好的面团滚圆,收口朝下捏紧放入涂抹少许油的盆中,盖上拧干的湿布或保鲜纸放置到温暧密闭的空间进行第一次发酵约1-2小时至面团变两倍大为止。

Punch down the dough. Divide the dough into 27 equal portions and mould it round. Let it rest for another 15 mins.
将面团用手压除气体,然后把面团平均分割成27等份, 滚圆盖上拧干的湿布或保鲜膜再让面团松弛15分钟.


Roll each ball into a 8-9 inch rope. Braid 3 ropes together, pinch the ends and tuck them under to seal. Gently place the braided dough on a baking tray line with greased parchment paper. Space the doughs 4 inches apart to make room for the doughs to expand. 
将面团擀成8-9寸长条,每3条为一组,编成三股辫尾端捏紧收口朝内,然后排入已刷上不融化牛油(或铺上烘培纸)的烤盘上。面团之间应保留4寸的距离,给予面团膨胀的空间。

Repeat the process for the balance 24pcs of dough.
重复同样的做法把其余的24份面团完成。


Spray some water over the surface with a fine mist nozzle. Final proof the bread in a unheated oven for another 50-60 mins.
将烤模放入未开火的烤箱中, 面团表面喷些水然后盖上烤箱门, 再侍发酵50-60分钟至两倍大. 

8-10 Mins prior to baking time, remove baking pan from oven and turn on the oven heat to 180C degrees.
发酵好前8-10分钟, 将烤面团模从烤箱中取出, 烤箱打开预热刊至180C度.

Apply egg wash over the surface. Sprinkle toppings (C) on top.
在完成第二次发酵的面包表层上涂上蛋液。面团表层撒上C装饰材料。

Bake in a preheated oven at 180C degrees for 16-17 mins or until golden brown.
送入已预热至180C度的烤箱内烘烤16-17分钟至面包烤熟及表面变金黄色即可。

Remove bread from oven and allow to cool on cooling rack.
烤好后放在铁网架上放凉。


Do link back to Coco Sweet Tooth if you have used any information as published in this blog.

Friday, March 24, 2017

龙珠果海绵蛋糕 Dragon Fruit Sponge Cake


Hello there. Its been a very long while since my last blog posting. For the upcoming months I will not be doing much posting due to heavy traveling schedules. Thank you for your support.
嗨!相隔一个多月没上网在博客里与你分享任何食谱,接着下来的几个月我将会非常的繁忙于出外而不能如以往般时常做菜或烘焙,感谢你们一直以来的支持。

Today I am sharing this simple an yummy cake recipe which I am personally fond of.  Hope you like it.
今天在此与您分享一道我本人喜爱的简易即松软可口的蛋糕食谱,希望您也喜欢。


龙珠果海绵蛋糕
Dragon Fruit Sponge Cake

Ingredients 材料
(A)
225g Golden Churn Butter 金桶牛油
150g Castor Sugar 细砂糖
5 Egg Yolks 蛋黄
188g Dragon Fruit Puree 龙珠果泥
225g Self Raising Flour 自发面粉 (sifted 过沥)
3 Tbsp Milk 鲜奶

(B)
5 Egg Whites 蛋清
25g Castor Sugar 细砂糖


Method 步骤


Preheat oven to 170C degrees. Grease bottom and sides of a 8" round cake pan and line bottom with parchment paper.
烤箱预热至170C度。准备一个8寸圆形蛋糕模具,模具底部涂上油质再铺上一层烘焙纸。

In a large mixing bowl beat the butter and sugar with an electric mixer until light and fluffy. Gradually beat in egg yolks, one at a time until well combined. Stir in dragon fruit puree and mix well.
将牛油与细砂糖置于圆底容器中,用电动打蛋器搅拌打发后,再分次把蛋黄加入拌匀才加入龙珠果泥,混匀。


Add in half of the sifted flour and fold to combine. Add milk until incorporated. Fold in remaining flour till combined.
把一半已过筛的发粉加入以上的奶油蛋黄糊里,以翻拌混合。再倒入牛奶混合入面糊,接着把剩余的面粉混入拌匀。

Place egg whites in a mixing bowl and beat until frothy. Add castor sugar and continue beating until firm peaks.
将蛋白倒入另一个搅拌碗中,打至发泡再把幼糖加入继续打发至达到了硬性发泡的状态。那就是当提起打蛋器的时候,蛋白能拉出一个短小直立的尖角即可。


Fold in beaten egg whites to the cake batter in 3 batches till combined.
分三次陆续把打发的蛋白霜拌入蛋糕糊,拌匀。

Transfer batter into the prepared cake mould and bake in the center rack of the preheated oven for 50-60 mins until the skewer inserted comes out clean.
面糊倒入蛋糕模具,送入已预热好的烤箱的中层烘烤50-60分钟至蛋糕熟透及边缘开始萎缩即可。

Invert the cake onto the cooling rack for 10 minutes before unmoulding.
蛋糕烤熟后,倒扣置于铁架待凉10分钟后便可脱模。


Do link back to Coco Sweet Tooth if you have used any information as published in this blog.

Printfriendly

Related Posts Plugin for WordPress, Blogger...